Chapter 2: Your first Pulumi program
This chapter covers:
Section titled “This chapter covers:”- Configuring your command-line tools
- Generating a new Pulumi program from a template
- Understanding the parts of a Pulumi program
- Developing a serverless messaging application
- Creating, updating, and destroying Pulumi stacks
- Getting acquainted with the Pulumi Cloud console
In Chapter 1, we covered a number of high-level topics like infrastructure as code and the parts of Pulumi, and you got a glimpse of what it’s like to work with Pulumi by taking a walk through a simple project. In this chapter, we’ll bring all of that knowledge forward and use it to build your first Pulumi program — a humble but practical application that uses Pulumi with AWS.
Books, blogs, and other infrastructure-as-code resources often suffer from being much too abstract. If you’re like me, you might appreciate knowing how easy it is to create a dozen virtual machines with a for loop, but question the value of that knowledge without something practical to do with it. Solutions without problems aren’t all that interesting to me. What I love most about infrastructure as code, and Pulumi in particular, is how it enables me to build applications that solve real problems — my problems — even when those problems happen to be, well, rather trivial.
For example, I have three young children. And like most children (and more than a few adults), they love to play video games. But at our house, we have only one game system, and our general policy is to limit gameplay to an hour a week per kid, usually on the same day. Which means that when that day finally comes, the kids come to me looking for answers: Who plays first? And in what order?
You’d think this could be handled with a simple coin toss. But I realized pretty quickly that with three kids, a coin toss isn’t as easy as it sounds; no matter what, someone always ends up in tears. Dice might’ve worked, if they weren’t constantly lost, and choosing a number between one and a hundred clearly gave the older kids an advantage. I needed something better — something truly random that I could run in one go, and that absolved me of as much personal responsibility for the outcome as possible.
Then I remembered that I’m a software engineer, and that JavaScript has a built-in function called Math.random() that was built, for all I knew, for precisely this purpose. So I popped open my laptop, fired up Node.js in the terminal, and wrote what would come to be known around our house as the Random Program:
$ node> ["Oliver", "Sam", "Rosemary"].sort(() => Math.random() > .5 ? -1 : 1);[ 'Rosemary', 'Oliver', 'Sam' ]JavaScript for the win. And it worked — for a while, anyway.
As the weeks rolled on, I grew increasingly irritated at having to tap out and run this script by hand at the command line. I was comfortable enough with its randomness — and I loved being able to blame the result on the computer — but having to pull out my laptop, open it up, type things, and so on, just didn’t sit well with me; something told me there had to be a better way. What I really wanted was for the universe to just tell me what the random order should be every week, without my having to ask it.
There are a half-dozen ways to solve this problem with a computer. You could write a Node.js script, perhaps, that ran forever on some interval, checking the day of the week and the time, and printing the result to the console on gameday. But that script would have to run somewhere, and it couldn’t be on the laptop, since we’ve already established that having to open the laptop is too painful. Somehow, the result of that script would have to find its way to you.
A text message sent to your phone would work, and there are a handful of third-party services out there with HTTP APIs that make sending such messages relatively simple. You could spin up a virtual machine on AWS, install Node.js, and deploy your script as a background process, calling the hypothetical third-party service’s text-messaging API once a week, maybe. Or better, you could simply use cron, the popular UNIX scheduling program, to call your script once a week on some predefined regular schedule.
An okay idea. But just thinking about having to set up all this stuff makes my brain a little uncomfortable. It’d be work to do it right, especially if you’re committed — as I know you are, now — to the practice of infrastructure as code. Would you really want to write the provisioning code to create the virtual machine, then write the configuration-management code to install Node.js, install your script and its dependencies, and set up the cron task to schedule its execution, then set up the automation to make everything work? You could do that, sure — but it wouldn’t be easy.
Not to mention that your virtual machine would be sitting there nearly 100% of the time doing absolutely nothing, idly marking the seconds to gameday, just like your children. Even the lowest-cost virtual machine on AWS still runs a few dollars a month, and to me, that’s too high a price for a problem like this one. What you really want is server-like behavior, only without the actual, running server.
Enter serverless
Section titled “Enter serverless”Serverless computing (or just “serverless” for short) is an architectural pattern aimed at addressing the need for more efficient, scalable computing — and it’s actually a perfect fit for a problem like this one in that serverless is ultimately all about running some code in response to an event.
In our case, what we want is to run our little one-line Node.js script once a week at a certain time, just like a regular UNIX cron task. And as it turns out, AWS has a service called CloudWatch 1 that we can use for exactly this purpose. To solve our problem, we can use CloudWatch to schedule a weekly event, and have another service called AWS Lambda 2 run a JavaScript function in response to that event.
For the sending of the message, we certainly could use a third-party service, as mentioned — but as it turns out we don’t have to, because AWS has a built-in service that can do that for us. With CloudWatch, AWS Lambda, and Amazon Simple Notification Service (SNS)3, we have everything we need to solve this problem with AWS alone. And as you might’ve guessed, we can wire it all together with a few lines of TypeScript code with Pulumi, using many of the concepts you learned in the previous chapter.
As for how the message finds its way to you, SNS can deliver to all sorts of destinations — including, yes, your phone, by text message. But these days, sending SMS in the United States requires registering an approved sending number with the mobile carriers, a days-long process involving more paperwork than a first project deserves. So we’ll use email instead, which behaves exactly the same way — the message still just comes to you — with zero setup.
Figure 2.1 shows the basic architecture of the application we’ll be building.

Figure 2.1: A diagram of the notification application you’ll build in this chapter.
Let’s get started.
Building a serverless cloud notifier
Section titled “Building a serverless cloud notifier”If you haven’t already, you’ll need to install and configure Pulumi, and since you’ll be programming your cloud applications in TypeScript, you’ll need a somewhat recent version of Node.js as well.
In addition to Pulumi and Node.js, you’ll probably want to install the AWS command-line interface (CLI)4, too. While the AWS CLI isn’t technically required — Pulumi communicates directly with AWS — it’s nevertheless a handy tool to have around for dealing with common tasks like configuring your AWS credentials, uploading files to S3 buckets, or running ad-hoc queries of various kinds. You’ll find platform-specific instructions for setting up all three of these tools in the appendix.
Before moving on, let’s run a few commands in the terminal to make sure you’ve got everything set up properly.
Configuring your command-line tools
Section titled “Configuring your command-line tools”Run the following commands in your terminal or shell of choice. In general, you should be able to run all of them from anywhere on your computer, provided their locations have been configured on your PATH.
Node.js
Section titled “Node.js”Recall from Chapter 1 that Pulumi uses Node.js to evaluate programs written in JavaScript or TypeScript. As of today, Pulumi supports Node.js 8 or greater, but in general, if you stick close to the current long-term support (LTS) version (which you’ll usually find quoted on the home page of the Node.js website at https://nodejs.org/en), you’ll be fine. Below are the versions of Node and npm that I’m using today, for reference:
$ node --versionv18.12.1
$ npm --version8.19.2
The AWS command-line interface (CLI)
Section titled “The AWS command-line interface (CLI)”Again, while not required, the AWS CLI is a helpful tool to be able to reach for when you need it, so we’ll be using it regularly in this chapter and beyond to assist us as we go. If you’ve installed the AWS CLI correctly, the following shell incantation should tell you what version you’re currently running. Again, here’s where I am, as of today:
$ aws --versionaws-cli/2.9.20 Python/3.11.1 Darwin/22.3.0 source/x86_64 prompt/offBy default, Pulumi uses your ambient AWS credentials — environment variables with standard names that you define in your current shell session — to communicate with AWS on your behalf. In general, you can provide these credentials in one of two ways:
-
By setting two environment variables,
AWS_ACCESS_KEY_IDandAWS_SECRET_ACCESS_KEY, with values obtained from the AWS Management Console, or -
By setting a single environment variable,
AWS_PROFILE, that refers to a named profile corresponding with credentials stored in a file on your computer.
Conveniently, these are the same environment variables recognized by the AWS CLI and SDK, which means you can use the AWS CLI to confirm your AWS identity before running Pulumi.
Try running the following command, which uses Amazon’s Security Token Service (STS)5 to determine your identity based on the presence of these environment variables. I’ve included the output I see when I run it myself, for reference:
$ aws sts get-caller-identity --output json{ "UserId": "MY_AWS_ACCESS_KEY_ID", "Account": "MY_AWS_ACCOUNT_ID", "Arn": "arn:aws:iam::MY_AWS_ACCOUNT_ID:user/pulumibook"}Here, AWS STS is telling me that my ambient credentials refer to an IAM user — IAM stands for Identity and Access Management — named pulumibook, which I created a few moments ago using the IAM service in the AWS Management Console6. In my case, I’d used the aws configure command to create a profile of the same name (after creating it first in the AWS Console), pasting its access key and secret into the terminal when prompted, and exporting the AWS_PROFILE environment variable afterward:
$ aws configure --profile pulumibookAWS Access Key ID [None]: ********************AWS Secret Access Key [None]: ********************Default region name [None]: us-west-2Default output format [None]: json
$ export AWS_PROFILE=pulumibook
If you happen to use multiple AWS accounts, as I do — e.g., one for work, and another for personal, with multiple IAM users for both — you’ll find aws sts get-caller-identity a helpful and reassuring command to have in your toolbox.
The Pulumi CLI
Section titled “The Pulumi CLI”With Node.js and the AWS CLI ready to go, let’s finish off by verifying your Pulumi version and user account, which you’ll use to manage your projects, stacks, and resources throughout the book.
$ pulumi versionv3.54.0
$ pulumi whoami --verboseUser: cnunciatoBackend URL: https://app.pulumi.com/cnunciato
If you haven’t run this command before, you’ll be prompted to sign into the Pulumi Cloud console to obtain an access token from Pulumi Cloud, which Pulumi will store in a folder in your home directory. You’ll learn more about working with access tokens and alternate backends (such as Amazon S3) a bit later in the book.
Creating the project and stack
Section titled “Creating the project and stack”With your tools configured, it’s time to start building the cloud notifier for real. To recap, the outcome we’re looking for is to receive an email containing a list of kid names, sorted randomly, on some regular interval — weekly, for example. To do that, you’ll use AWS CloudWatch to generate a recurring event, AWS Lambda to define a function to respond to that event, and Amazon SNS to handle the publishing and delivery of the message.
Every new project begins with an empty directory. Let’s create one now, then use the pulumi new command to generate the files you’ll need to get this project started.
$ mkdir cloud-notifier && cd cloud-notifier$ pulumi newCalled without arguments, the new command presents you with a list of project templates to choose from, organized by cloud provider and language:
```bash title=“Choosing the aws-typescript template to bootstrap the cloud-notifier project. Templates are available for many more cloud service providers and languages.”
Please choose a template: [Use arrows to move, enter to select, type to filter]
aws-csharp A minimal AWS C# Pulumi program
aws-go A minimal AWS Go Pulumi program
aws-javascript A minimal AWS JavaScript Pulumi program
aws-python A minimal AWS Python Pulumi program
aws-typescript A minimal AWS TypeScript Pulumi program azure-csharp A minimal Azure C# Pulumi program azure-go A minimal Azure Go Pulumi program … Show additional templates
Project templates are sourced from <https://github.com/pulumi/templates>, and you can even create templates of your own if you like; we'll explore custom templates in more detail in Chapter 11, when we look at the many ways of sharing cloud projects and code with Pulumi. The list you see here is of the most popular templates; choosing "Show additional templates" reveals the full set.
For this project, you'll be deploying on AWS and writing your program code in TypeScript, so you should choose the `aws-typescript` template.
:::tip
You'll probably find that in most cases, you'll use the same cloud provider and language from one project to the next, so to save a bit of time, you can pass the name of the template you'd like to use to the `new` command, as you saw in Chapter 1:
```bash$ pulumi new aws-typescript
:::
Specifying your project settings
Section titled “Specifying your project settings”When you start a new project with pulumi new, you’ll be asked for a few details, including the project’s name, a brief description of it, and the name of the stack you’d like to build first. A stack, as you’ll recall from Chapter 1, is a collection of cloud resources managed by a single Pulumi program, and you can think of them somewhat analogously to deployment environments (development, test, production, and the like). Stacks are configurable independently, and you can create as many of them as you like. It’s conventional to begin with a dev stack, so Pulumi supplies this for you as a default, and it recognizes the current directory as the default name of your project as well.
Let’s use the following values for the cloud-notifier project:
project name: cloud-notifierproject description: A Pulumi program that sends notifications with AWSstack name: devOnce you’ve provided these values, you’ll be asked which AWS region you’d like to deploy into:
aws:region: The AWS region to deploy into: (us-east-1)Since I live in the Pacific Northwest, I usually set this value to us-west-2, but you can use whichever region works best for you, given where you are. The full list of AWS regions and their codes can be found at https://docs.aws.amazon.com/general/latest/gr/rande.html.
Once you’ve chosen a region, Pulumi proceeds with creating the project, installing its Node.js dependencies and concluding with an invitation to deploy:
Your new project is ready to go!To perform an initial deployment, run 'pulumi up'.Before we run that pulumi up, though, let’s have a quick look at the files that Pulumi’s created for you.
Understanding the new project layout
Section titled “Understanding the new project layout”Now would be a good time to open the cloud-notifier project in your editor of choice. When you do, you’ll see a number of new files that together comprise a complete, ready-to-run project containing a minimal Pulumi program with just enough configuration to get going.
./cloud-notifier ├── index.ts ├── Pulumi.yaml ├── Pulumi.dev.yaml ├── package.json ├── package-lock.json └── tsconfig.jsonindex.ts
Section titled “index.ts”This file represents the Pulumi program; it’s a TypeScript application that Pulumi will evaluate, with the help of Node.js, to determine the cloud infrastructure you want to create. Right now, it contains a resource declaration for a single AWS S3 bucket, but we’ll change that in a moment when we flesh out the details of the cloud-notifier program.
package.json, package-lock.json and node_modules
Section titled “package.json, package-lock.json and node_modules”Pulumi itself is distributed as a single executable program compiled for your platform, so it doesn’t have any dependencies of its own. But since we’re writing in TypeScript and using Pulumi’s SDK for Node.js, you’ll need a way to manage the program’s dependencies. By default, Pulumi generates a package.json file and uses npm to install it, but if you’d prefer to use another packager, such as Yarn (https://yarnpkg.com), you can do so with an environment variable:
$ export PULUMI_PREFER_YARN=true$ pulumi new aws-typescriptWhen you do this, you’ll get a yarn.lock instead of a package-lock.json, and you’ll be able to manage your dependencies with Yarn from that point forward.
tsconfig.json
Section titled “tsconfig.json”This file contains a number of settings controlling how TypeScript compiles your code into the JavaScript expected by the Node.js runtime. Feel free to modify these settings however you like. See the TypeScript documentation for a complete reference at https://www.typescriptlang.org/tsconfig.
Pulumi.yaml and Pulumi.dev.yaml
Section titled “Pulumi.yaml and Pulumi.dev.yaml”These are your project and stack configuration files, respectively. A Pulumi project can have at most one Pulumi.yaml file, but it can have many stack-configuration files, one for every stack in the project. Pulumi.yaml typically contains just a few settings, like the project’s name, description, and language runtime (e.g., nodejs), whereas stack-configuration files like Pulumi.dev.yaml are meant for storing stack-specific settings, like the aws:region you provided with pulumi new. You’ll learn much more about projects and stacks and how to configure them in Chapters 3 and 4.
Now that you understand the purpose of each file in your project, you’re ready to start writing the program.
Writing the code
Section titled “Writing the code”To compose the serverless cloud notifier, we’ve chosen the following AWS resources:
- An AWS SNS Topic, which accepts the messages we want to send,
- An AWS SNS Topic Subscription, which receives those messages and forwards them to an email address,
- An AWS CloudWatch Event that we’ll trigger once a week, and
- An AWS Lambda function that responds to these events by creating a message and publishing it to the Topic.
Declaring the topic and subscription
Section titled “Declaring the topic and subscription”Let’s start by opening index.ts, replacing the code in that file with what’s shown in Listing 2.1.
import * as aws from "@pulumi/aws";import { SNS } from "@aws-sdk/client-sns";
const topic = new aws.sns.Topic("topic");
const subscription = new aws.sns.TopicSubscription("subscription", { topic: topic, protocol: "email", endpoint: "you@example.com",});1 | Imports the @pulumi/aws library, which defines all AWS resources. |
2 | Imports the SNS class from the AWS SDK for JavaScript. |
4 | Declares an SNS Topic resource. |
6-10 | Declares an SNS Topic Subscription resource. |
7 | Relates the TopicSubscription with the Topic. |
8 | The messaging protocol to use for the notification. For the list of supported protocols, see the AWS SNS documentation. |
9 | The email address to send the message to. |
The first line imports the @pulumi/aws library, which you’ll use with just about every program you write in this book. It represents the TypeScript API for the entire AWS cloud; every AWS resource you can manage with Pulumi is contained in one of its more than 120 modules. You’ll use this library extensively, and find its full documentation at https://www.pulumi.com/docs/reference/pkg/aws.
The second line imports the SNS class from the AWS SDK for JavaScript. While Pulumi handles the infrastructure resources (like topics and subscriptions), we’ll need the AWS SDK to interact with those resources at runtime — specifically, to publish messages to our topic from within the Lambda function callback. You’ll need to add the package to the project (with npm install @aws-sdk/client-sns), but only to keep TypeScript happy: at runtime, the AWS SDK comes bundled with AWS Lambda’s Node.js environment.
Lines 4 and 6-10 declare an SNS topic and subscription, terms commonly used in publish/subscribe (or “pub/sub”) messaging architectures. A topic is a messaging channel; you can think of it as a bucket whose job is just to receive messages. A subscription, on the other hand, is a registration to be notified of those messages in a particular way.
Here, we’re declaring that we’d like to be notified by email7 at the address you@example.com of all messages published to the topic declared a couple of lines up. (You can — and should! — use your own email address here instead; any inbox you can check will do.) The protocol and endpoint values we’re providing to the subscription declaration are simple strings, but the topic is a special kind of Pulumi object reference called an Output. You’ll learn more about Inputs, Outputs, and how to work with both of them in the chapters ahead.
For now, let’s add a few more lines to create a recurring CloudWatch event and a handler for it.
Scheduling and handling events
Section titled “Scheduling and handling events”To set up the CloudWatch event and its handler, add the lines in Listing 2.2 to index.ts.
const schedule = "rate(1 minute)";
const handler = new aws.lambda.CallbackFunction("handler", { policies: [aws.iam.ManagedPolicy.AWSLambdaBasicExecutionRole], callback: () => { const kids = ["Oliver", "Sam", "Rosemary"];
const shuffled = kids .sort(() => Math.random() > .5 ? -1 : 1) .join(", ");
const message = `This week's game-playing order: ${shuffled}.`;
console.log(message); },});
aws.cloudwatch.onSchedule("handler", schedule, handler);12 | Defines a CloudWatch schedule expression of once per minute. |
14 | Declares the handler as a CallbackFunction so we can configure its role. |
15 | Scopes the function to a single managed policy --- least privilege. |
19-21 | Composes a randomized list of names. |
25 | Prints the message to the console. |
29 | Schedules the function to run on that interval. |
These new lines declare an event, a callback function to handle it, and a schedule that ties the two together. This time, we’ve written the handler as an aws.lambda.CallbackFunction rather than a bare arrow function, so that we can hand it a policies array and keep its permissions tightly scoped — we’ll come back to why when we deploy. The event itself is configured with a CloudWatch schedule expression, and there are two kinds: rate expressions and cron expressions. Rate expressions are good for triggering events on some fixed interval — every minute, every hour, every 3 days, and the like. Cron expressions are more suitable for date- or time-based events: every Saturday morning at nine-twenty, for example.
Since we’re still in development, let’s use a rate expression that tells CloudWatch to raise an event once a minute, so we can easily test this application as we build it. And in the callback handler, we’ll simply assemble the message containing the randomized list of kid names and log it to the console. (We’ll get to the actual sending of messages in a bit.)
Deploying the application
Section titled “Deploying the application”In your terminal shell of choice, navigate to the directory containing the cloud-notifier project and run pulumi up.
$ pulumi up
Previewing update (dev): Type Name Plan + pulumi:pulumi:Stack cloud-notifier-dev create + ├─ aws:cloudwatch:EventRuleEventSubscription handler create + │ ├─ aws:cloudwatch:EventRule handler create + │ ├─ aws:iam:Role handler create + │ ├─ aws:iam:RolePolicyAttachment handler-58ed699a create + │ ├─ aws:lambda:Function handler create + │ ├─ aws:cloudwatch:EventTarget handler create + │ └─ aws:lambda:Permission handler create + ├─ aws:sns:Topic topic create + └─ aws:sns:TopicSubscription subscription create
Resources: + 10 to create
Do you want to perform this update?> yes no details1 | Initiates the deployment, running a preview first to confirm the changes to be made. |
3 | Shows that we’re deploying the dev stack. |
5 | A resource itself, the stack is the logical parent of all other resources. |
6, 13-14 | The cloud resources explicitly declared in the program. |
Remember that by default, Pulumi will run a preview before deploying the application to give you a chance to examine the infrastructure you’ll be creating. The output shows you’ll be creating 10 new resources, most of which should look familiar, based on the code and the learning you’ve done so far. But there are a few in there that Pulumi seems to have chosen to create on its own — namely an IAM role, a role-policy attachment, and a Lambda permission:
... + │ ├─ aws:iam:Role handler create + │ ├─ aws:iam:RolePolicyAttachment handler-58ed699a create + │ ├─ aws:lambda:Permission handler create...If you choose details, you’ll see a rich diff that conveys a lot more about these new resources than you may understand at this point, but the gist is that because Pulumi knows, based on your code, that you want your function to be invoked in response to the event you’ve defined, it’s implicitly declared the role, role-policy attachment, and permission needed to make that possible. This is abstraction by way of encapsulation at work: by tucking away that plumbing, the @pulumi/aws library lets you focus on how the application works, without getting lost in the low-level details. The one thing we didn’t leave to Pulumi is how much the function is allowed to do — that policies array we passed to the CallbackFunction scopes its role to a single managed policy, AWSLambdaBasicExecutionRole, just enough to write logs to CloudWatch and nothing more. Granting a function only the permissions it needs (leave policies off, and you’ll get a broad set of defaults instead) is the principle of least privilege, and a good habit to build early.
Choose yes to allow Pulumi to proceed, and watch as the application is deployed to AWS.
Do you want to perform this update? yes
Updating (dev): Type Name Status + pulumi:pulumi:Stack cloud-notifier-dev created + ├─ aws:cloudwatch:EventRuleEventSubscription handler created + │ ├─ aws:cloudwatch:EventRule handler created + │ ├─ aws:iam:Role handler created + │ ├─ aws:iam:RolePolicyAttachment handler-58ed699a created + │ ├─ aws:lambda:Function handler created + │ ├─ aws:cloudwatch:EventTarget handler created + │ └─ aws:lambda:Permission handler created + ├─ aws:sns:Topic topic created + └─ aws:sns:TopicSubscription subscription created
Resources: + 10 created
Duration: 23s
Permalink: https://app.pulumi.com/cnunciato/cloud-notifier/dev/updates/117 | Confirms all resources were created successfully. |
19 | Indicates the deployment took 23 seconds to complete. |
Congratulations! Your first Pulumi-powered serverless application is now running in the cloud.
Before we go any further, though, go check your inbox: there should be a message waiting for you from AWS with the subject “AWS Notification - Subscription Confirmation”. Until you click the Confirm subscription link inside it, your subscription sits in a PendingConfirmation state, and no messages will be delivered. This is a sensible safeguard on Amazon’s part — without it, any program could sign your inbox up for whatever it pleased — so give that link a click now, and SNS will start delivering to you.
Tailing the logs
Section titled “Tailing the logs”According to the code, we should be logging something to the console once per minute, so let’s take a moment to verify that’s actually happening.
Back in your terminal, run pulumi logs --follow (or pulumi logs -f for short). After a minute or so, you should see your newly created event handlers being invoked, and their log statements logging, as expected.
$ pulumi logs --follow
Collecting logs for stack dev since 2026-06-07T16:23:44.000-07:00.
2026-06-07T16:29:15.773-07:00 [handler-3633816]INFO This week's game-playing order: Rosemary, Oliver, Sam....2026-06-07T16:30:15.662-07:00 [handler-3633816]INFO This week's game-playing order: Sam, Oliver, Rosemary....1 | Collects and streams the aggregate logs of the dev stack’s resources to your terminal. |
5 | Indicates this log line was written by the Lambda callback function. |
I’ve trimmed and wrapped the lines a bit for readability, but as you can see, the app is indeed appending to the logs once a minute. (To stop following the logs, press Control-C.)
But wait — logging to where, exactly? This app isn’t running on your local machine, of course; it’s running in the AWS cloud. Where are these logs being recorded? What is it we’re seeing, here?
AWS Lambda functions send their logs to AWS CloudWatch automatically (CloudWatch is primarily a logging and monitoring service), so the logs you see when you run pulumi logs are actually the aggregated logs for this Pulumi stack — specifically, the dev stack of this Pulumi project. If you look closely at the output, you’ll see that the log lines also contain a label, [handler-3633816]. This label corresponds to the Lambda function we named handler in the program. If the dev stack had contained additional resources, their logs would appear alongside these as well, interleaved and labeled with their own respective resource names.
Logging is great, but we’re not done yet: we’ve got messages to send. Let’s finish this off by adding the code to do that now.
Completing the program
Section titled “Completing the program”Using Listing 2.3 as a guide, replace the console.log statement with a call to publish the message to the SNS Topic, logging successes and failures to the console accordingly. Note the two other small changes here as well: since the function now calls the SNS API directly, its role gets a second managed policy, AmazonSNSFullAccess, granting it permission to publish — and since the SDK’s publish() method is promise-based, the callback becomes async so we can await the result.
import * as aws from "@pulumi/aws";import { SNS } from "@aws-sdk/client-sns";
const topic = new aws.sns.Topic("topic");
const subscription = new aws.sns.TopicSubscription("subscription", { topic: topic, protocol: "email", endpoint: "you@example.com",});
const schedule = "rate(1 minute)";
const handler = new aws.lambda.CallbackFunction("handler", { policies: [ aws.iam.ManagedPolicy.AWSLambdaBasicExecutionRole, aws.iam.ManagedPolicy.AmazonSNSFullAccess, ], callback: async () => { const kids = ["Oliver", "Sam", "Rosemary"];
const shuffled = kids .sort(() => Math.random() > .5 ? -1 : 1) .join(", ");
const message = `This week's game-playing order: ${shuffled}.`;
const sns = new SNS();
try { const response = await sns.publish({ Subject: "Game day!", Message: message, TopicArn: topic.arn.get(), }); console.log(response); } catch (error) { console.error(error); } },});
aws.cloudwatch.onSchedule("handler", schedule, handler);17 | Grants the function’s role permission to publish to SNS. |
19 | Makes the callback async, enabling the use of await. |
28 | Creates an instance of the SNS class of the AWS SDK for JavaScript. |
31-35 | Prepares and sends a publish request. |
32 | Sets the subject line of the email. |
34 | Passes the Amazon Resource Name (ARN) of the SNS topic to publish to. |
36,38 | Logs the results of publish requests to CloudWatch. |
There are several interesting things to point out about what’s happening in these last few lines, but rather than just explain them, I’ll share a little story instead.
Deploy-time vs. runtime: a brief digression
Section titled “Deploy-time vs. runtime: a brief digression”The first time I wrote a Pulumi program like this one, I instinctively went looking for a publish() method on the topic object itself, figuring that since the topic’s job was to accept messages, and I already had a handle to it, I’d be able to call publish() with the content of my message, and be done. But what I found — or more accurately didn’t, as Figure 2.2 shows — rather surprised me.
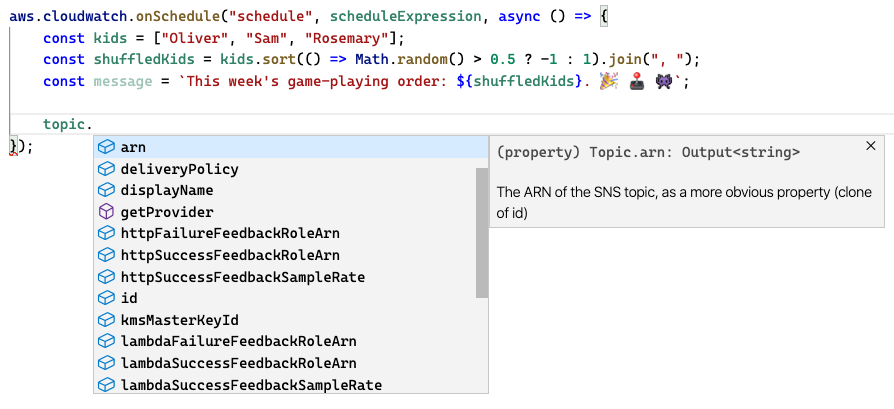
Figure 2.2: Inspecting the SNS Topic instance with Visual Studio Code, but finding no publish method. Hmm.
There didn’t seem to be a way to publish this message — nothing on the topic itself, and nothing in the Pulumi documentation, either. It seemed I was stuck, and more than a little confused.
But after a good several minutes of frustrated Googling, it dawned on me that I was thinking about this all wrong. There was a subtle but important difference between the code I’d written to declare the components of the infrastructure and the code I was now attempting to write to handle the event. The job of the former — of Pulumi — was to create and manage the cloud resources: the topic, the subscription, the event, and its handler. The job of the latter, however, was different: it was to publish a message at some point in the future, long after Pulumi had finished its work and left the scene.
Once I grasped this distinction — between what happens at deploy-time and what happens at runtime — it was clear that what I needed was a way to send publish requests to the AWS SNS API itself, from within the body of an already-deployed Lambda function. And what better way to do that than with Amazon’s own JavaScript SDK?
It turns out AWS Lambda’s Node.js runtime conveniently ships with the AWS SDK for JavaScript (https://aws.amazon.com/sdk-for-javascript), and that SDK’s SNS class happens to expose a publish() method that accepts a topic and a message, just as I’d hoped.
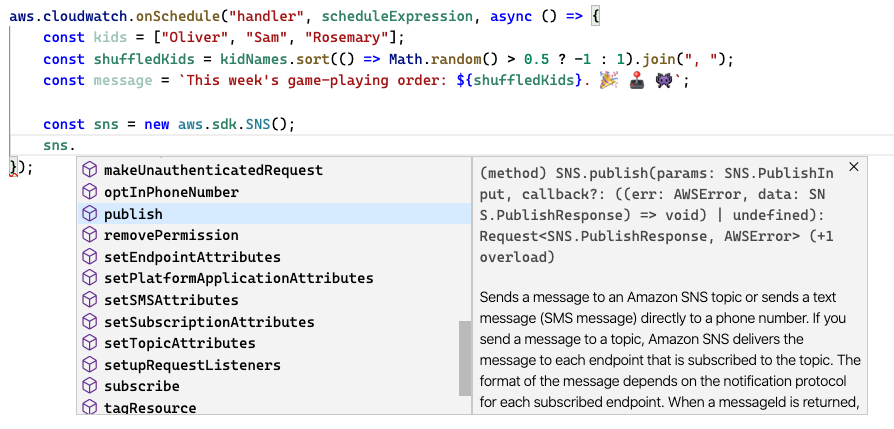
Figure 2.3: Using the AWS SDK for JavaScript to publish a message to the topic.
Looking back at the code in Listing 2.3, then, it should now be clear what’s going on. To send the message, we simply create an instance of the SNS class and call its publish() method, passing the content of the message and the Amazon Resource Name (ARN) of the topic to publish to (which we can conveniently pass by reference), and logging the results of those publish requests to the console.
With that, let’s update the application and start sending some messages.
Updating the stack
Section titled “Updating the stack”After making the changes in Listing 2.3, save the program and run pulumi up, choosing yes when you’re comfortable with your understanding of the preview. The deployment should take only a few seconds, since all you’re changing is the content of the event handler and the permissions of its role.
$ pulumi up
Previewing update (dev): Type Name Plan Info + aws:iam:RolePolicyAttachment handler-f3372347 create ~ aws:lambda:Function handler update [diff: ~code]
Resources: + 1 to create ~ 1 to update 2 changes. 9 unchanged
Do you want to perform this update? yes
Updating (dev): Type Name Status Info + aws:iam:RolePolicyAttachment handler-f3372347 created ~ aws:lambda:Function handler updated [diff: ~code]
Resources: + 1 created ~ 1 updated 2 changes. 9 unchanged
Duration: 14s
Permalink: https://app.pulumi.com/cnunciato/cloud-notifier/dev/updates/25 | Attaches the new SNS policy to the function’s role. |
6 | The Lambda function’s code changed, so Pulumi plans to update it. |
9-11 | Summarizes the changes to be made: one create, one update, nine unchanged. |
13 | Confirms the preview and initiates the update. |
17 | The function is updated in place --- its code, not its ARN. |
20-22 | Summarizes the changes that occurred. |
And in a minute or so — assuming you’ve confirmed the subscription — the first “Game day!” email should land in your inbox.
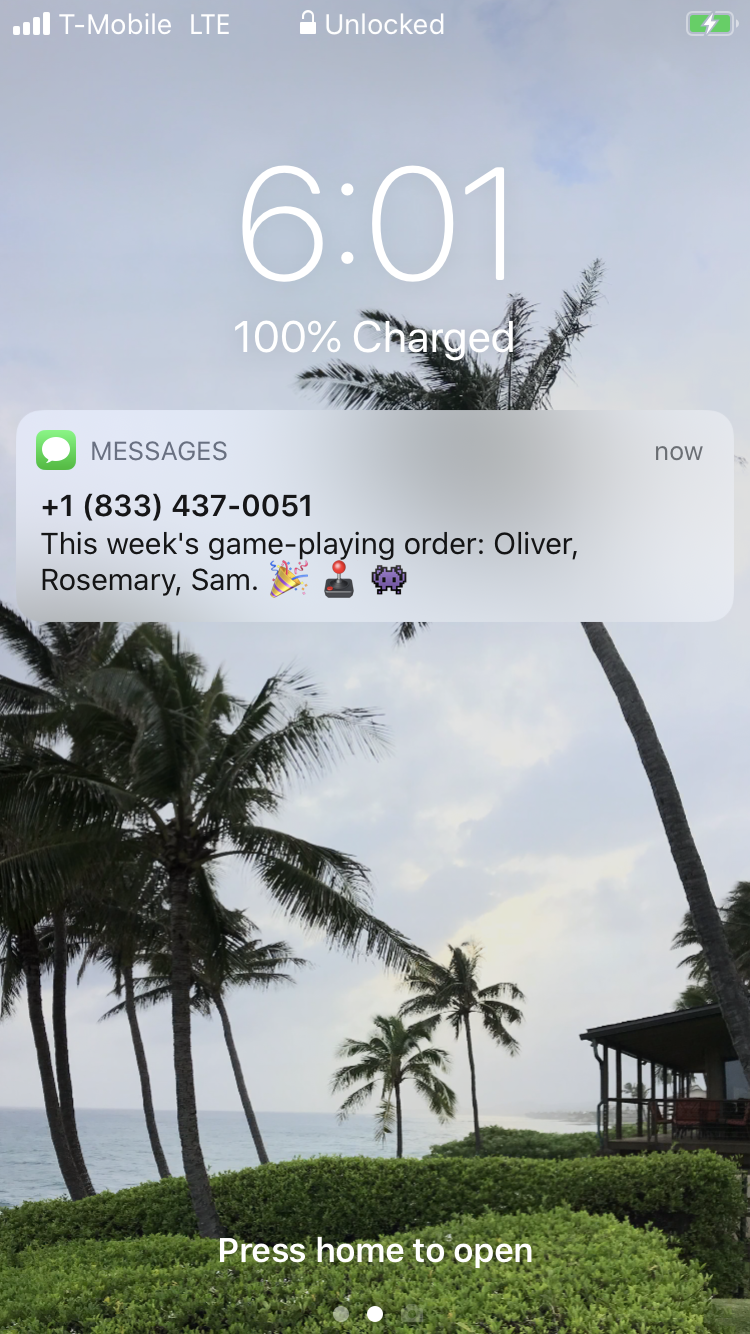
Figure 2.4: The notification, delivered to your inbox by AWS.
There’s one little problem, though: your inbox is going to keep filling up, once a minute, every minute, and that’s probably not what you want. Let’s dial back the schedule expression to something more useful with a cron expression instead. Using Listing 2.4 as a guide, update the program to use a cron expression that works for you. Be sure to express the time in 24-hour Coordinated Universal Time (UTC).
const schedule = "cron(20 16 ? * SAT *)";12 | A CloudWatch cron expression of “every Saturday at 16:20 UTC” (or 9:20 AM Seattle time). |
Now run a final pulumi up to apply the new schedule. If the preview looks good — you should see that only the schedule property of the CloudWatch EventRule will be changing — choose yes. The update shouldn’t take more than a few seconds to complete.
$ pulumi up...
Updating (dev): Type Name Status Info ~ aws:cloudwatch:EventRule handler updated [diff: ~scheduleExpression]
Resources: ~ 1 updated 10 unchanged
Duration: 4s
Permalink: https://app.pulumi.com/cnunciato/cloud-notifier/dev/updates/36 | Shows that only the CloudWatch event schedule was updated. |
Within a minute or so of your scheduled time, your message should arrive. (If it doesn’t, double-check the syntax of your cron expression — it’s easy to get them wrong.)
There’s a good chance you still have at least a few questions, though. If you’re like me, you’re looking at those hard-coded strings, wondering whether and how to make them configurable. Or maybe you’re puzzling over the need for that little .get() accessor we happened to tack onto the end of the topic reference — without explanation — when we made the call to publish the message.
I can promise you answers to these questions in the pages ahead. For now, let’s take a break from the command line and turn to the browser for a higher-level look at what we’ve done so far.
Browsing the stack
Section titled “Browsing the stack”If you follow the Permalink at the end of the output from the latest pulumi up, you’ll see a view much like the one in Figure 2.5, which shows the changes that took place in that last update.
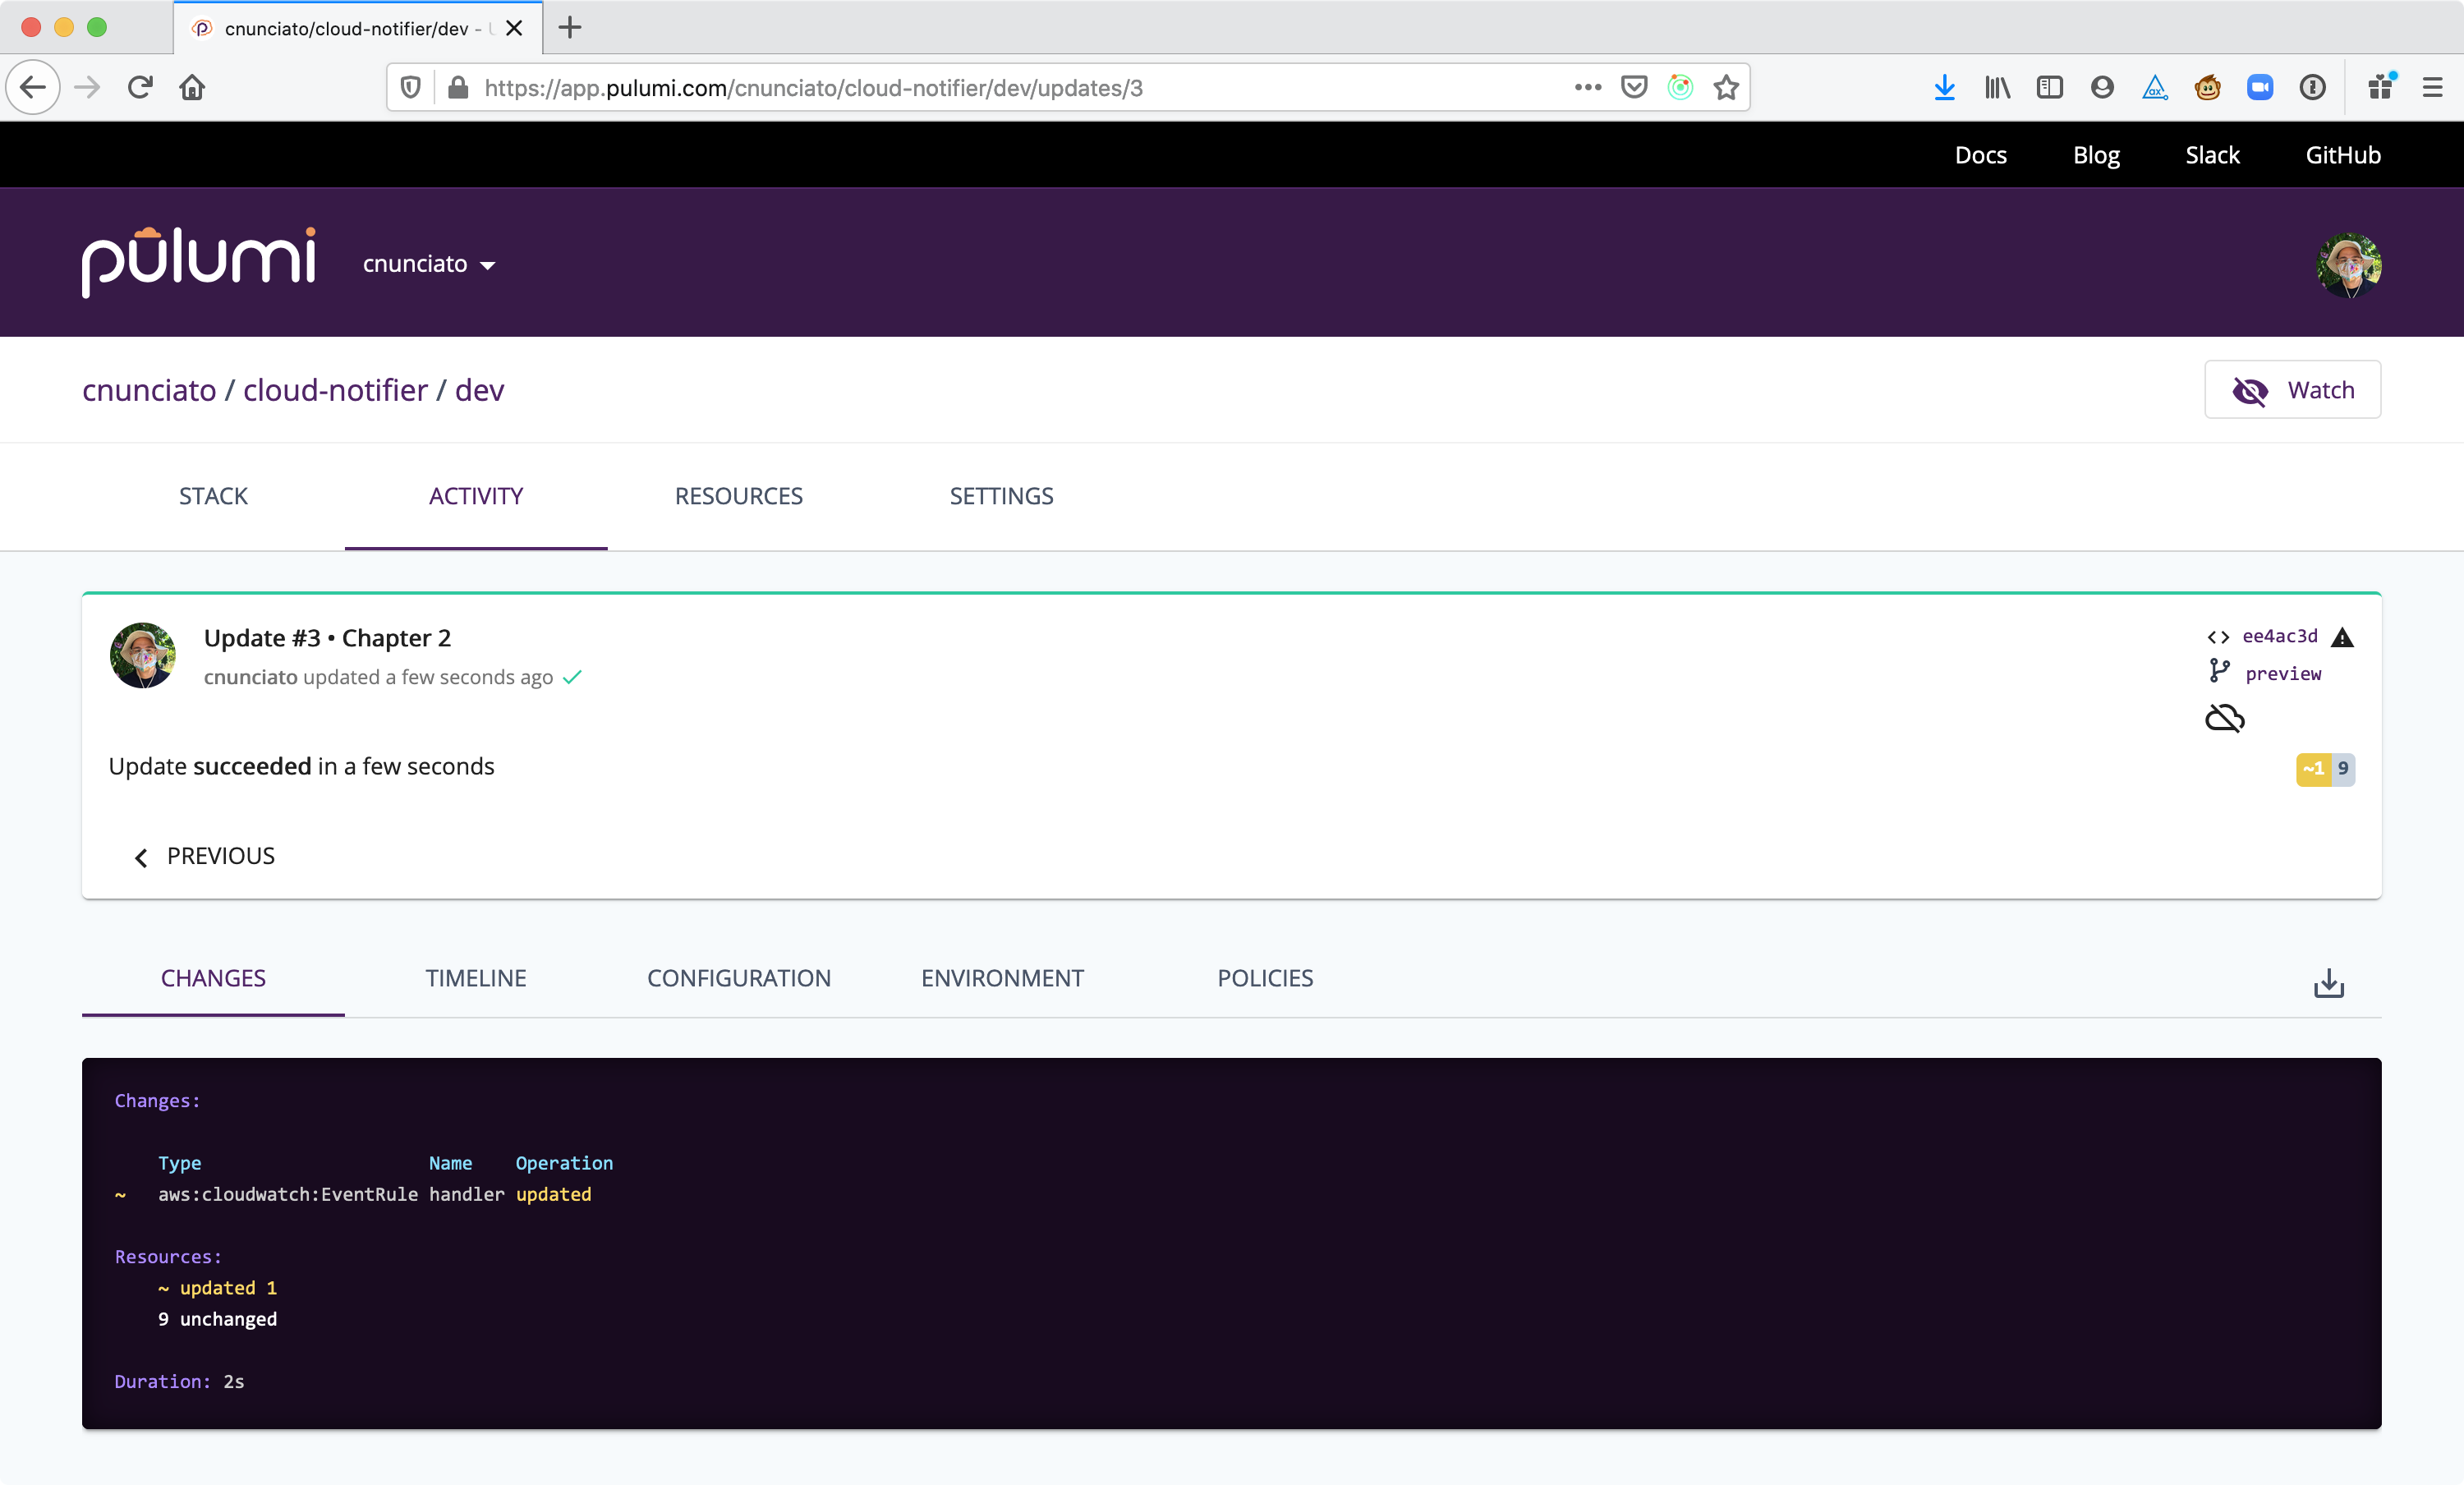
Figure 2.5: The Changes tab of the Pulumi Cloud console, showing the cloud-notifier/dev stack’s most recent update.
The default view should look a lot like the output you saw in your terminal, and hovering over that view should reveal some additional options, including Diff, which shows you exactly what changed with each resource during the update.
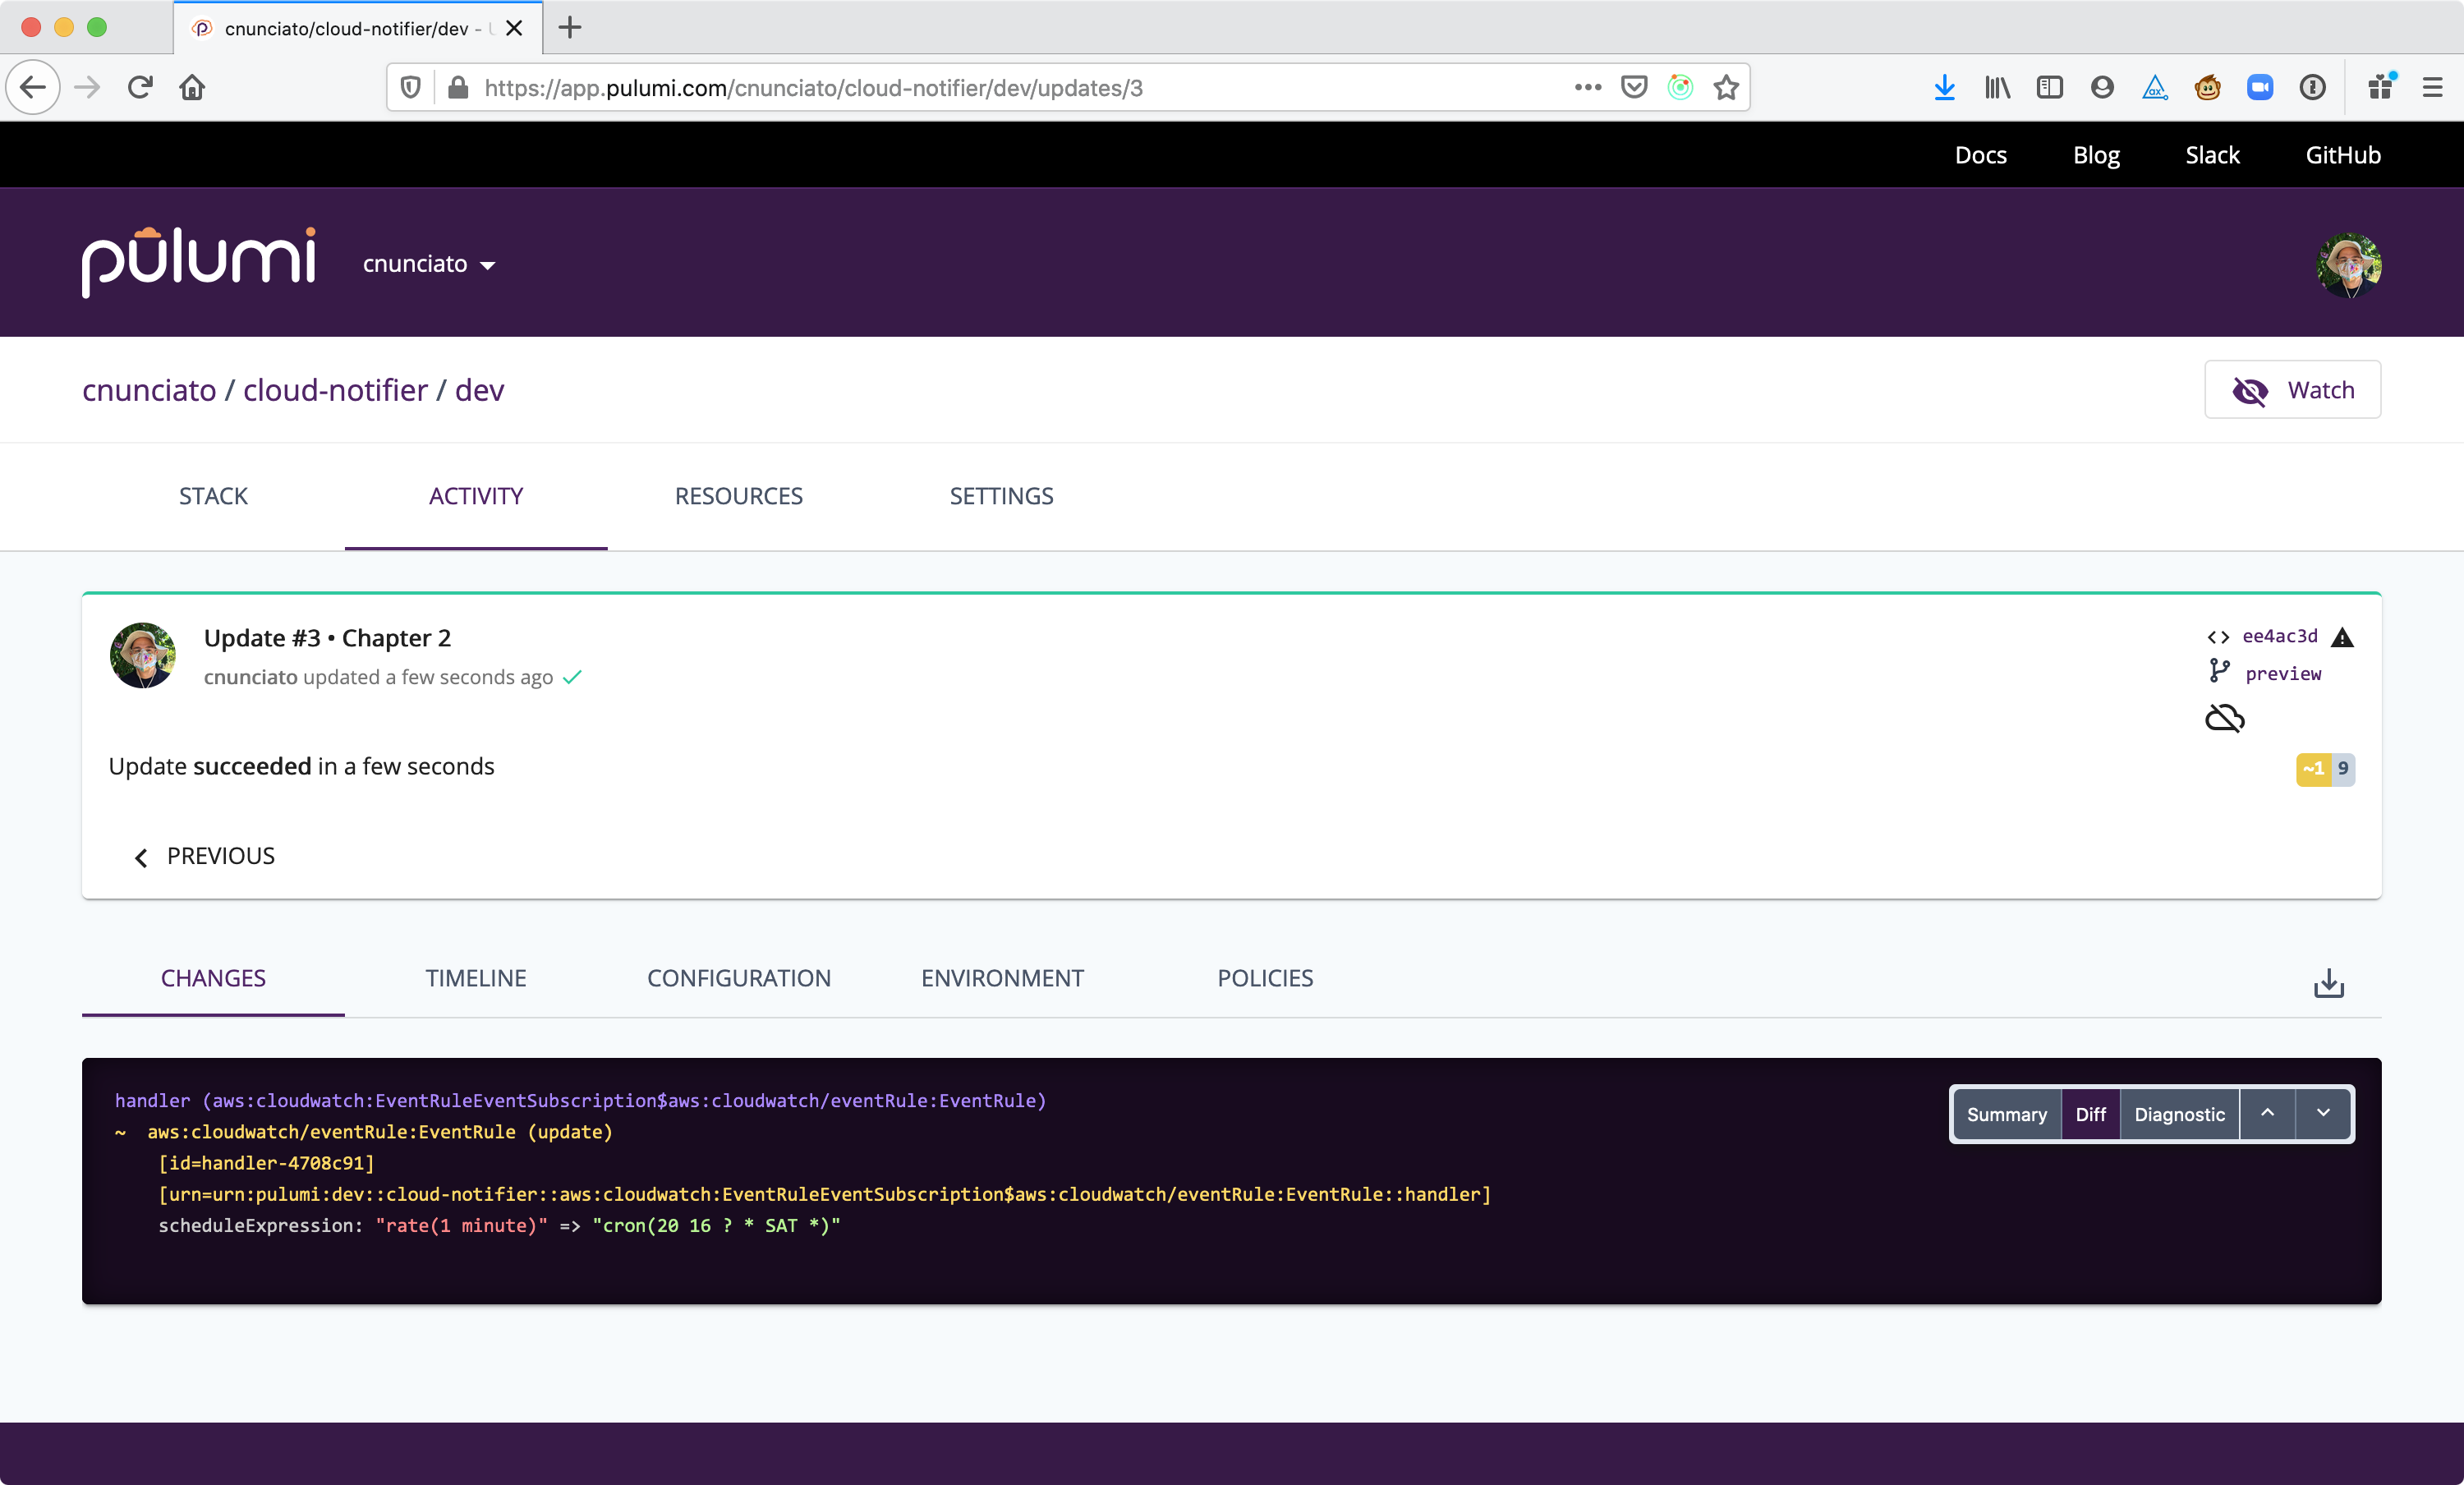
Figure 2.6: The Diff view of the update, showing the before-and-after values of the schedule expression.
On the Resources tab, you’ll see a list of all of the cloud resources comprising the stack, along with a graph view that can be helpful for visualizing the relationships between resources.
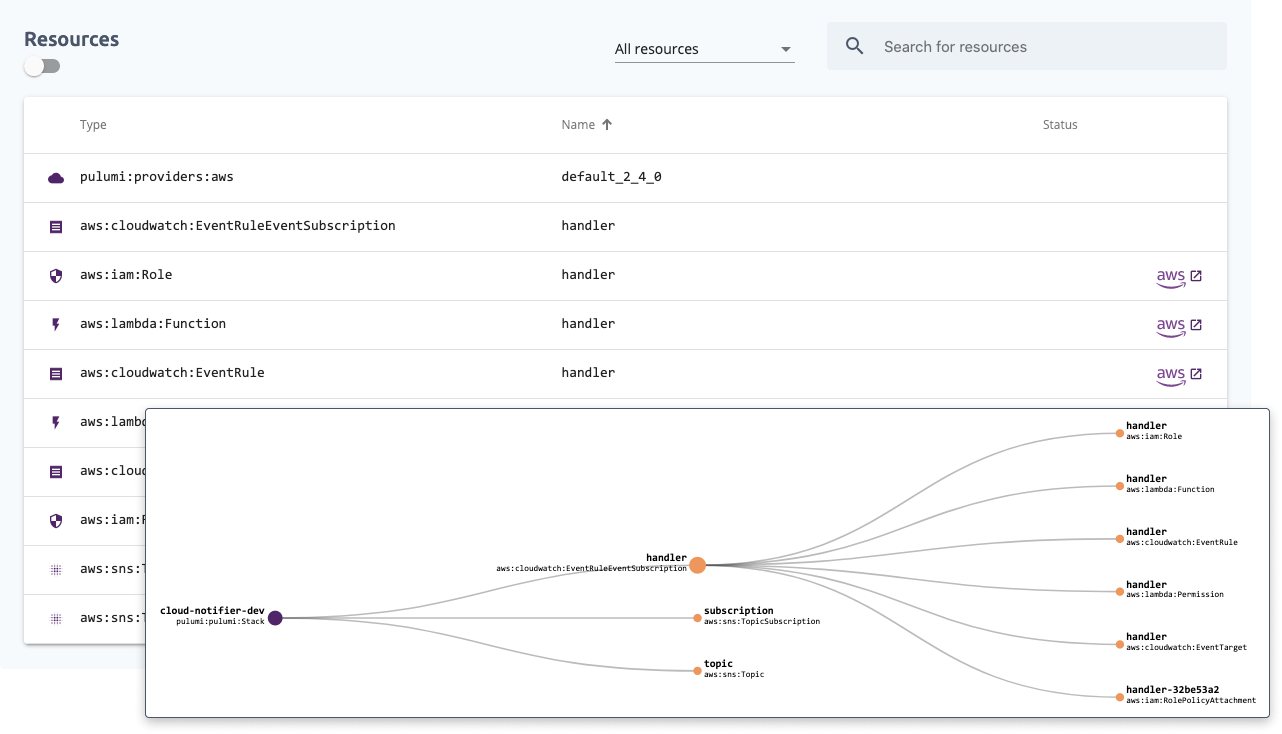
Figure 2.7: The Resources tab shows a full inventory of the stack, including a graph view for visualizing resource dependencies.
From there, you can follow the resource links to the AWS Management Console to get even more information about a particular resource. If you wanted to know when to expect your next notification, for example, you could follow the link beside the aws.cloudwatch.EventRule and be taken directly to the list of upcoming dates.
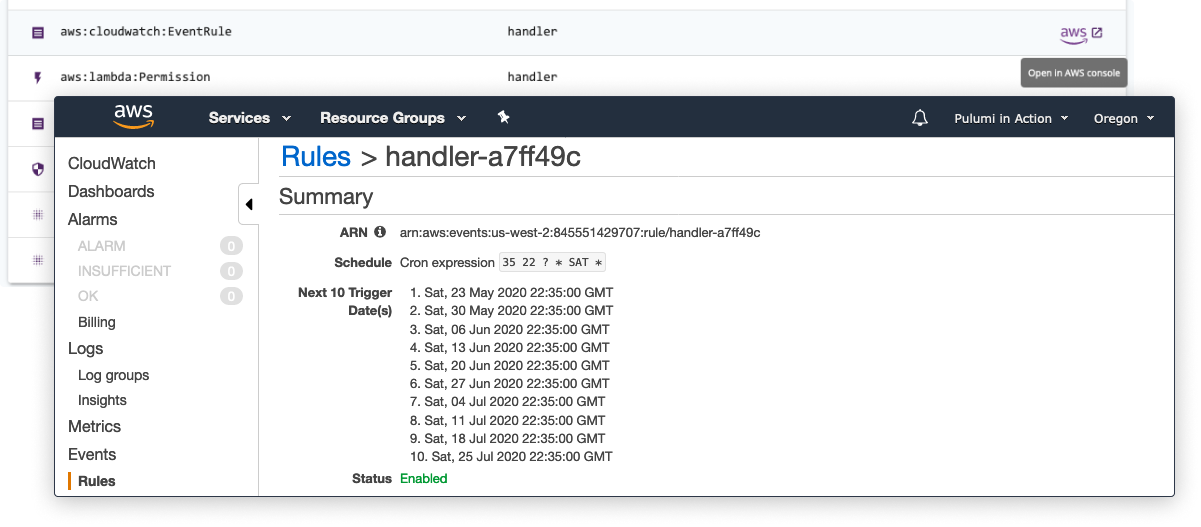
Figure 2.8: Linking to a specific resource in the AWS Management Console.
You’ll explore the many features of the Pulumi Cloud console, and learn your way around the AWS Management Console as well, as we work through the projects in this book. For now, let’s wrap up the project by doing a little cleanup work.
Tidying up
Section titled “Tidying up”With Pulumi, you can destroy cloud infrastructure just as easily as you create it. Let’s do that now with a command you’ll often run at the end of each project we build, just to practice good hygiene (and to make sure we keep your AWS costs as close to zero as possible).
Back in your terminal, run pulumi destroy.
$ pulumi destroy
Previewing destroy (dev): Type Name Plan - pulumi:pulumi:Stack cloud-notifier-dev delete - ├─ aws:sns:TopicSubscription subscription delete - ├─ aws:cloudwatch:EventRuleEventSubscription handler delete - │ ├─ aws:cloudwatch:EventTarget handler delete - │ ├─ aws:lambda:Permission handler delete - │ ├─ aws:iam:RolePolicyAttachment handler-58ed699a delete - │ ├─ aws:iam:RolePolicyAttachment handler-f3372347 delete - │ ├─ aws:lambda:Function handler delete - │ ├─ aws:cloudwatch:EventRule handler delete - │ └─ aws:iam:Role handler delete - └─ aws:sns:Topic topic delete
Resources: - 11 to delete
Do you want to perform this destroy?> yes no details1 | Initiates the destroy operation, running a preview first to let you review the changes before applying them. |
18 | Indicates all of the resources in the dev stack will be deleted. |
Again, notice Pulumi runs a preview by default, as with pulumi up, to give you a chance to review the changes before applying them. Choose yes to confirm, and in a few seconds, your stack should be empty.
...
Destroying (dev): Type Name Status - pulumi:pulumi:Stack cloud-notifier-dev deleted - ├─ aws:sns:TopicSubscription subscription deleted - ├─ aws:cloudwatch:EventRuleEventSubscription handler deleted - │ ├─ aws:cloudwatch:EventTarget handler deleted - │ ├─ aws:lambda:Permission handler deleted - │ ├─ aws:iam:RolePolicyAttachment handler-58ed699a deleted - │ ├─ aws:iam:RolePolicyAttachment handler-f3372347 deleted - │ ├─ aws:lambda:Function handler deleted - │ ├─ aws:cloudwatch:EventRule handler deleted - │ └─ aws:iam:Role handler deleted - └─ aws:sns:Topic topic deleted
Resources: - 11 deleted
Duration: 9s
Permalink: https://app.pulumi.com/cnunciato/cloud-notifier/dev/updates/418 | Confirms all eleven resources of the dev stack were deleted. |
Even after destroying all of its infrastructure, though, you’ll still be able to browse to the stack in the Pulumi Cloud console and see the details of the delete operation, as shown in Figure 2.9.

Figure 2.9: The results of the destroy operation.
And of course, you can easily build the stack up again with another pulumi up.
I’ll usually keep emptied stacks around for a while for reference. But when they start to pile up, they’re easily deleted8, either by clicking the Delete button on the Settings tab or on the command line with pulumi stack rm:
$ pulumi stack rm
This will permanently remove the 'dev' stack!Please confirm that this is what you'd like to do by typing ("dev"): devStack 'dev' has been removed!1 | The rm command deletes a stack and all of its update history. |
3 | Typing the name of the stack confirms the deletion request. |
4 | Indicates the stack was removed. |
We’ve covered a lot of material in these first two chapters, and there’s plenty more to learn in the pages ahead. Before moving on, take a moment to ponder the application you’ve built, add a customization or two, and spend a little time exploring @pulumi/aws. In the next chapter, you’ll dive deeper into projects and stacks and get to know the Pulumi CLI a little better.
Summary
Section titled “Summary”-
Serverless applications are driven by cloud-based events and composed of code that runs in response to those events.
-
AWS CloudWatch is a logging and monitoring service that can also be used for triggering cloud events on a fixed interval or time-based schedule.
-
Amazon Simple Notification Service (SNS) is a publish/subscribe (or “pub/sub”) messaging service that can deliver messages to subscribers in several ways, including email.
-
With Pulumi, you can build event-driven serverless applications that seamlessly blend infrastructure and application code in a single program.
-
Pulumi’s AWS SDK for Node.js supports more than 120 AWS services, including CloudWatch, SNS, and AWS Lambda, one of several AWS serverless computing services.
-
You can generate a new Pulumi project by choosing from a collection of open-source, provider- and language-specific templates from GitHub.
-
Pulumi projects can have one to many stacks, each one configurable independently.
-
The
pulumi logscommand allows you to retrieve and follow the aggregate log streams of all of the cloud resources belonging to a Pulumi stack. -
The
pulumi destroycommand deletes all of the resources of a given stack. -
The
pulumi stack rmcommand deletes a stack record and all of its update history. -
The Pulumi Cloud console keeps track of all of the projects, stacks, and resources that you manage with Pulumi Cloud, and offers several ways of visualizing those resources and their relationships.
Footnotes
Section titled “Footnotes”-
For a complete list of supported protocols, see the AWS SNS documentation at https://docs.aws.amazon.com/sns/latest/api/API_Subscribe.html. ↩
-
As long as they really are empty. To protect you from orphaning cloud resources accidentally (which can be terribly difficult to reconcile manually), Pulumi doesn’t allow you to remove any stack that still contains resources. ↩