Chapter 4: Configuration and secrets
This chapter covers:
Section titled “This chapter covers:”- Understanding the basics of Pulumi configuration
- Configuring multiple stacks with the Pulumi CLI and SDK
- Using numbers, booleans, and structured data for configuration
- Encrypting and decrypting sensitive values with Pulumi secrets
- Protecting secret values from inadvertent exposure
In the last chapter, you learned about Pulumi projects and stacks by building a simple, event-driven serverless application targeting multiple environments, and you configured those stacks with simple environment variables. In this chapter, you’ll pick up where you left off and dive into Pulumi’s built-in configuration system, which gives you a whole other level of control over how your cloud applications and infrastructure are configured, and lets you manage sensitive data like passwords and secrets easily and safely using industry-standard encryption.
Let’s jump right in.
A quick recap
Section titled “A quick recap”At this point, assuming you worked through the example in Chapter 3, you should have a health-checker project with two stacks, dev and production, each configured with environment variables. You’re setting those environment variables (SCHEDULE, SITE_URL, and WEBHOOK_URL) on the command line before running pulumi up, and then reading them in your program with the process.env object exposed by Node.js. And it works! Which is great. There is much cause to celebrate.
Still, there’s room for improvement, too. Environment variables are a useful general-purpose tool to have in your infrastructural toolbox, and it’s great to be able to use them so easily in a Pulumi program. But environment variables also have to be set on the command line somehow, whether typed into a terminal session by hand or written into a script that runs before the program that uses them, and that usually means they have to be documented, too — and well enough that someone else running the program (or even a future version of yourself) will be able to set and use them properly. Sometimes environment variables are just what you need, but they’re also one more thing that needs to be managed.
Beyond just documentation and management, there’s also the problem of being able to see what their values are when you need to. Now and then, for example, it’s helpful to be able to determine how a running application is configured — which account it’s using to connect to the database, which API key it’s using to interact with a third-party API service, and so on. If you happen to have direct, root-level access to the physical or virtual machines running your applications, you can sometimes remote into them and run commands to inspect their environments — but today, with modern cloud architectures and security practices as they are, that’s a lot harder than it used to be, and for good reason. As of now, if you had to diagnose a configuration problem with our beloved health checker in production, you’d have to dig into the JavaScript source code of the program in the AWS Lambda Console.
What you need, then, is a way to configure your cloud environments easily, independently, and in a self-documenting way — i.e., in code — that can be checked into a version control system safely and inspected by anyone else on the team. And as you’ll see, Pulumi’s configuration fits that bill pretty well.
Introducing Pulumi config
Section titled “Introducing Pulumi config”Out of the box, Pulumi includes a powerful and flexible key-value based configuration system that makes it easy to manage variability between stacks and deployments. For our purposes in this chapter, the task at hand is pretty straightforward: we need to configure the dev and production stacks of the health checker to monitor two different API endpoints, and we need to prevent the Webhook URL from being exposed in plain text. To do this, we’ll start by replacing the three values currently managed with environment variables — schedule, siteURL, and webhookURL — with values managed with Pulumi configuration.
Configuring the dev stack
Section titled “Configuring the dev stack”Start by making sure you’re in the same directory as the health-checker project’s Pulumi.yaml file, then run the following Pulumi commands to select the dev stack and configure the health-check interval and endpoint URL. (We’ll deal with the slightly-more-complicated Webhook URL value in a moment.)
$ pulumi stack select dev
$ pulumi config set schedule "rate(1 minute)"$ pulumi config set siteURL "https://pulumibook.com/ch03/health-checker/api/dev"
If all goes well, these commands will return silently (i.e., with no output). You can confirm both values were set by running pulumi config to list all config values or pulumi config get to emit just one of them.
$ pulumi configKEY         VALUEaws:region  us-west-2schedule    rate(1 minute)siteURL     https://pulumibook.com/ch03/health-checker/api/dev
$ pulumi config get schedulerate(1 minute)Now update the contents of index.ts to change the lines highlighted below, which import the @pulumi/pulumi library, create a new instance of pulumi.Config, and read the values of schedule and siteURL you just set with pulumi config set.
import * as pulumi from "@pulumi/pulumi";import * as aws from "@pulumi/aws";import got from "got";
const config = new pulumi.Config();const schedule = config.get("schedule");const siteURL = config.get("siteURL");const webhookURL = process.env.WEBHOOK_URL;
if (!schedule || !siteURL || !webhookURL) { throw new Error("Missing one or more required variables.")}
const handler = new aws.lambda.CallbackFunction("subscription", { policies: [aws.iam.ManagedPolicy.AWSLambdaBasicExecutionRole], callback: async () => { try { const response = await got(siteURL); console.log(`Site's up! Status was ${response.statusCode}.`); } catch(error) { const status = error.response.statusCode; const message = JSON.parse(error.response.body).message;
try { const response = await got.post(webhookURL, { json: { username: "health-check", icon_emoji: ":scream:", text: `${siteURL} returned HTTP ${status} (${message}).` } }); } catch(error) { console.error(`Error posting to Slack: ${error}`); } } },});
aws.cloudwatch.onSchedule("subscription", schedule, handler);1 | Imports @pulumi/pulumi, which defines the pulumi.Config class. |
5 | Creates an instance of pulumi.Config. |
6 | Uses the get() method to read the schedule variable configured for this stack. |
7 | Uses the get() method again to read the value of siteURL. |
With these modifications in place, and with the dev stack selected, you can run pulumi up to bring the stack back into existence. (Once again, I’m suppressing some output to focus on the more-relevant details.)
$ pulumi upPreviewing update (dev)...
Updating (dev)
View live: https://app.pulumi.com/cnunciato/health-checker/dev/updates/1
...     Type                                         Name                Status +   pulumi:pulumi:Stack                          health-checker-dev  created +   └─ aws:cloudwatch:EventRuleEventSubscription subscription        created ...
Resources:    + 8 created
If all goes well, you should see the stack and its resources were created, which by now should come as no surprise. But when you follow the link to the update in the Pulumi Cloud console, you should see (on the Configuration tab) that the two new values have been applied to health-checker/dev, as shown in Figure 4.1.
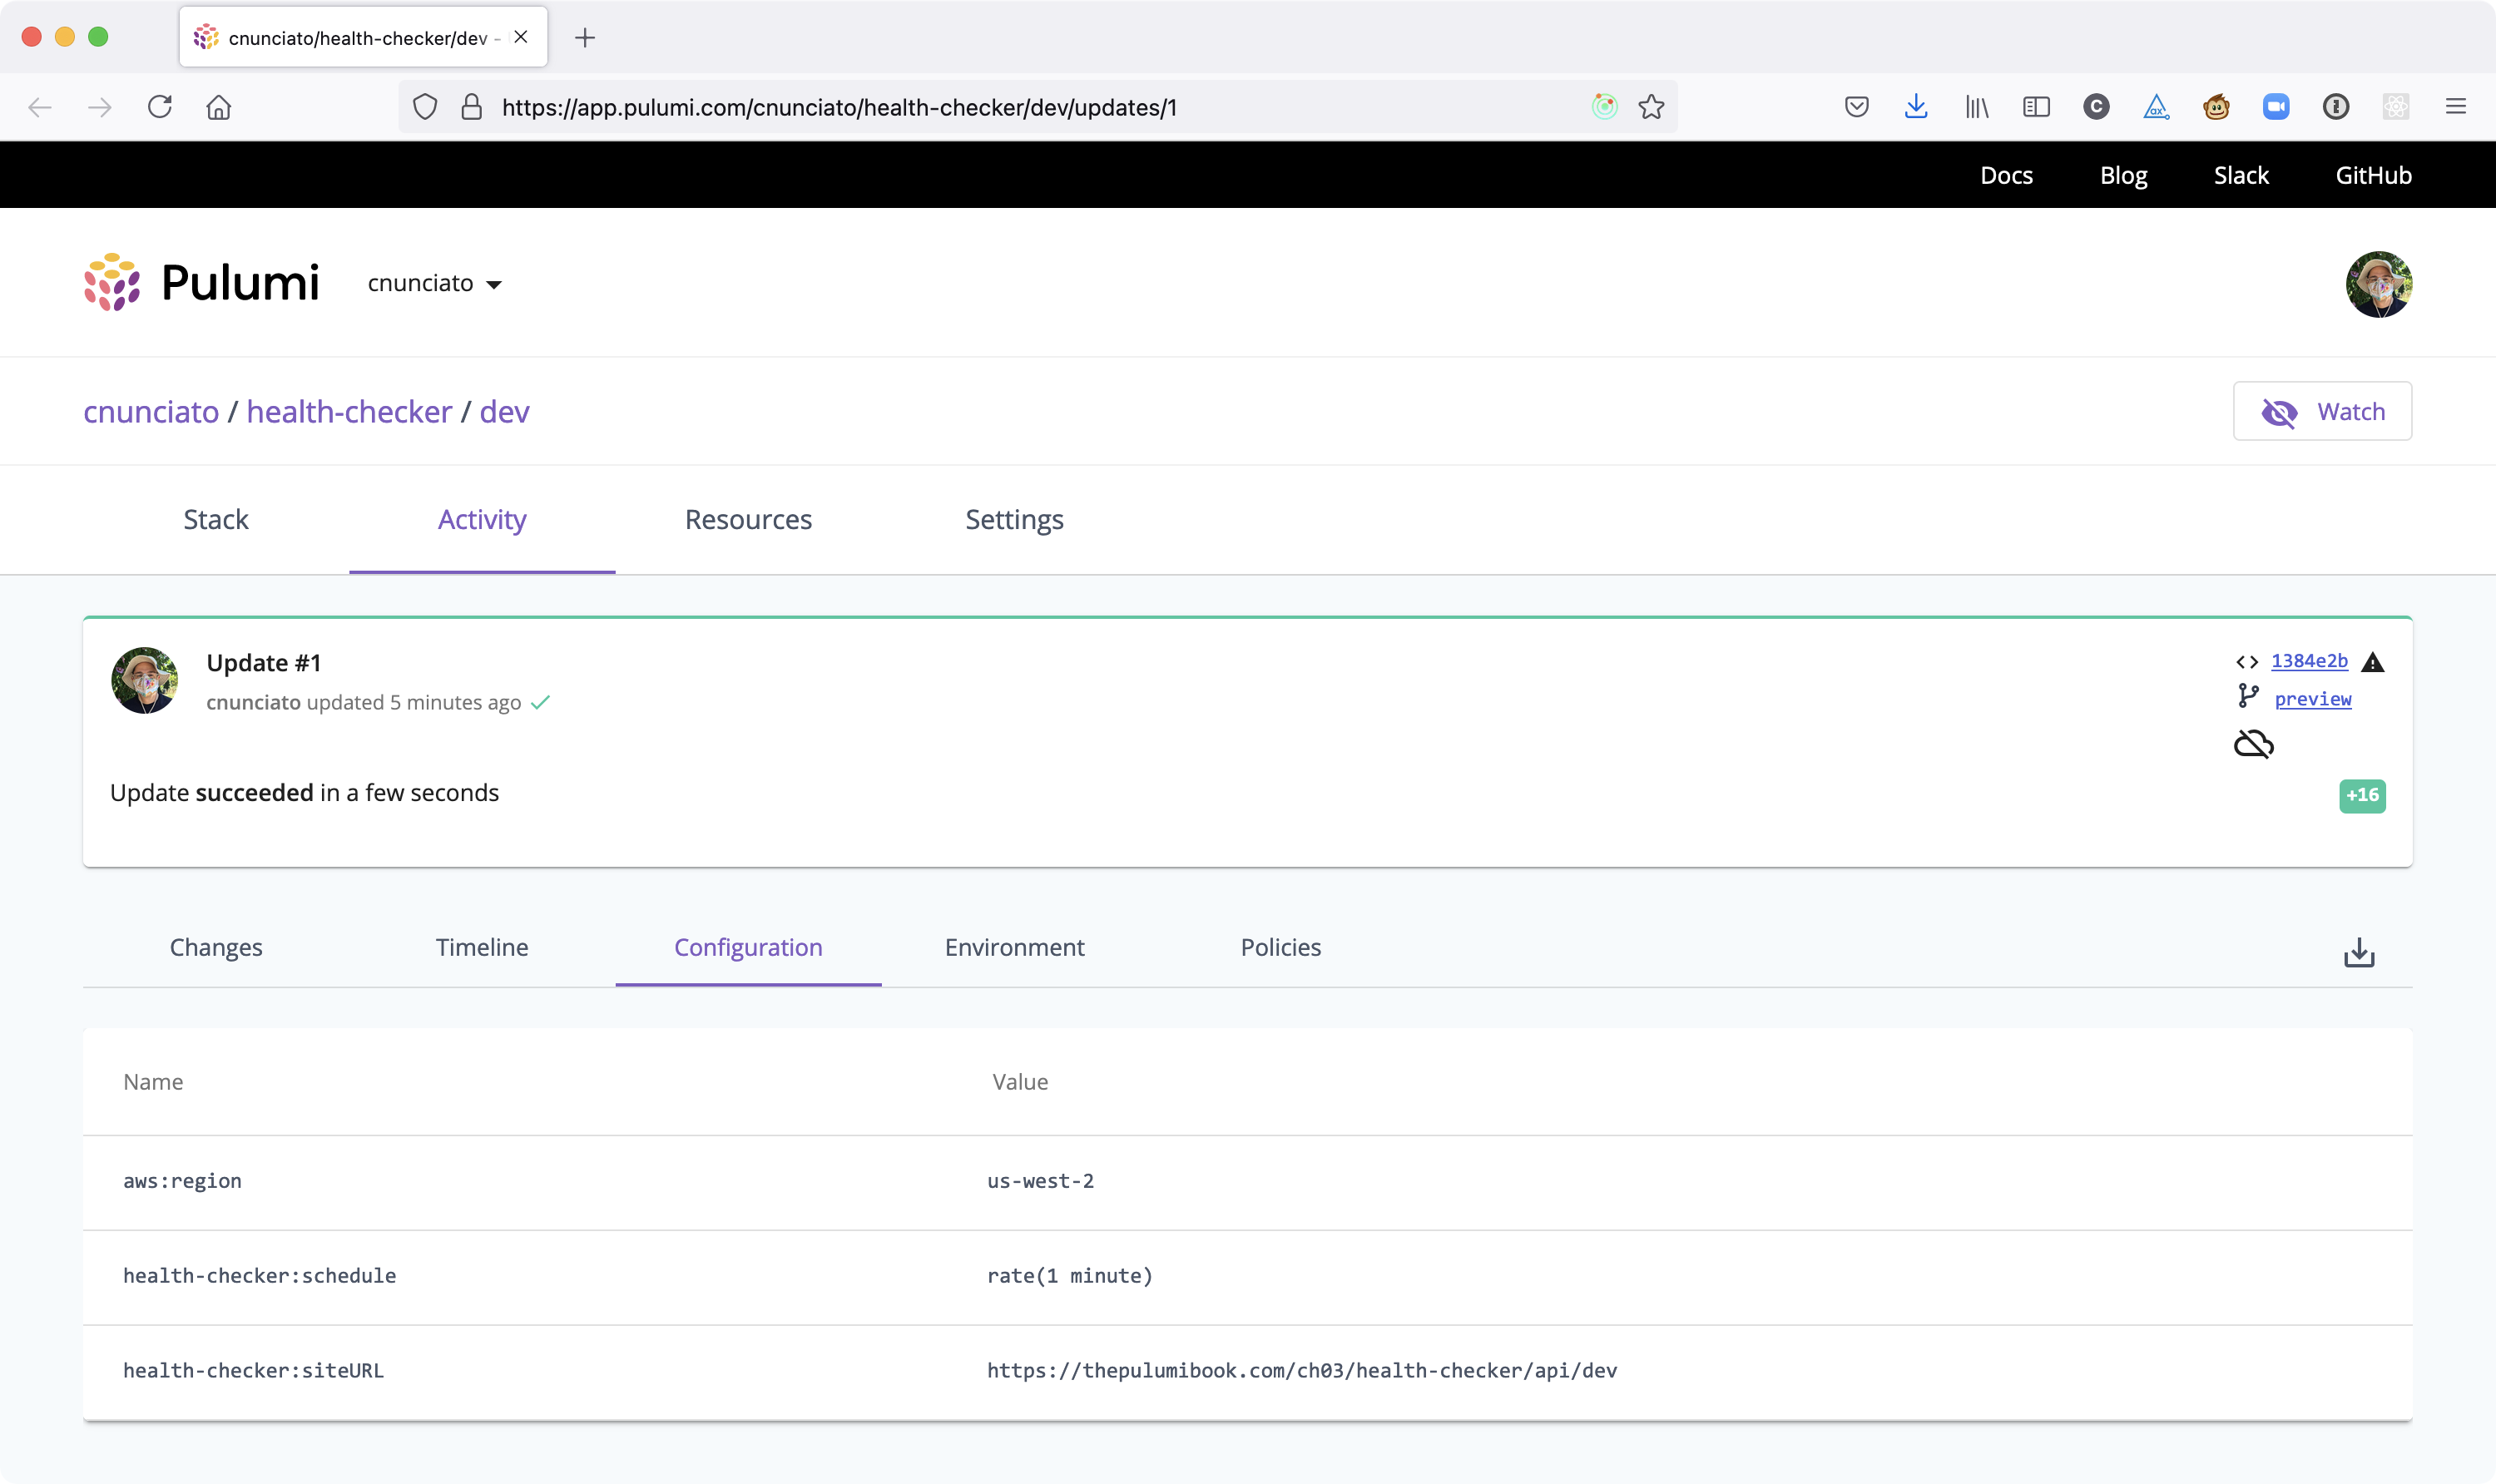
Figure 4.1: The Configuration tab of the dev stack, showing two new configuration items.
What’s nice about this is that it means you or anyone else with access to this stack can see how it’s configured anytime, just by visiting the Pulumi Cloud console — an easy solution to the problem of environment inspection I mentioned earlier.
You might be wondering, though, how those values actually got there. Were they written to Pulumi Cloud when you ran pulumi config set, or at some time later, like when you ran pulumi up?
It’s actually the latter. Before you ran pulumi up, the new configuration values had been applied only locally; you could use them to develop and test with, but they wouldn’t be written to Pulumi Cloud until later, specifically on update. If you’d visited the Pulumi Cloud console after running config set but before running up, you would’ve seen only aws:region in the list — which is a good thing, because it means you can develop and iterate on a given stack locally, and preview regularly, without having to worry about affecting anything that’s already been deployed.
Running pulumi config set simply wrote those values to the dev stack’s configuration file. Go ahead and open Pulumi.dev.yaml and you’ll see all three values listed there now, sorted alphabetically by namespace and key.
config: aws:region: us-west-2 health-checker:schedule: rate(1 minute) health-checker:siteURL: https://pulumibook.com/ch03/health-checker/api/devSo that’s how it works. When you run a Pulumi program with preview or up, the pulumi.Config references in that program are resolved using the entries in the selected stack’s configuration file, and when you run pulumi config commands with the CLI, you’re writing to (or reading from) that same configuration file. That’s what allows you to develop and iterate locally. When you deploy with pulumi up, Pulumi performs the deployment using the values in that file, and then persists the resulting stack state, along with all of the entries in that file, to Pulumi Cloud.
You can edit these files manually if you like — although it’s usually a good idea to use config set instead, to guard against typos, syntax errors, and the like — and you can, and generally should, check these files into version control as well, so that anyone you’re collaborating with will be able to read and extend them.
At this point you’re probably wondering what we’re going to do about that Webhook URL. We’ll get to that next — but first, let’s take a quick moment to cover a few more options you have for working with other kinds of not-so-sensitive configuration data.
Configuring with more than just strings
Section titled “Configuring with more than just strings”You’ve seen how easy it is to use the Pulumi CLI and SDK to configure your stacks with simple strings, and in practice, strings are often all you really need to get by. But with Pulumi, you can configure your stacks just as easily with other types of data, including:
- Numeric values
- Boolean values
- Structured data, such as arrays, maps, etc.
You don’t have to do anything special on the command line to work with numbers or booleans — you just set them like you would a regular string:
$ pulumi config set some_number 8$ pulumi config set some_boolean trueFor structured data, though, it’s a bit more cumbersome in that you need to specify the hierarchical position of the key-value pair that you want to set using the --path option relative to the configuration root. For example, if you wanted to set a JSON object like this one and be able to use it in your program:
{ "some_object": { "some_inner_key": "some_value" }}… you’d need to specify the position of some_inner_key as a child of some_object, and by doing so implicitly create the some_object parent:
$ pulumi config set --path some_object.some_inner_key some_value
$ pulumi configKEY          VALUEsome_object  {"some_inner_key":"some_value"}
Similarly, to read the value of a structured-data property, you’d use --path as well:
$ pulumi config get --path some_object.some_inner_keysome_valueFor arrays, it’s the same idea — although you might need to wrap the key name in quotes, depending on whether your shell interprets brackets (as mine does) in a special way:
$ pulumi config set --path 'some_array[0]' 1$ pulumi config set --path 'some_array[1]' 2And multi-line string values can be set by piping to standard input:
$ echo "somemulti-linestring" | pulumi config set some_multiline_string
$ cat Pulumi.dev.yamlconfig:  ...  health-checker:some_multiline_string: |-    some    multi-line    string  ...
As you saw in Listing 4.1, reading these values in your program is as easy as using the get method of a pulumi.Config instance. However, when you look closely at the signature of that method, you’ll see that it returns either string or undefined (the latter for items that don’t exist), as shown in Figure 4.2.
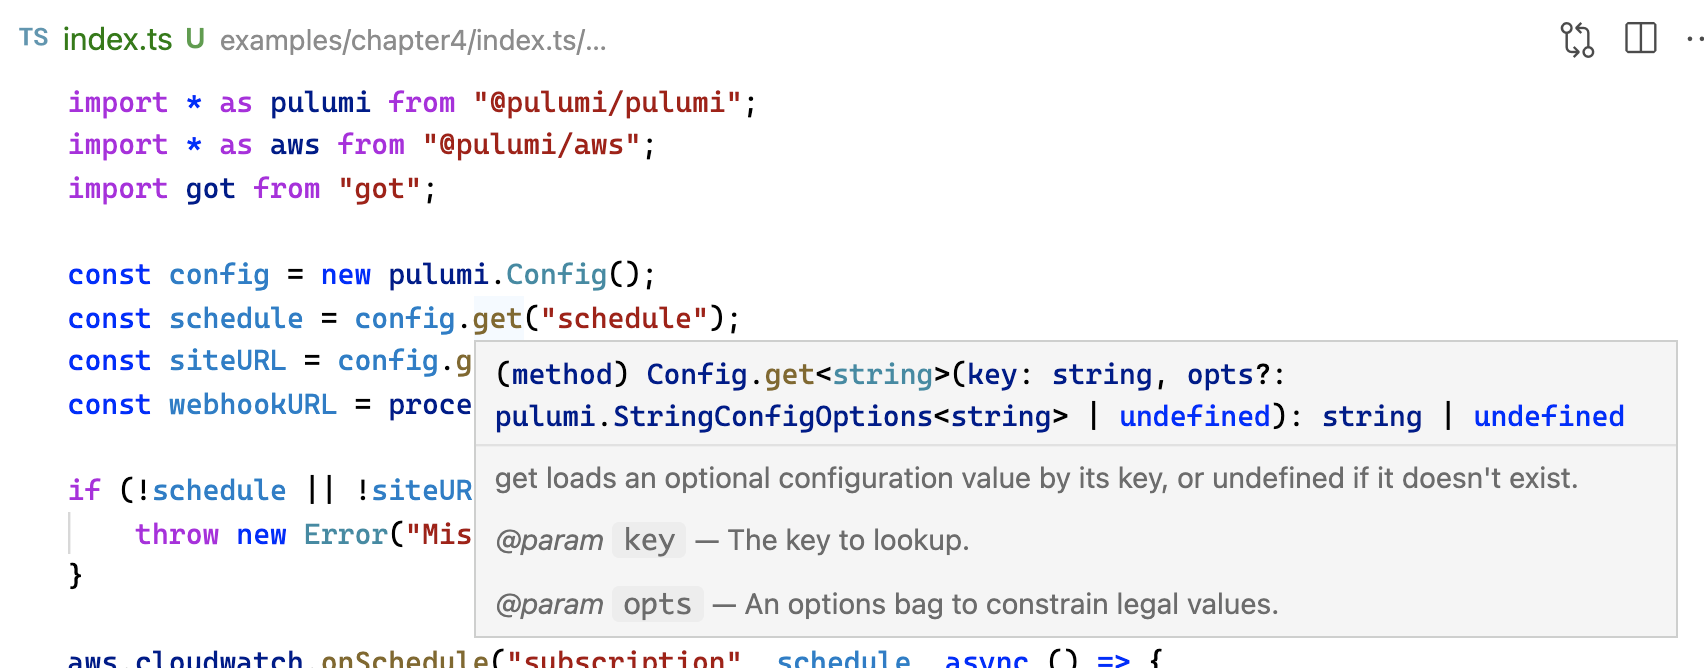
Figure 4.2: The type signature of the Config#get method.
For actual string values, returning a string is fine — but for numbers, booleans, and structured data, it’s much nicer to be able to work with them using their underlying types. If you were to log the types of the hypothetical values I just mentioned using config.get(), you’d see they were all pulled into the program as strings:
...console.log(typeof config.get("some_number"));console.log(typeof config.get("some_boolean"));console.log(typeof config.get("some_object"));console.log(typeof config.get("some_non_existent_item"));...$ pulumi up...Diagnostics: pulumi:pulumi:Stack (health-checker-dev): string string string undefinedSo to make it easier to work with properly typed configuration values, Pulumi provides a number of convenience methods that let you read, validate, cast, and even require those values all in a single method call. The set of Config methods prefixed with get either return typed values when they exist or undefined when they don’t, or throw errors when they do exist, but can’t be cast successfully. For example:
console.log(typeof config.get("some_non_existent_item"))// undefined
console.log(typeof config.getNumber("some_non_existent_item"))// undefined
console.log(typeof config.getBoolean("some_number"))// error: Configuration 'some_number' value '8' is not a valid boolean
Another set of methods, those prefixed with require, go a step further to ensure that a given item both exists and has a valid value:
console.log(typeof config.require("schedule"))// string
console.log(typeof config.requireNumber("some_number"))// number
console.log(typeof config.requireBoolean("some_non_existent_item"))//  error: Missing required configuration variable 'some_non_existent_item'
There’s one more set of convenience methods to cover and you’ll make their acquaintance in the next section, as we figure out how to deal with that pesky Webhook URL.
Introducing Pulumi secrets
Section titled “Introducing Pulumi secrets”You’ve seen how easy it is to post messages into a Slack channel with the Slack API; all you need is a Webhook URL and a properly formatted bit of JSON, and that’s it — no usernames, passwords, or access tokens required. But that also means anyone with that Webhook URL can post directly into your Slack workspace, and that’s not great. So in most cases, you’ll probably want to protect that URL in a way that lets only the people you trust gain access to it.
Pulumi makes this easy with secrets. To store a configuration item like the Webhook URL as a secret, all you need to do is pass the --secret option with pulumi config set, and Pulumi will encrypt the value using an encryption key specific to your stack1 before writing the encrypted value to the stack configuration file. Then, to read the secret value in your Pulumi program, you can use one of the secret methods of the Config class, which operate similarly to the methods we’ve already covered, albeit in a secret-specific way. Table 4.1 lists their names and return types.
Config Method | Returns |
|---|---|
getSecret | string or undefined |
getSecretBoolean | boolean or undefined |
getSecretNumber | number or undefined |
getSecretObject | object or undefined |
requireSecret | string |
requireSecretBoolean | boolean |
requireSecretNumber | number |
requireSecretObject | object |
And like their non-secret counterparts, all of these methods will raise an error when their corresponding value can’t be cast as the specified type successfully.
So let’s go ahead and fix up that Webhook URL now. In the terminal, make sure you’re still in the same directory as Pulumi.dev.yaml and that your shell still has the WEBHOOK_URL environment variable set, then use pulumi config set --secret to encrypt it:
$ echo $WEBHOOK_URLhttps://hooks.slack.com/services/...
$ pulumi config set --secret webhookURL $WEBHOOK_URLYou can confirm the value’s been applied as a secret in a few different ways. One is by inspecting the output of pulumi config, as below, which shows that the webhookURL now exists, its value masked with the word [secret]:
$ pulumi configKEY VALUEaws:region us-west-2schedule rate(1 minute)siteURL https://pulumibook.com/ch03/health-checker/api/devwebhookURL [secret]If you want to see what the secret value is, you can read it either by asking pulumi config to --show-secrets in plain text or by fetching the value specifically by name — which, again, only you can do, since only you have access to the unique encryption key that’s able to decrypt the value:
$ pulumi config --show-secretsKEY         VALUEaws:region  us-west-2schedule    rate(1 minute)siteURL     https://pulumibook.com/ch03/health-checker/api/devwebhookURL  https://hooks.slack.com/services/...
$ pulumi config get webhookURLhttps://hooks.slack.com/services/...
Another way to confirm a value’s been applied as a secret is just by opening and examining the contents of Pulumi.dev.yaml, which, as of now, should show the encrypted webhookURL in ciphertext:
$ cat Pulumi.dev.yaml
config:  ...  health-checker:webhookURL:    secure: AAABAGB91Dicws+puNhH7keS8wyJ7U27CrGemjKZcQpxLVGKTcPRNgQIWG3[...]=
And again, even with secrets, it’s both safe and good practice to check these files into source control, because only you and those with access to the stack are able to decrypt and read them.
Lastly, you can browse to the stack in the Pulumi Cloud console and see its configuration. We’ll do that in a moment, once we’ve updated the program to use the secret we just set.
Updating the program to use the secret
Section titled “Updating the program to use the secret”One way to retrieve the newly configured secret to use in your program would be to use config.get(), like you’ve been doing up to now, by making the following change to replace the environment-variable reference:
const config = new pulumi.Config();const schedule = config.get("schedule");const siteURL = config.get("siteURL");const webhookURL = process.env.WEBHOOK_URL;const webhookURL = config.get("webhookURL");And indeed, this would work: if you made this change now and then ran pulumi up, you’d see that no changes were to be made, suggesting that Pulumi was able to decrypt and read the value successfully.
$ pulumi upPreviewing update (dev)
...Updating (dev)
     Type                 Name                Status     pulumi:pulumi:Stack  health-checker-dev
Resources:    8 unchanged
Afterward, you could even browse to the Pulumi Cloud console and see that value was being tracked as a secret there as well, as shown in Figure 4.3 — which would make sense, considering that’s how you applied it.
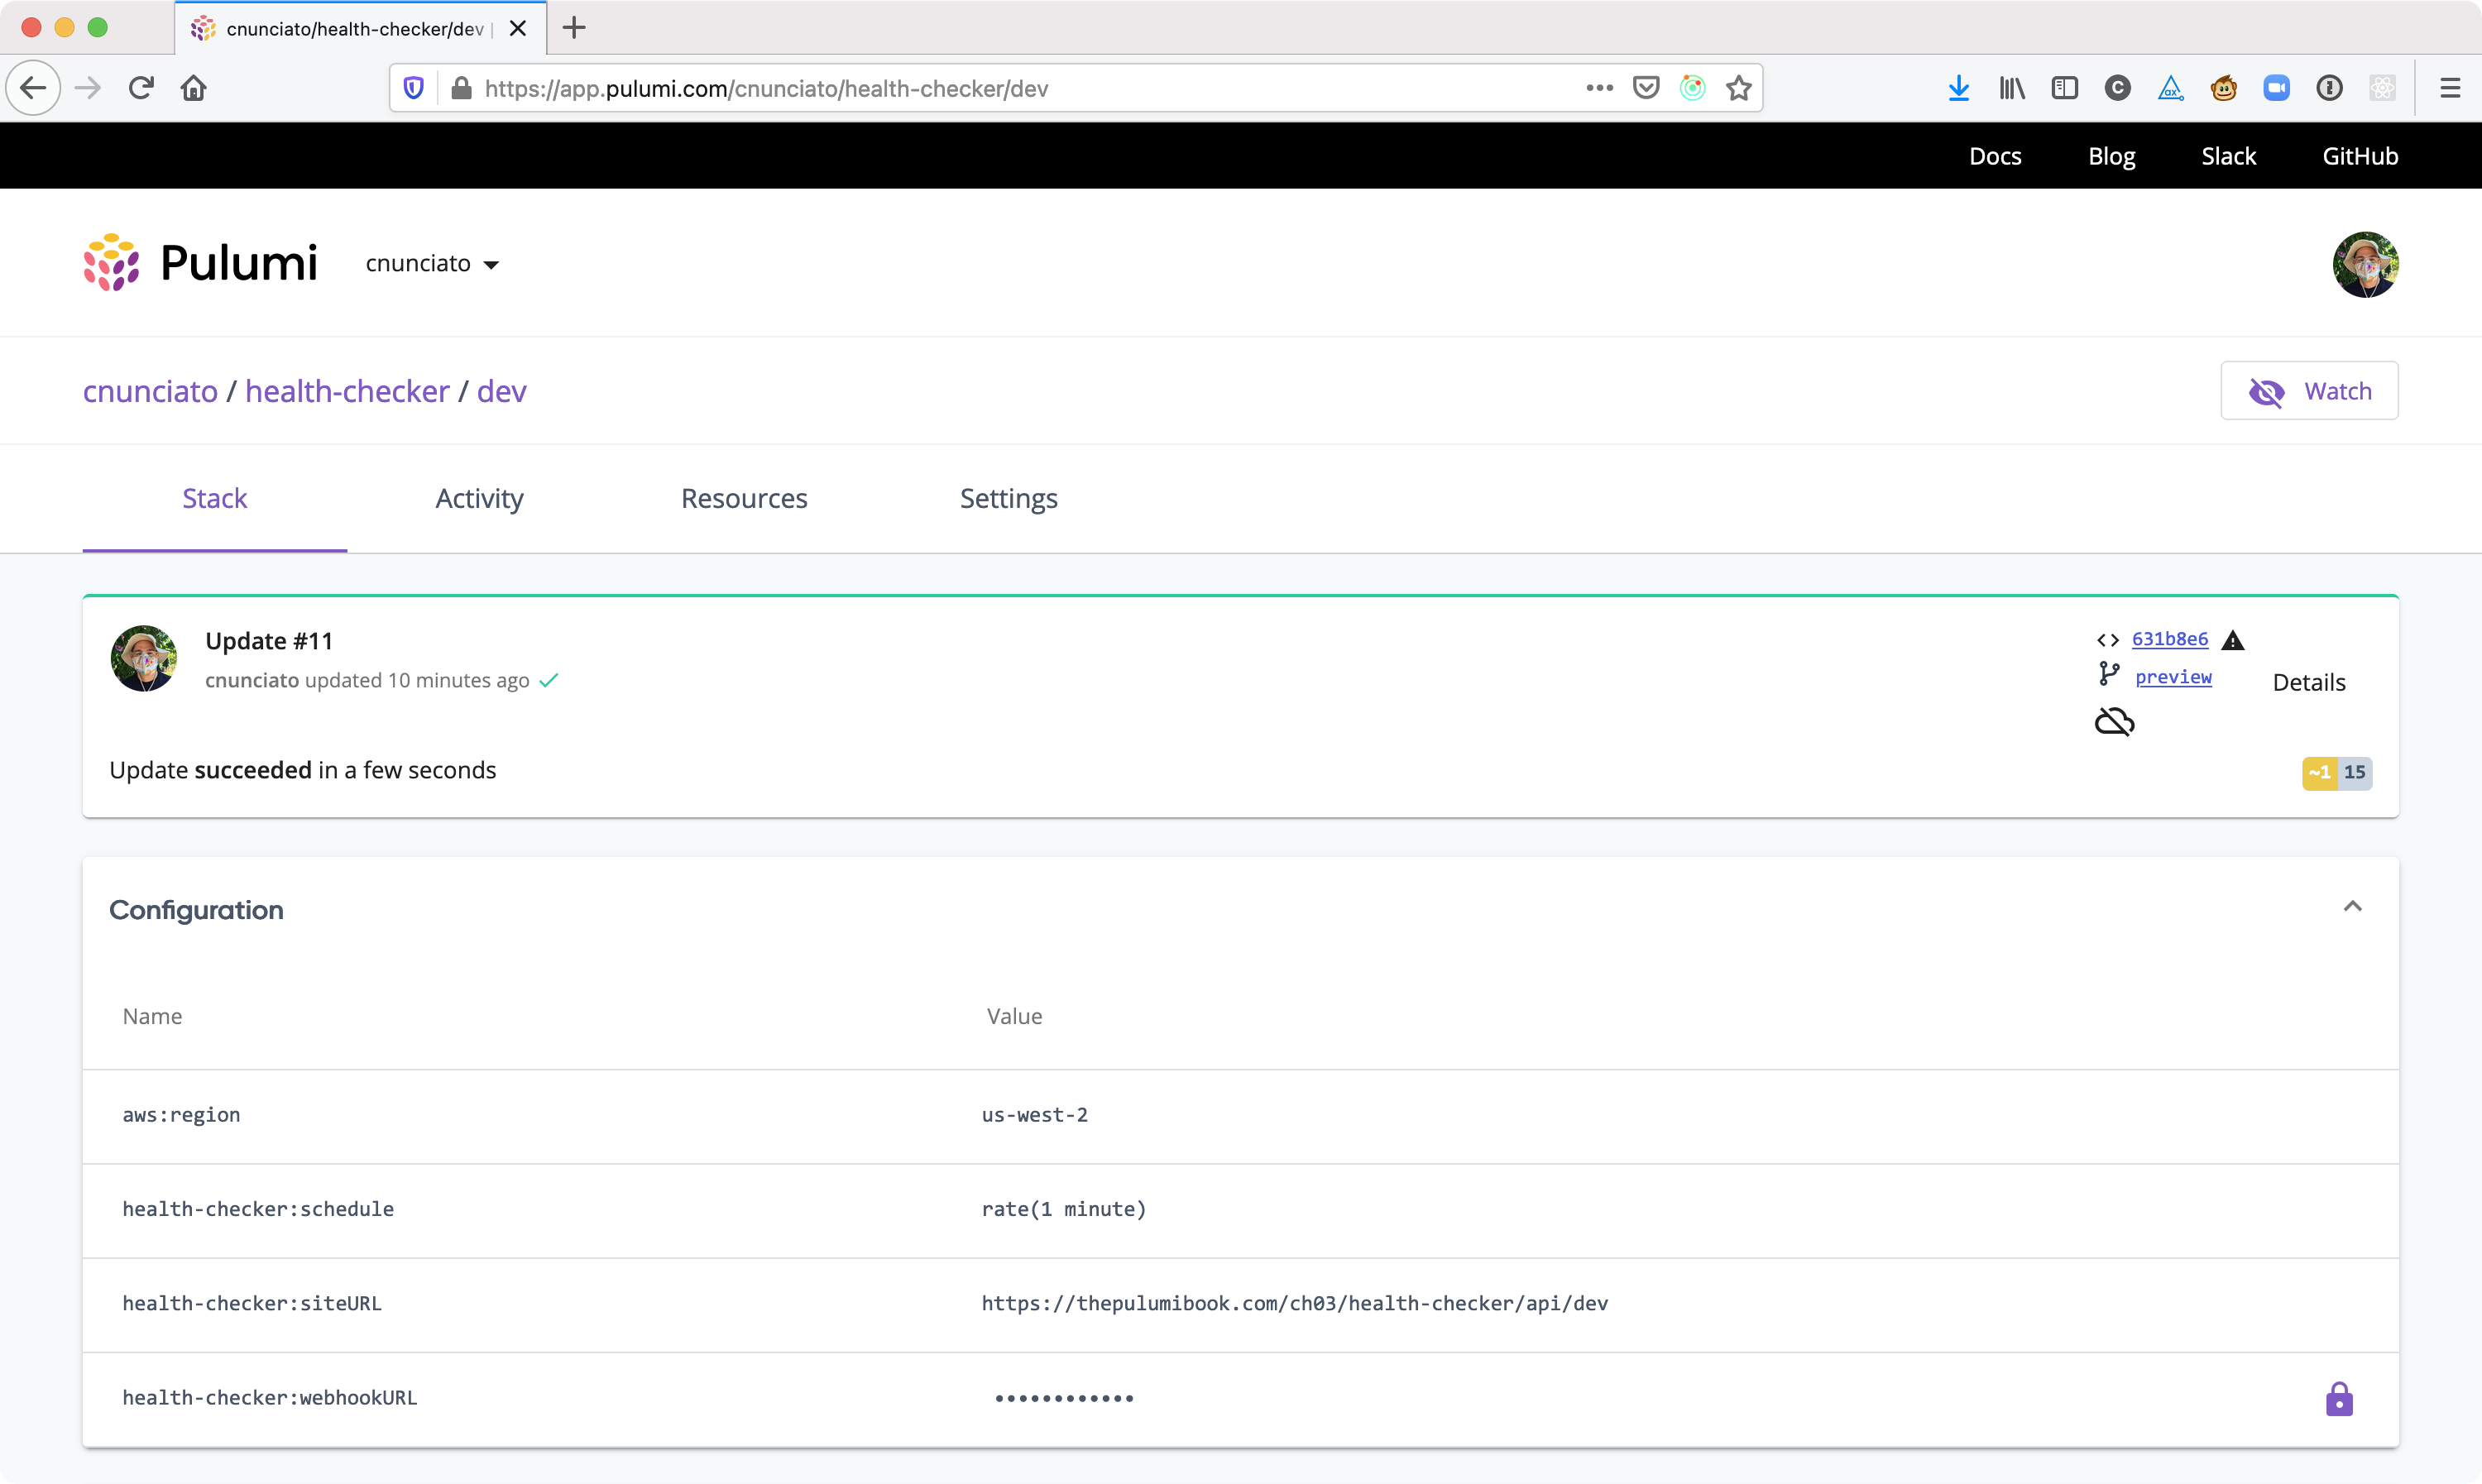
Figure 4.3: The updated configuration of the dev stack, showing webhookURL applied as a secret.
But while config.get() works, it’s not ideal, because as we saw earlier, the return type of that method is string | undefined, meaning it returns a regular, plain-text string — and plain-text strings are easily mishandled. You’ve already seen how easy it is to leak a secret into a Lambda through closure serialization, and we’ve all heard the stories of other programmers (certainly not us!) pushing their plain-text credentials to public repositories on GitHub, or unintentionally logging some sensitive value or other to standard out.
That’s why those secret methods I mentioned earlier exist. When you use a method like getSecret() to read a configuration value, you’re asking Pulumi to mark that value as a secret and track it as such throughout the life of your program — which it does by putting safeguards in place to prevent you from exposing it by accident.
Let’s see what happens when you update the program accordingly — and in fact, let’s make all three values required, so we can remove those truthiness checks (as require() will throw when a value is missing), and use requireSecret() to read the webhook URL instead. Go ahead and update the program now using Listing 4.3 as a guide.
```ts title=“Listing 4.3, index.ts: Updating the program to use require and requireSecret.” showLineNumbers ins={6-8}
import * as pulumi from “@pulumi/pulumi”;
import * as aws from “@pulumi/aws”;
import got from “got”;
const config = new pulumi.Config(); const schedule = config.require(“schedule”); const siteURL = config.require(“siteURL”); const webhookURL = config.requireSecret(“webhookURL”);
const handler = new aws.lambda.CallbackFunction(“subscription”, {
policies: [aws.iam.ManagedPolicy.AWSLambdaBasicExecutionRole],
callback: async () => {
try {
const response = await got(siteURL);
console.log(Site's up! Status was ${response.statusCode}.);
}
catch(error) {
const status = error.response.statusCode;
const message = JSON.parse(error.response.body).message;
try { const response = await got.post(webhookURL, { json: { username: "health-check", icon_emoji: ":scream:", text: `${siteURL} returned HTTP ${status} (${message}).` } }); } catch(error) { console.error(`Error posting to Slack: ${error}`); } }},});
aws.cloudwatch.onSchedule(“subscription”, schedule, handler);
As you make this change, if you're using an IDE that supports TypeScript validation, you'll immediately see that TypeScript is unhappy (see [Figure 4.4](#squiggle)), and that it seems to have something to do with `webhookURL`.
<a id="squiggle"></a>
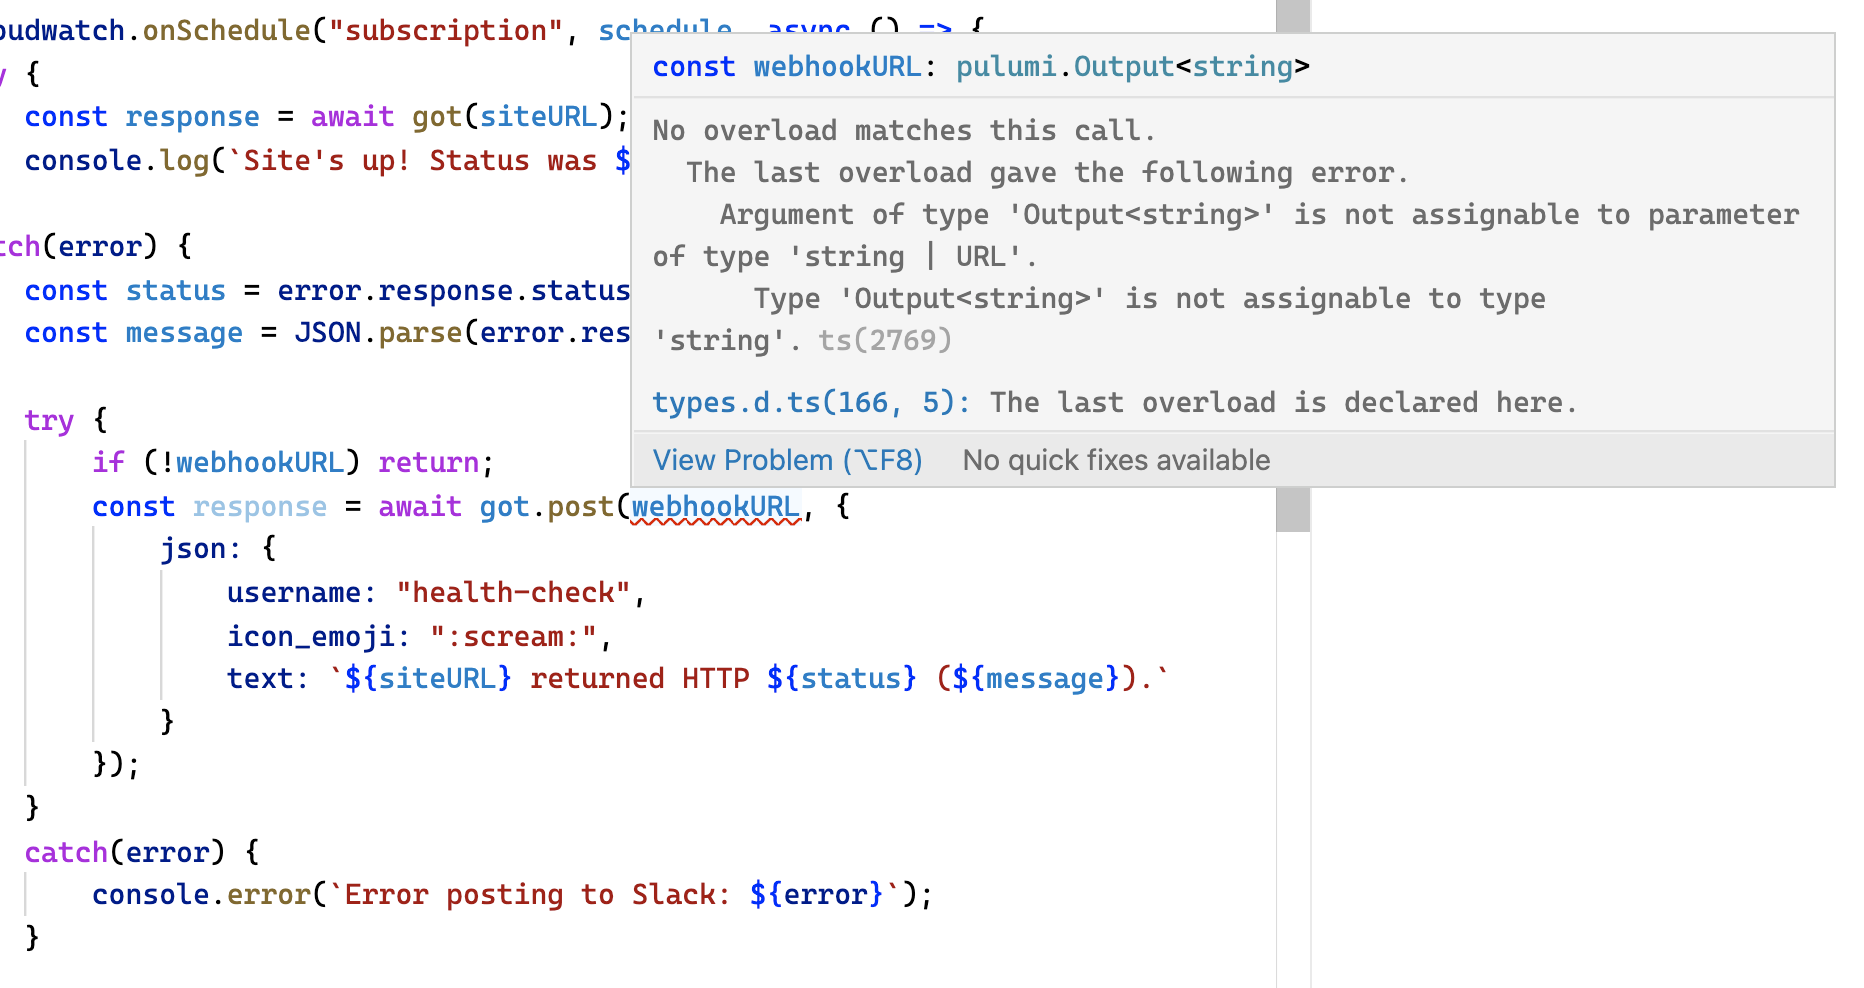
*Figure 4.4: Type `string` is apparently not assignable to type `Output<string>`.*
The problem here is that the value returned by `requireSecret()` is not just a simple string anymore, but an `Output<string>`, which isn't compatible with the string that `got.post()` is expecting. That explains the validation error — but why `Output<string>`?
Earlier on, you were told you could think of Outputs as promise-like objects meant to capture future values. Here, though, the value is definitely known: you just saw so a moment ago when you read it synchronously with `config.get()`. Why all of a sudden is the value an `Output` instead of a `string`?
The gist is that by wrapping secrets as `Output`s, Pulumi can track them differently within the running program, and by doing so grant you additional protection from exposing them accidentally — something it wouldn't be able to do if those values were simple strings.
You can verify this in a handful of ways. Try updating the program now, for example, to use `Output#get`, the same method you used in Chapter 2 to obtain the generated Amazon Resource Name (ARN) of the SNS topic your callback needed to publish to. The `get()` method exposes the _eventual_ value of an `Output` to code that runs sometime after deployment — e.g., in an AWS Lambda callback. Go ahead and make the changes highlighted below, then run `pulumi up` — and notice we aren't _quite_ out of the woods yet:
```ts ins={4}...try { if (!webhookURL) return; const response = await got.post(webhookURL.get(), { json: { username: "health-check", icon_emoji: ":scream:", text: `${siteURL} returned HTTP ${status} (${message}).` } });}...$ pulumi upPreviewing update (dev)... Type Name Info pulumi:pulumi:Stack health-checker-dev └─ aws:lambda:Function subscription 1 warning
Diagnostics: aws:lambda:Function (subscription): warning: A secret value was captured and serialized into the body of the Lambda Function 'subscription'. This value will be stored as an encrypted Pulumi secret, but may be available in plain text inside the AWS deployment package. You can use 'pulumi.unsecret' to convert the value to a non-secret value if this is not a sensitive value, or else use Secrets Manager or environment variables to pass the sensitive data to your function.
Do you want to perform this update? yes> no detailsHm. Now what?
Keeping secrets secret
Section titled “Keeping secrets secret”You’re probably getting the picture that Pulumi will do all it can to prevent you from leaking secret values, and that’s what’s happening here. The warning is telling you that your function appears to have closed over a value that’s being tracked as a secret, and that as a result, it could end up containing the value in plain text. Figure 4.5 shows, for example, what you would see in the AWS Console if you chose to ignore this warning and proceed with the update anyway.
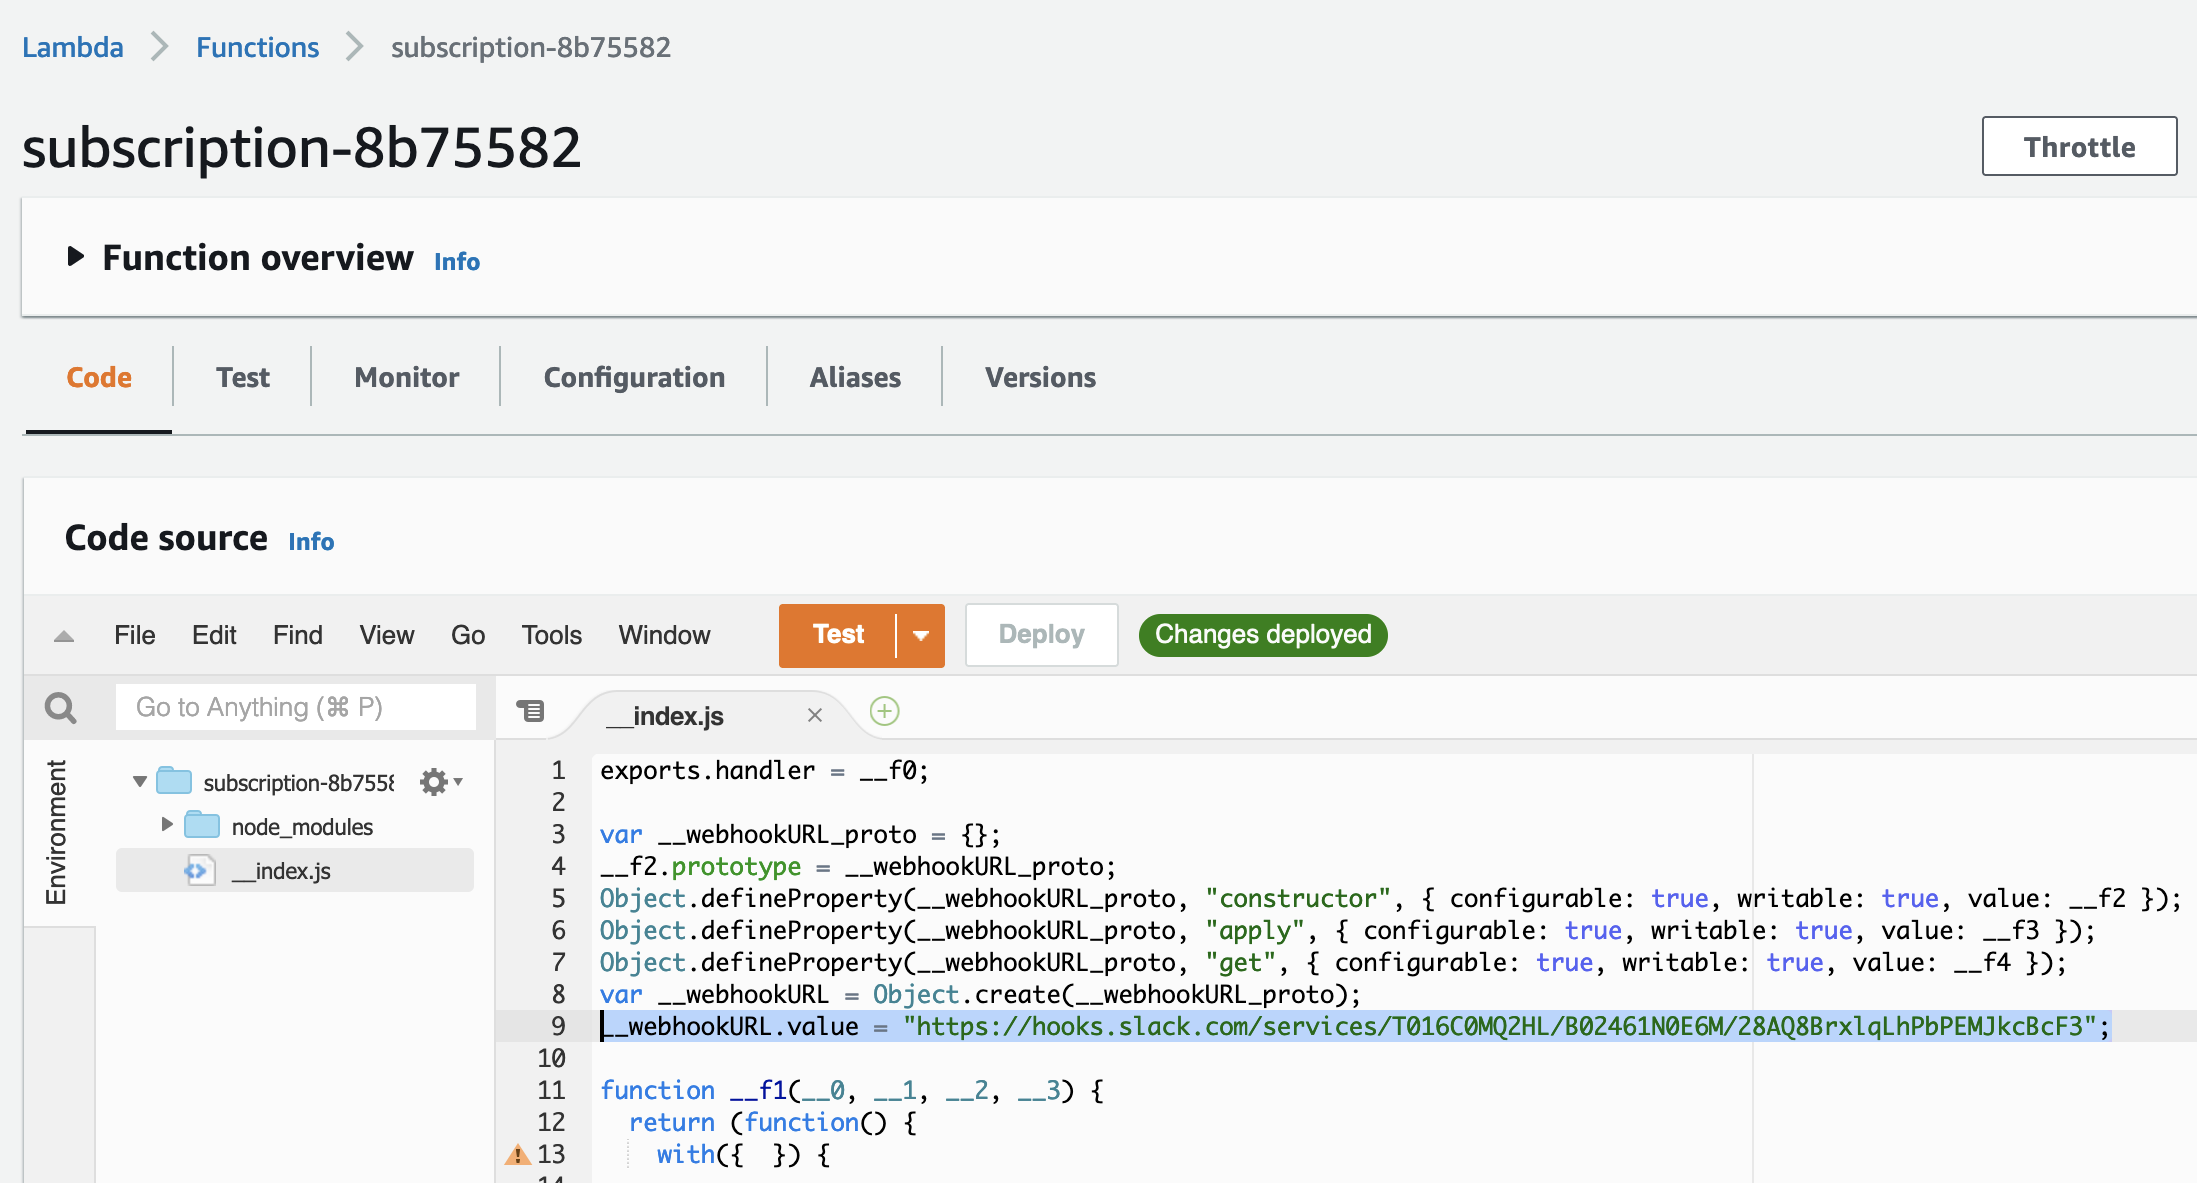
Figure 4.5: The Webhook URL value baked into the Lambda function.
Of course you could choose to proceed — technically, it’s just a warning. But you generally shouldn’t, for obvious reasons.
There may be times, though, when you know what you’re doing and actually do want to proceed anyway. In such situations, you can do as the warning suggests and use pulumi.unsecret to extract the raw value into a plain-text string,2 suppressing the warning and continuing on your merry way:
const config = new pulumi.Config();const schedule = config.get("schedule");const siteURL = config.get("siteURL");const webhookURL = config.requireSecret("webhookURL");const webhookURL = pulumi.unsecret(config.requireSecret("webhookURL"));But at best, that’s a workaround — and at worst, a serious problem. Ultimately, if you want to get that value out of the Lambda, you’re going to have to come up with a different approach.
Configuring with AWS environment variables
Section titled “Configuring with AWS environment variables”Up to now, you’ve been expressing Lambda functions concisely and idiomatically as inline arrow functions, and most of the time, that’s a great way to work: as JavaScript programmers, we certainly love our inline callbacks. But here, you’re in a bit of a bind in that the callback you’ve written needs to do something Pulumi is telling you that you probably shouldn’t be doing — or more accurately, that the function contains something it probably shouldn’t contain. But for the health checker to be able to do its job, it definitely needs that Webhook URL somehow.
What you need, then, is a way to provide the function with the value of webhookURL without letting that value get captured and serialized into the function uploaded to AWS Lambda. How do you do that?
Recall that when AWS Lambda ultimately executes this function, it does so with Node.js, and Node, as you’ve seen, lets you read variables from its runtime environment using the built-in process.env object. If you could somehow set the value of webhookURL in a way that exposed it as an environment variable at runtime — where “at runtime” means when AWS invokes the function later — you could read the value as an environment variable with process.env from within the body of the function, and avoid having to close over and serialize the raw value itself.
And as it turns out, AWS Lambda makes this pretty simple.3 With Lambda, you can specify any number of custom environment variables to expose to your function at runtime, and you can use Pulumi to set those variables easily as well. Even better, the API you need to do it is one you’ve already been using: aws.lambda.CallbackFunction.
So far, we’ve used CallbackFunction mainly as a way to keep our functions’ permissions scoped to least privilege — but there’s more to it than that. A closer look at the signature of aws.cloudwatch.onSchedule reveals4 that it accepts, as its third argument, any object of type aws.cloudwatch.EventRuleEventHandler — which includes both vanilla JavaScript functions and instances of aws.lambda.CallbackFunction, which is why we’ve been able to pass ours directly. See Figure 4.6 for details.
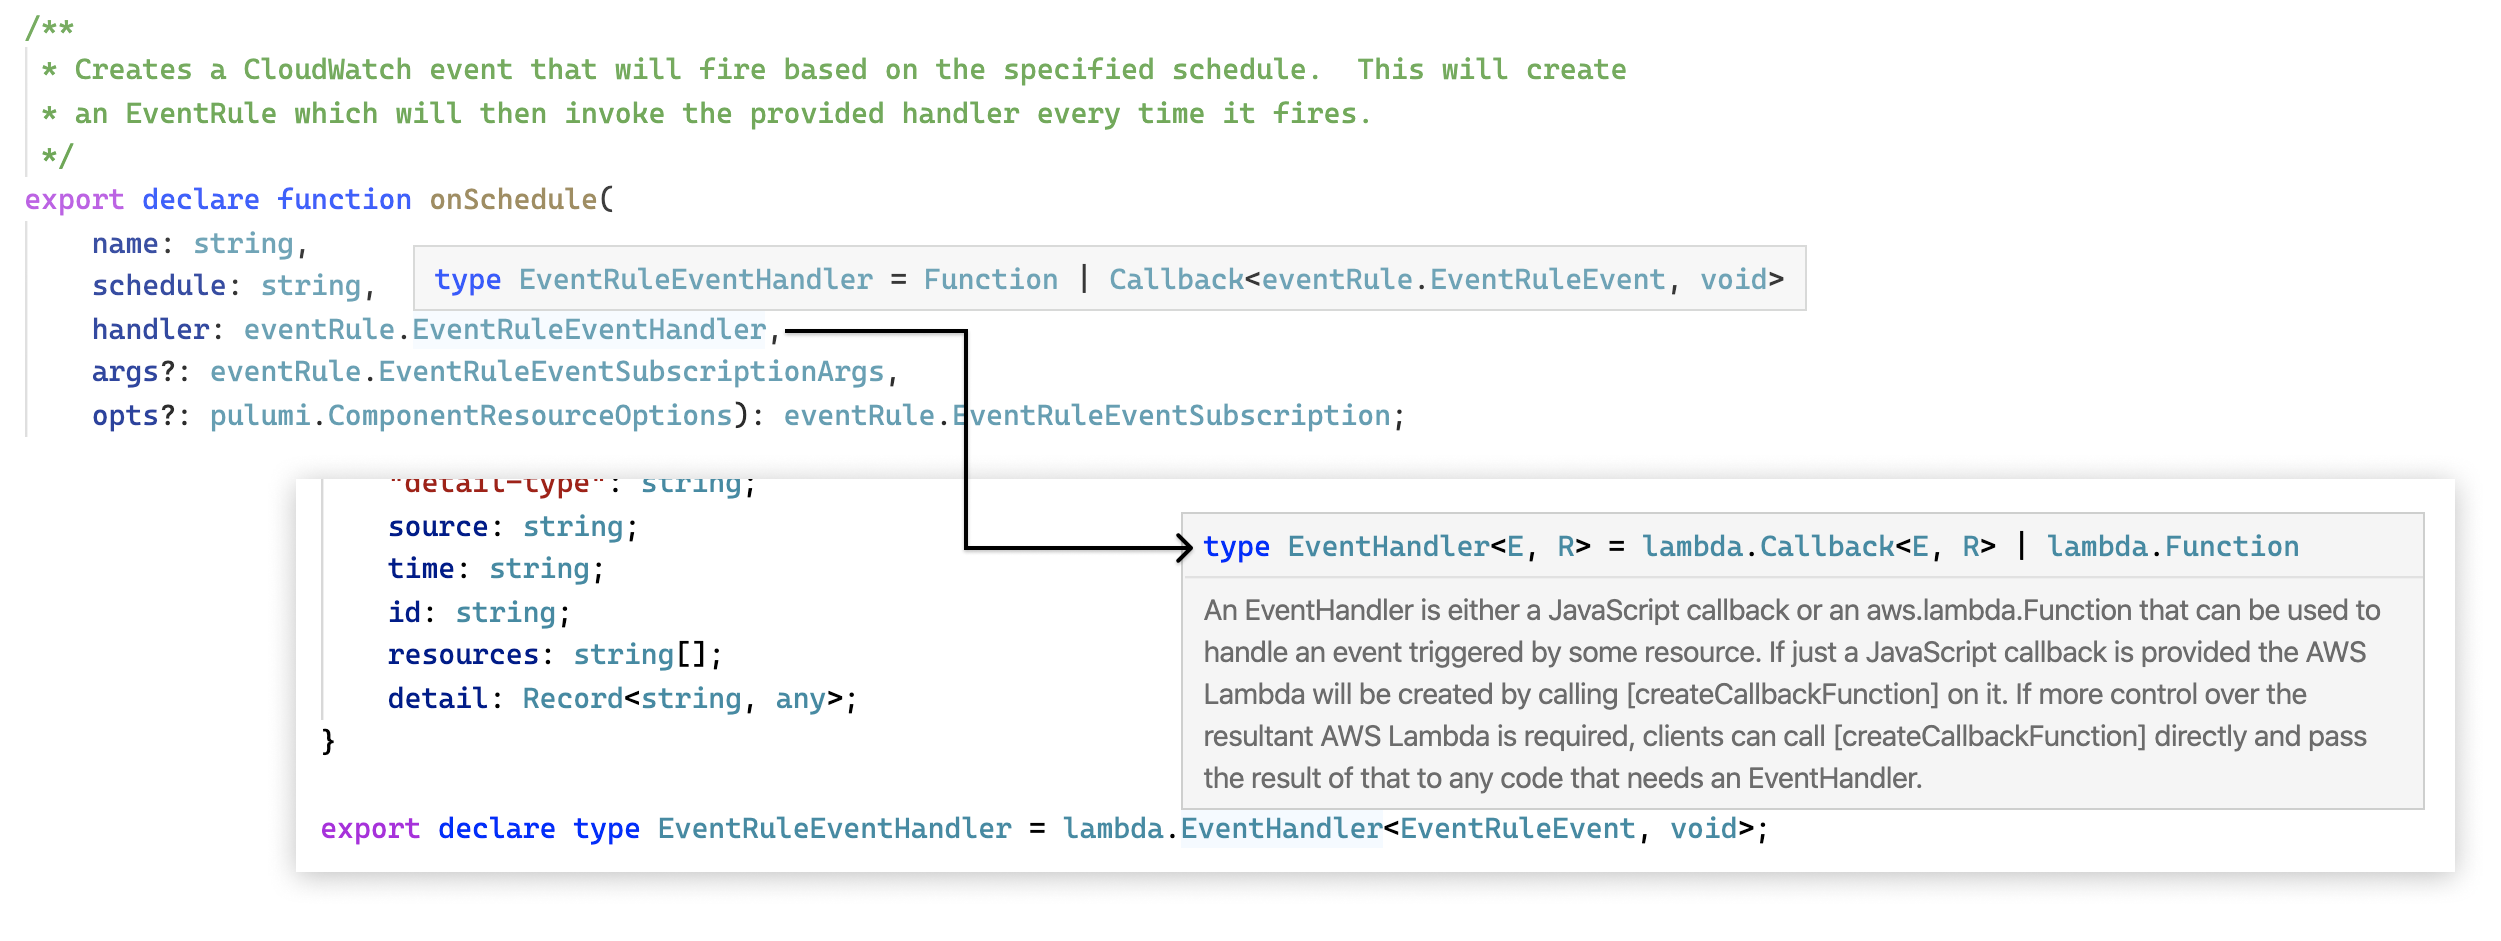
Figure 4.6: The EventRuleEventHandler resource definition.
Digging a bit deeper into the definition of aws.lambda.CallbackFunction, you’ll see that it extends aws.lambda.LambdaFunction — which itself extends an abstract class called pulumi.CustomResource, the base class from which nearly all Pulumi resource classes derive. Like all pulumi.CustomResources, a CallbackFunction accepts three arguments:
-
A name that uniquely identifies the resource within the scope of a project
-
A set of properties specific to the resource (
aws.s3.Bucket, for example, accepts awebsiteproperty) -
A set of options common to all Pulumi resources allowing for finer-grained, lower-level control over how those resources are configured and related to one another
Most of the resources you’ll manage with Pulumi will conform to this interface, which generally takes the following form:
const myResource = new provider.namespace.ResourceName( "my-resource", { someProperty: "someValue" }, { someOption: "someValue" });1 | The resource declaration, expressed as an object instantiation. |
2 | The resource name, unique in the scope of the project. |
4 | One of several input properties, often of type pulumi.Input<T>. |
6 | One of several options belonging to pulumi.CustomResourceOptions. |
If you put your cursor inside the CallbackFunction declaration you already have (again, if you’re using an IDE with TypeScript support), you can explore the full set of its input properties:
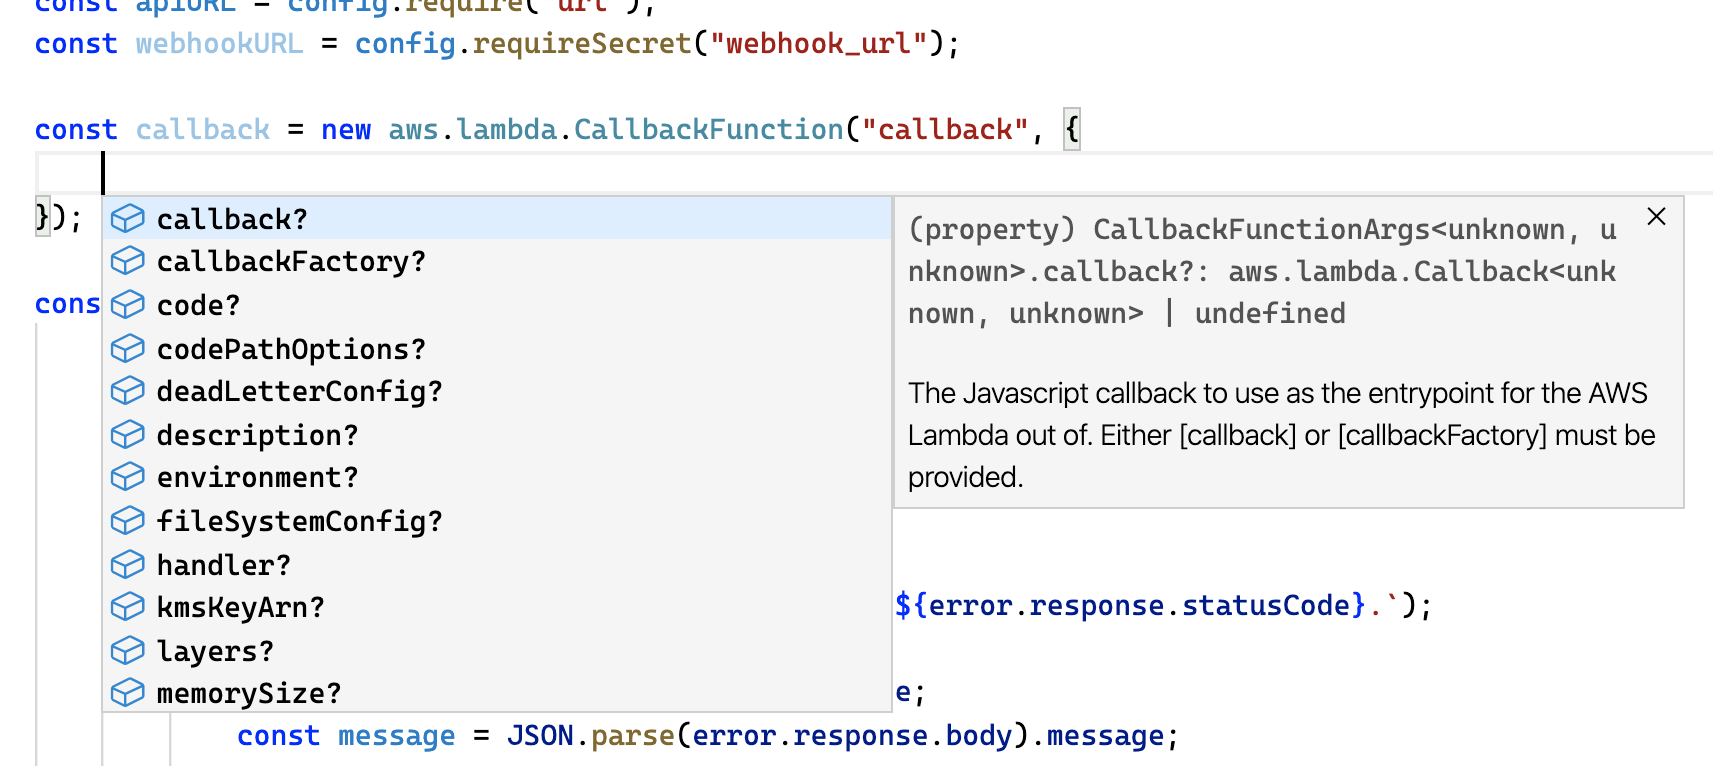
Figure 4.7: Declaring the callback instead as an aws.lambda.CallbackFunction.
I’ll often use this technique to get a sense of how to work with a given resource, particularly one I’m not familiar with yet. Here, notice that among the many input properties available for this resource, two in particular seem especially interesting: callback and environment. As the inline documentation suggests, the callback property can be used for defining the function itself (conveniently, as an inline arrow function, just as before), and the environment property can be used for supplying environment variables to be passed to the function when it’s invoked by AWS Lambda. Sounds just about perfect.
Listing 4.4 shows the finished program, then, extended to set the WEBHOOK_URL environment variable in AWS Lambda using the decrypted secret (more on this in a moment), and to read that variable at runtime with process.env.
import * as pulumi from "@pulumi/pulumi";import * as aws from "@pulumi/aws";import got from "got";
const config = new pulumi.Config();const schedule = config.require("schedule");const siteURL = config.require("siteURL");const webhookURL = config.requireSecret("webhookURL");
const callback = new aws.lambda.CallbackFunction("callback", { policies: [aws.iam.ManagedPolicy.AWSLambdaBasicExecutionRole], callback: async () => { const webhookURLFromEnv = process.env.WEBHOOK_URL;
if (!webhookURLFromEnv) { console.error("WEBHOOK_URL not set. Skipping."); return; }
try { const response = await got(siteURL); console.log(`Site's up! Status was ${response.statusCode}.`); } catch(error) { const status = error.response.statusCode; const message = JSON.parse(error.response.body).message;
try { const response = await got.post(webhookURLFromEnv, { json: { username: "health-check", icon_emoji: ":scream:", text: `${siteURL} returned HTTP ${status} (${message}).` } }); } catch(error) { console.error(`Error posting to Slack: ${error}`); } } }, environment: { variables: { WEBHOOK_URL: webhookURL } },});
aws.cloudwatch.onSchedule("subscription", schedule, callback);10 | Declares a new aws.lambda.CallbackFunction resource. |
11 | Keeps the function’s permissions scoped to least privilege, as usual. |
12 | Passes an inline function for the resource’s callback property. |
13 | Reads the WEBHOOK_URL environment variable from the Lambda runtime environment. |
15 | Exits early with an error if the variable isn’t set. |
29 | Passes the Webhook URL to Got for posting to Slack. |
44 | Sets the Webhook URL as an AWS Lambda environment variable. |
Now, go ahead and deploy these changes to the dev stack:
$ pulumi up
Previewing update (dev)...
Updating (dev)
     Type                          Name                   Status    Info +   aws:iam:Role                  callback               created +   aws:iam:RolePolicyAttachment  callback-58ed699a      created +   aws:lambda:Function           callback               created ~   aws:cloudwatch:EventTarget    subscription           updated   [diff: ~arn] +-  aws:lambda:Permission         subscription           replaced -   aws:iam:RolePolicyAttachment  subscription-58ed699a  deleted -   aws:lambda:Function           subscription           deleted -   aws:iam:Role                  subscription           deleted
Resources:    + 3 created    ~ 1 updated    - 3 deleted    +-1 replaced    8 changes. 3 unchanged
Duration: 20s
There’s a lot more going on in this update than in our previous ones, and it’s worth a moment to unpack. Because we renamed the function from subscription to callback, Pulumi treats the old function (and its role and policy attachment) as resources to be deleted and the new ones as resources to be created — and notice the order in which it does all this: the new resources are created first, the event target is updated to point to the new function, and only then are the old resources deleted. That’s a zero-downtime replacement, courtesy of the auto-naming behavior you learned about in Chapter 3, and it’s exactly what you’d want to happen in a production environment.
And within a few minutes, you should start seeing messages flow into Slack.
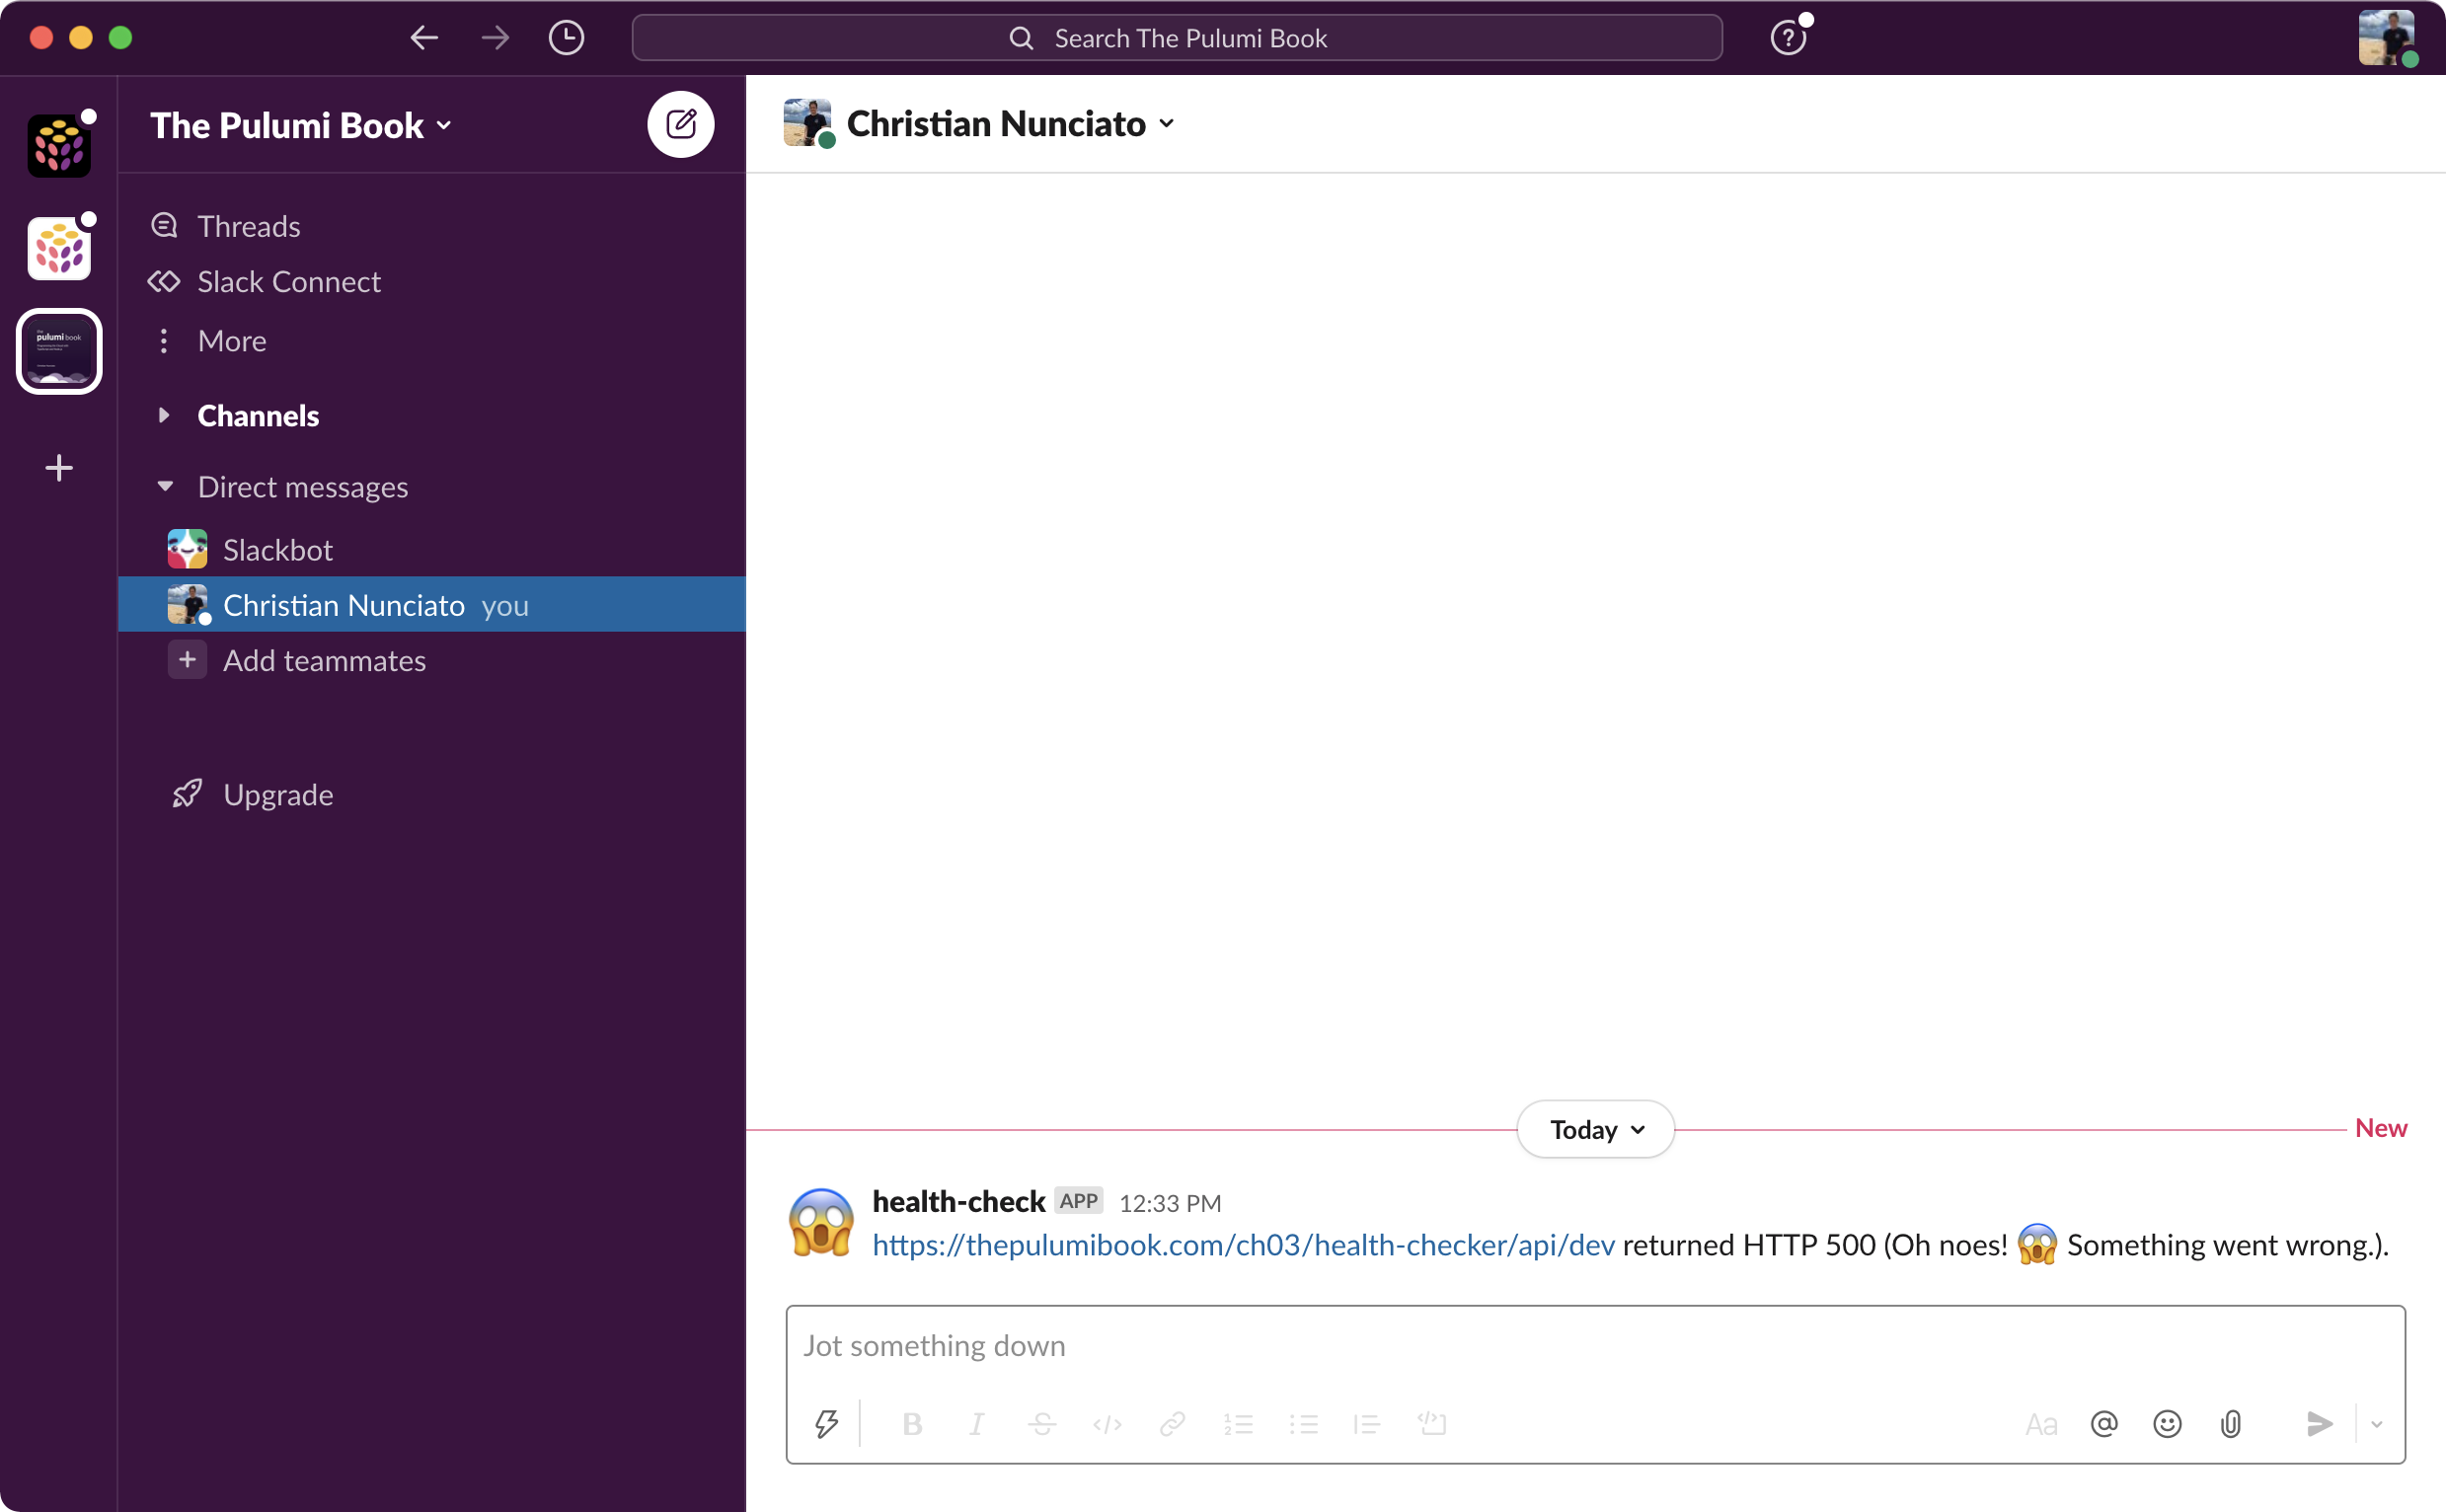
Figure 4.8: Health-check failure notifications in Slack for the dev stack.
And with that, the program itself is complete: with the dev stack refactored to use Pulumi configuration, all that’s left is to configure the production stack, which we’ll do next to close out the chapter.
Before we do, though, there’s just one more little thing to point out.
By setting the Webhook URL as an environment variable, you’ve managed to keep it out of the body of the Lambda, which is great. But since the value itself is applied in the AWS environment (at runtime, later, by AWS) as a plain-text string, and AWS Lambda lists the environment variables configured for a given function (including their values) alongside the function in the AWS Console, it’s still possible for someone with access to the AWS Console to see what those values actually are.
You can see this yourself by following the link to the stack in the Pulumi Cloud console, navigating to the Resources tab, and then clicking the link alongside the aws.lambda.Function resource to be taken directly to the function’s page in the AWS Console. There, you’ll see the Webhook URL key and value shown under Configuration > Environment Variables.
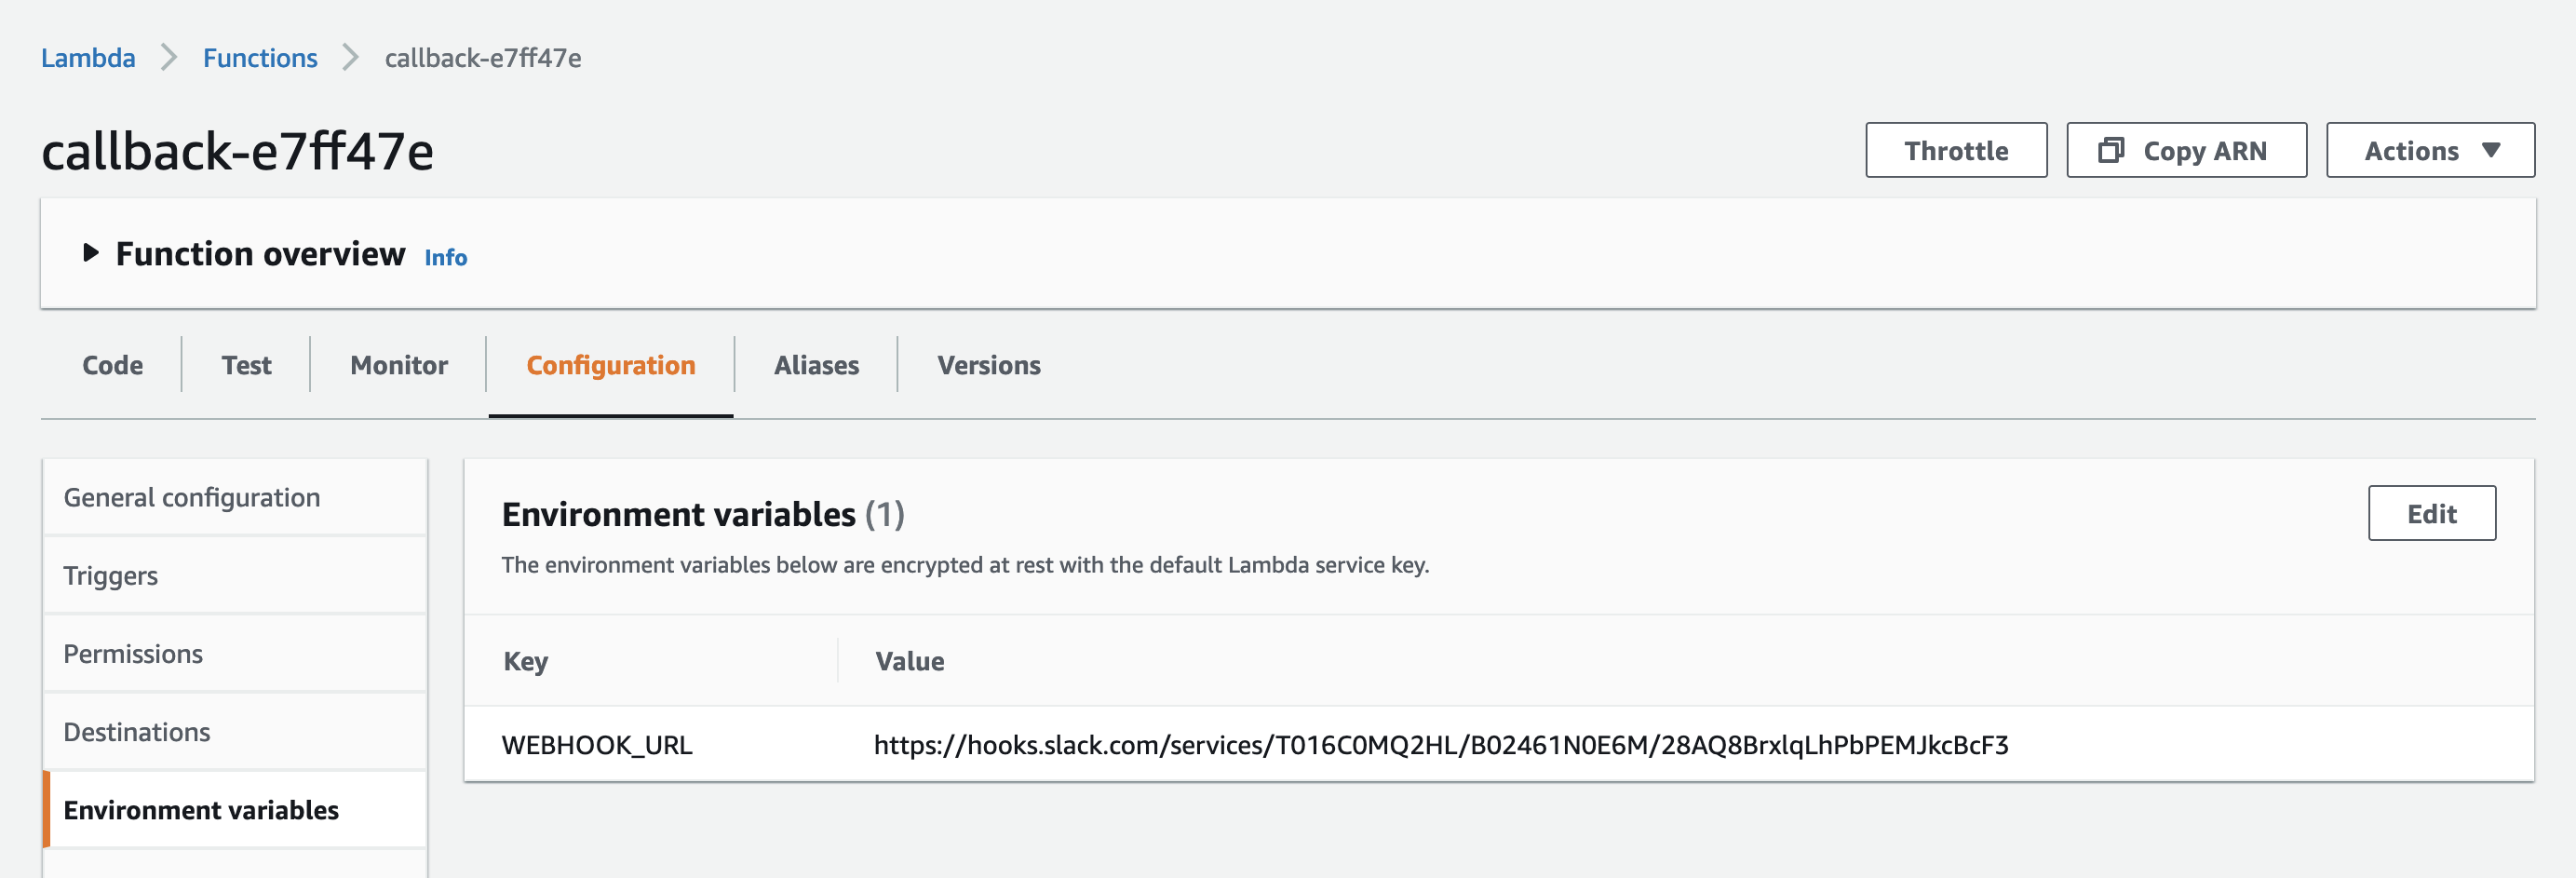
Figure 4.9: The Webhook URL exposed as an environment variable in the AWS Console.
To be sure, this is better than leaking the value unwittingly into the Lambda function body as before, but it’s still not perfect — even if it is a fairly common practice.
For especially sensitive values, it’d probably be best, in the end, to avoid using environment variables for secrets and instead use a service like AWS Secrets Manager (https://aws.amazon.com/secrets-manager). It takes a few more lines of code to do so — one or two to declare the secret with Pulumi, and a couple more to decrypt it at runtime with the AWS SDK for JavaScript — but it’s nothing too complicated, and arguably worth the effort. You’ll find an extended version of the health checker that uses Secrets Manager instead of environment variables beside this one in the book’s GitHub repository at https://github.com/pulumibook/examples.
Updating and deploying the production stack
Section titled “Updating and deploying the production stack”With the program now finished, and the dev stack configured, you’re ready to configure the production stack as well.
One way to do that would be to follow the same steps as before:
- Change to the
productionstack withpulumi stack select - Configure
siteURLandscheduleas plain-text strings - Configure
webhookURLas a Pulumi-encrypted secret - Deploy the
productionstack with a finalpulumi up
But this time, let’s take a slightly different tack just to show off a few more ways to configure Pulumi stacks.
First, in the terminal, make sure you’re still in the same folder as Pulumi.yaml and that the dev stack is still selected and configured.
$ pulumi stack select dev
$ pulumi configKEY         VALUEaws:region  us-west-2schedule    rate(1 minute)siteURL     https://pulumibook.com/ch03/health-checker/api/devwebhookURL  [secret]
Now, to configure the production stack, you have a few options:
- You can configure each value one at a time with
pulumi config set - You can configure multiple values at once with a single CLI command
- You can copy one or more values from one stack to another, including secrets
Let’s use each method to configure and deploy the production stack.
Configuring items individually
Section titled “Configuring items individually”You already know how to configure both secrets and non-secret values with pulumi config set, so I won’t cover that again — I’ll just add that pulumi config (like many other Pulumi commands)5 also accepts a --stack option (or -s for short) that you can use to configure a different stack than the one currently selected. Try using this approach now to configure the schedule value for the production stack.
$ pulumi stack lsNAMEdev*production
$ pulumi config --stack productionKEY         VALUEaws:region  us-west-2
$ pulumi config set schedule "rate(1 minute)" --stack production
$ pulumi config --stack productionKEY         VALUEaws:region  us-west-2schedule    rate(1 minute)
Now let’s take a look at how to configure several items at once.
Configuring multiple items
Section titled “Configuring multiple items”You can also configure multiple items in a single command-line invocation with pulumi config set-all, passing a list of key-value pairs as command-line arguments. This technique is a bit more verbose in that it requires you to specify whether each item is a plain-text value or secret, but it’s occasionally useful, so good to be aware of. Try using it now to set the schedule and siteURL values — and note that by doing so, you’re able to overwrite the value of schedule you just set:
$ pulumi config set-all \    --stack production \    --plaintext schedule="rate(1 minute)" \    --plaintext siteURL="https://pulumibook.com/ch03/health-checker/api/prod"
$ pulumi config --stack productionKEY         VALUEaws:region  us-west-2schedule    rate(1 minute)siteURL     https://pulumibook.com/ch03/health-checker/api/prod
Copying configuration values between stacks
Section titled “Copying configuration values between stacks”Finally, you can copy both secrets and non-secret values from the currently selected stack to another one using pulumi config cp and passing the name of the target stack with --dest. Do that now to set the webhookURL for the production stack using the value from dev (since again, we’re using the same Webhook URL for both stacks for simplicity):
$ pulumi config cp webhookURL --dest production
$ pulumi config --stack productionKEY         VALUEaws:region  us-west-2schedule    rate(1 minute)siteURL     https://pulumibook.com/ch03/health-checker/api/prodwebhookURL  [secret]
Now that the production stack is fully configured, you can change to it and deploy it in the usual way.
$ pulumi stack select production
$ pulumi up...View Live: https://app.pulumi.com/cnunciato/health-checker/production/updates/1
     Type                                          Name                 Status +   pulumi:pulumi:Stack                           health...production  created +   ├─ aws:cloudwatch:EventRuleEventSubscription  subscription         created +   │  ├─ aws:cloudwatch:EventRule                subscription         created +   │  ├─ aws:lambda:Permission                   subscription         created +   │  └─ aws:cloudwatch:EventTarget              subscription         created +   ├─ aws:iam:Role                               callback             created +   ├─ aws:iam:RolePolicyAttachment               callback-58ed699a    created +   └─ aws:lambda:Function                        callback             created
Resources:    + 8 created
Duration: 22s
When the update completes, you should be able to follow the link to the Pulumi Cloud console and confirm that the stack was updated successfully, and tail the logs with pulumi logs -f to see that the production health checker is once again in business:
$ pulumi logs -f
Collecting logs for stack production...
2026-06-07T13:00:45.141-07:00 [callback-20f47fe]INFO  Site's up! Status was 200....
2026-06-07T13:01:45.405-07:00 [callback-20f47fe]INFO  Site's up! Status was 200....
Well done. Let’s wrap up.
Tidying up
Section titled “Tidying up”Let’s close out the chapter by destroying both dev and production and having a last look at a couple of config commands that are sure to come in handy at some point in your stack-managing future.
You can destroy both stacks much as you did in the previous chapter using pulumi destroy. I’m once again using the --skip-preview and --yes options to save a little time, but you could omit both to get a preview of the changes and be prompted for a confirmation if you prefer:
$ pulumi destroy --skip-preview --yes --stack dev...Resources:    - 8 deleted
$ pulumi destroy --skip-preview --yes --stack production...Resources:    - 8 deleted
Deleting stack-configuration items
Section titled “Deleting stack-configuration items”At this point, both stacks have been destroyed, but their configurations still exist — in Pulumi Cloud as well as in Pulumi.dev.yaml and Pulumi.production.yaml — and that’s good, as it means you can deploy either one anytime with another pulumi up. Since we’re finished with this project, though, and have no plans to deploy it again, you can take this opportunity to use pulumi config rm (short for remove) to delete a few items before deleting both stacks permanently.
Start by removing a few values from the dev configuration:
$ pulumi config rm schedule --stack dev
$ pulumi config --stack devKEY         VALUEaws:region  us-west-2siteURL     https://pulumibook.com/ch03/health-checker/api/devwebhookURL  [secret]
Now try removing multiple items from both stacks with pulumi config rm-all:
$ pulumi config rm-all aws:region siteURL webhookURL --stack dev
$ pulumi configKEY  VALUE
$ pulumi config rm-all aws:region schedule siteURL webhookURL \    --stack production
$ pulumi config --stack productionKEY  VALUE
Deleting stacks
Section titled “Deleting stacks”After you ran pulumi destroy on the dev and production stacks, you might’ve noticed a message about removing those stacks permanently. When you know you’re finished with a stack for good, you can delete it — along with all of its configuration and update history — with pulumi stack rm. (Just be careful when you do, as this action can’t be undone.)
Go ahead and bid a final, fond, totally-not-undoable farewell to both of your faithful health-checker stacks.
$ pulumi stack rm devThis will permanently remove the 'dev' stack!Please confirm that this is what you'd like to do by typing ("dev"): devStack 'dev' has been removed!
$ pulumi stack rm production --yesStack 'production' has been removed!
And that brings us, at last, to the end of Part 1.
Now, it might seem like you’ve already learned way more about Pulumi than you’ll ever use in actual practice — but I promise, there’s a lot more in store. In Part 2, we’ll bring all of this foundational knowledge forward to take on some real-world, full-stack, production-grade applications, starting with my personal favorite: the humble static website.
Summary
Section titled “Summary”-
Pulumi has a built-in, key-value based configuration system that lets you easily manage variations between the stacks of a given project.
-
Stacks can be configured with strings, numbers, boolean values, and other types of structured data like maps and arrays.
-
Configuration values can be marked as required or optional, and you can have your Pulumi program fail when a particular value can’t be cast as a certain type successfully.
-
Configuration keys are namespaced to help prevent naming collisions, and by default, the keys you define are namespaced with the name of your project.
-
You can write, read, and delete configuration items with
pulumi config set,get, andrm, respectively. To create a secret with the CLI, you need only pass the--secretoption topulumi config set. -
Secret values are encrypted and decrypted with Pulumi Cloud using a unique, stack-specific encryption key. Only those users with access to a given stack can encrypt and decrypt its secret values.
-
It’s safe (and considered good practice) to check a stack’s configuration files into source control — even those containing ciphertext, since such text is only usable by those with access to the associated stack.
-
In a running Pulumi program, secret values can be unwrapped into their underlying values using the helper function
pulumi.unsecret(), and plain-text items, similarly, can be converted into secrets usingpulumi.secret(). -
Pulumi protects secret values by tracking them throughout the life of a program, suppressing their values in CLI output and issuing warnings when your code may be handling them inappropriately.
-
Configuration items can be copied between stacks with
pulumi config cp. -
Stacks (along with their configuration and update history) can be deleted permanently with
pulumi stack rm.
Footnotes
Section titled “Footnotes”-
That’s assuming you’re using the Pulumi Cloud backend (as this book still assumes you are). You can still use secrets with alternative backends, though, and you’ll learn more about how to do that in Part 3. ↩
-
Similarly, you can turn a plain-text string into a secret with
pulumi.secret(). Try it! ↩ -
https://docs.aws.amazon.com/lambda/latest/dg/configuration-envvars.html ↩
-
This, by the way, is my preferred method of exploring the Pulumi SDK. With VS Code, I can find what I’m looking for quickly, drill into type definitions and function signatures, browse SDK documentation, and more. But if you happen to be more of a bare-bones text-editor kind of person, you can always reach for the Pulumi SDK documentation, which you’ll find, for all cloud providers and for Pulumi itself, at https://pulumi.com/docs/reference/pkg. ↩
-
I highly recommend exploring all
pulumicommands by passing the--helpoption after a command or subcommand. There’s a lot you can learn just by having a look around, and as you’ll see, we’re still just scratching the surface. It’s also a good way to discover new features: indeed, when I started writing this chapter, I had no idea some of the commands we’ve covered even existed; I only learned of them by stumbling onto them by way ofpulumi --help. ↩