Chapter 3: Projects and stacks
This chapter covers:
Section titled “This chapter covers:”- Creating and configuring Pulumi projects
- Understanding Pulumi projects and stacks
- Designing and developing applications with multiple stacks
- Using third-party libraries in your Pulumi programs
- Managing projects and stacks with the Pulumi CLI
Having been through a couple of projects now, you should be getting a sense of the overall workflow: a Pulumi project begins with a template, like aws-typescript, and from that template, you generate a new project and stack. You write some code in the form of a small program that declares a few cloud resources, and then you run that code with Pulumi to turn those declarations into cloud infrastructure. In Chapter 1, you followed these steps to make a simple one-page website with Amazon S3, and in Chapter 2, you did the same to build an event-driven messaging application with AWS CloudWatch, Lambda, and Simple Notification Service. In fact, just about every Pulumi project you’ll ever build will more or less begin with these very same steps.
But of course, it rarely ends there. Most of the projects we build, whether in our personal or professional lives, eventually want more from us: more features, more bug fixes, more enhancements of various kinds, and that’s where it starts to get complicated. How, for example, would you go about making changes to the cloud notifier without messing with the version you’ve already deployed? You can’t — not yet, anyway. To do that, you’d need to work on a separate copy somehow; you’d need to set up some sort of a development environment. And once you start thinking in terms of multiple environments, you invariably end up having to figure out how to manage those environments independently of one another — and that usually means having to configure them independently as well.
Fortunately, with Pulumi, you’ve got all you need to handle these sorts of challenges, and it’s all made possible by way of projects and stacks. So in this chapter, you’ll dive deeper into both by building another simple serverless application aimed at solving a real-world problem — and this time, you’ll solve it in a much more real-world way.
Monitoring a website’s uptime serverlessly
Section titled “Monitoring a website’s uptime serverlessly”If you haven’t got your health, you haven’t got anything. — Count Tyrone Rugen (the Six-Fingered Man), The Princess Bride, 1987
Imagine you’re back in Chapter 1, having just finished recovering from the disaster that left your users and their pups so helplessly immobile. Outages of that kind are thankfully rare, but at the same time, they do happen, and in a world as heavily networked as ours, even the slightest technical mishap can easily take out an entire service, leaving those of us responsible for maintaining such services totally oblivious until the phone starts ringing. In an ideal world, our broken systems would just heal themselves — and later, you’ll learn a few ways to do that — but at a minimum, it’d just be nice to be able to ask whether a given service is healthy, and if it isn’t, to be told about it immediately, so we don’t have to learn about major outages from our users (or worse, from our managers).
The web is full of choices when it comes to monitoring a web application, some of them quite nice (if generally not free). But with the right set of tools, it’s actually easy to build one of your own — a simple one, at least.
So as a way to learn more about projects and stacks, let’s build ourselves a little health checker. We’ll start with a goal that’s simple and attainable: to be alerted when a service we care about goes down. We’ll work out the mechanics and details as we go. For now, that’s enough to get started.
Sketching it out
Section titled “Sketching it out”Any health-check service worth its salt should be able to answer one question: Is the service I care about up and running right now? There’s always more that you might want to know — Is it responding in a timely way? Is it able to reach the services it relies on? — but as a baseline, just knowing a given service is online is often enough to put our minds at ease.
Assuming that service were a web-based one, like a REST API, you could easily answer that question just by pinging the service every minute or so, expecting it to respond in an affirmative way. If it does, great — all is well. But if it doesn’t — say, if it responds with an HTTP status other than 200 OK (or worse, doesn’t respond at all) — then the health check should fail, triggering a notification that somehow finds its way to you, leaving you to decide whether and how to investigate.
For an app like this, you might start with a simple diagram like the one in Figure 3.1, which shows a service to be monitored, a program to monitor it, and some to-be-undetermined action to be taken when the program receives an unsatisfactory response.

Figure 3.1: A concept diagram of a generic health-check application showing a service to be monitored, a program to monitor it, and an action to be taken when the service somehow fails.
We don’t have much in the way of detail yet, but that’s okay. With the broad strokes in place, we can start thinking about which cloud resources would be suitable to the task. So let’s do that next.
Choosing the right set of cloud resources
Section titled “Choosing the right set of cloud resources”In Chapter 2, with the cloud notifier, you learned that when it comes to running some JavaScript code on regular interval, AWS CloudWatch is a good place to start. Paired with AWS Lambda, CloudWatch can raise an event and call a function in response to that event as often as once a minute, and you can use that function in all kinds of interesting ways. With the cloud notifier, you used a Lambda function to publish a message to AWS SNS using the AWS SDK for JavaScript. Here, you can use one to issue requests on the API service to be monitored, then to take some action when one of those requests is unsuccessful.
Expanding on the diagram in Figure 3.1, then, you might end up with a version that looks more like Figure 3.2, which combines CloudWatch and Lambda to create a small, event-driven serverless application that should more than suffice, given our modest requirements. We still haven’t settled on how we’ll handle the actual notifying, but at this point, it’s safe to assume that whatever we choose will be callable over HTTP, so a Node.js-powered Lambda function shouldn’t have any trouble communicating with it.

Figure 3.2: The health-checker architecture, which uses AWS CloudWatch to schedule an event and AWS Lambda to run a function in response to the event.
A simple, solid plan for what should be a useful little application. Let’s start building.
Creating the project and stack
Section titled “Creating the project and stack”Break out your shell and your editor of choice and make a directory for a new Pulumi project. Then, from within that directory, run pulumi new to generate the project and an initial development stack.
$ mkdir health-checker && cd health-checker$ pulumi new aws-typescriptConfigure the project and stack by following the prompts:
- For project name, choose
health-checker, which should be the default (as inferred from the current directory). - For stack name, stick with
dev, the default for new projects. - For description, use whatever you like. (I’m using
A simple HTTP health checker, myself.) - For region, use your preference as well. (For now, I’m sticking with
us-west-2.)
When the command completes, the contents of your project directory should resemble the following, which shows the project-configuration file, a stack-configuration file for the newly created dev stack, and the Pulumi program file. I’m using the handy tree1 command below to list the contents of the current directory, passing the -I option to ignore node_modules, which contains the dependencies of the Pulumi SDK.
$ tree -I node_modules.├── Pulumi.yaml├── Pulumi.dev.yaml├── index.ts├── package-lock.json├── package.json└── tsconfig.json3 | The project-configuration file. |
4 | The stack-configuration file. |
5 | The Pulumi program file. |
You learned about each of these files in the previous chapter, so I won’t spend a lot of time going over them again here; I’ll just point out that collectively, they comprise the Pulumi project, and that it’s Pulumi.yaml specifically that both designates the root of the project and defines its basic properties, including:
-
The project’s name, which is required, and must be unique within the scope of a Pulumi organization.2 If you attempt to create a new project with a name that’s already in use within an organization, Pulumi will complain.
-
Its runtime, or language host, also required. Recall that the language host is the executable Pulumi uses to execute your code; in this book, it’ll almost always be
nodejs, but if you were writing in a language other than JavaScript, it might bepython,go, ordotnet, depending on the language. There are a few other properties you can set for this value, but in most cases, just the name is enough. See the Pulumi project docs (https://www.pulumi.com/docs/intro/concepts/project) for details. -
An optional description for the project, which will appear in the Pulumi Cloud console alongside its name and its list of stacks. When you’re working with multiple projects, a nice description can help you find what you’re looking for quickly.
-
An optional main, or entrypoint, directory. By default, Pulumi assumes your program file (e.g.,
index.ts) is in the same directory asPulumi.yaml, but if you’d like to keep your program code somewhere else, you can do so by specifying the path to the directory containing the program file, relative to (and importantly, alongside or below) the location ofPulumi.yaml. -
An optional config location. Similarly, Pulumi assumes your stack-configuration files (e.g.,
Pulumi.dev.yaml) are in the same directory asPulumi.yaml, but you can put those somewhere else as well by specifying a relative path to their location. -
An optional template, which lets you define the default configuration settings for new projects based on this one. You’ll learn more about project templates in Part 3 when we explore the many ways of packaging and distributing Pulumi programs.
-
An alternate backend, or state store, if you’d rather not use the hosted Pulumi Cloud. You’ll learn more about alternate backends in Part 3 as well.
As you step through the prompts with pulumi new, Pulumi will set most of these values for you automatically, and once they’ve been set, you’ll rarely go back to them, other than to make the occasional tweak to a project description.
But you’re certainly free to switch things up if you like.3 An alternate project layout and configuration for the same program might look something like the following, which specifies the use of TypeScript (the default for Node.js projects; to restrict a project to JavaScript, you can set this property to false), sets the entrypoint path to a relative directory named program, and sets the stack-configuration file path to a directory named stacks:
```yaml title=“Listing 3.1: A Pulumi.yaml containing an alternate project configuration.” showLineNumbers
name: health-checker
description: A simple HTTP health checker.
runtime:
name: nodejs
options:
typescript: true
main: program
config: stacks
| | || :---: | --- || `4` | Explicitly specifies Node.js as the language host for this project. || `6` | Instructs Pulumi to compile the project with TypeScript, rather than constrain it to JavaScript. || `7` | The relative path to the directory containing the program entrypoint (`index.ts`). || `8` | The relative path to the directory containing the stack-configuration files. |
The file and folder structure corresponding with this configuration would resemble the following:
```bash showLineNumbers$ tree.├── Pulumi.yaml├── program│   ├── node_modules│   │   └── ...│   ├── tsconfig.json│   ├── index.ts│   ├── package-lock.json│   ├── package.json│   └── tsconfig.json└── stacks    └── Pulumi.dev.yaml
3 | Designates the root of the Pulumi project and contains its config settings. |
4 | Contains the program’s entrypoint (index.ts) and Node.js dependencies. |
12 | Contains the project’s stack-configuration files. |
Later, as we get into building more complex applications, we’ll look at a few other ways to keep your app code and infrastructure code well organized alongside one another. But for now, to keep things focused, let’s stick with the defaults, as created by pulumi new.
Finally, let’s modify index.ts to better suit the needs of this project. Right now, the generated program file contains an aws.s3.Bucket declaration — but since our working design doesn’t call for an S3 bucket, we can remove that declaration from index.ts.
In fact, since we’ll be writing this program entirely from scratch, let’s go a step further and just remove everything from it. Starting with an empty program might seem like an odd thing to do, but it lets us observe a couple of interesting aspects of Pulumi programs: one, that an empty program is still a valid program — it’s just a Node.js program that doesn’t declare any resources — and two, that by not declaring any resources, an empty program is implicitly declaring nothing. In other words, an empty program (or a program declaring no resources) is another way of saying that the stacks produced by the program should both exist and be empty.
To see what I mean, clear out the contents of index.ts, leaving it totally empty, as reflected in Listing 3.2. (The comment is optional, of course, included only for clarity.)
// Nothing to see here!Now, with an empty index.ts, bring the dev stack into existence with an initial pulumi up.
$ pulumi up
Previewing update (dev)...
Type Name Plan + pulumi:pulumi:Stack health-checker-dev create
Resources: + 1 to create
Do you want to perform this update? yes no> details7, 10 | Shows the stack will be created. |
If you choose details, you’ll see that only the dev stack itself will be created:
pulumi:pulumi:Stack: (create) [urn=urn:pulumi:dev::health-checker::pulumi:pulumi:Stack::\ health-checker-dev]2 | Pulumi gives every resource, including the stack, a Uniform Resource Name (URN). |
Choose yes to continue, and you’ll see that the stack was created.
Updating (dev)...
Type Name Status + pulumi:pulumi:Stack health-checker-dev created
Resources: + 1 created
Duration: 2s5 | Shows the empty stack was created. |
Figure 3.3 shows the new, empty dev stack in the Pulumi Cloud console.
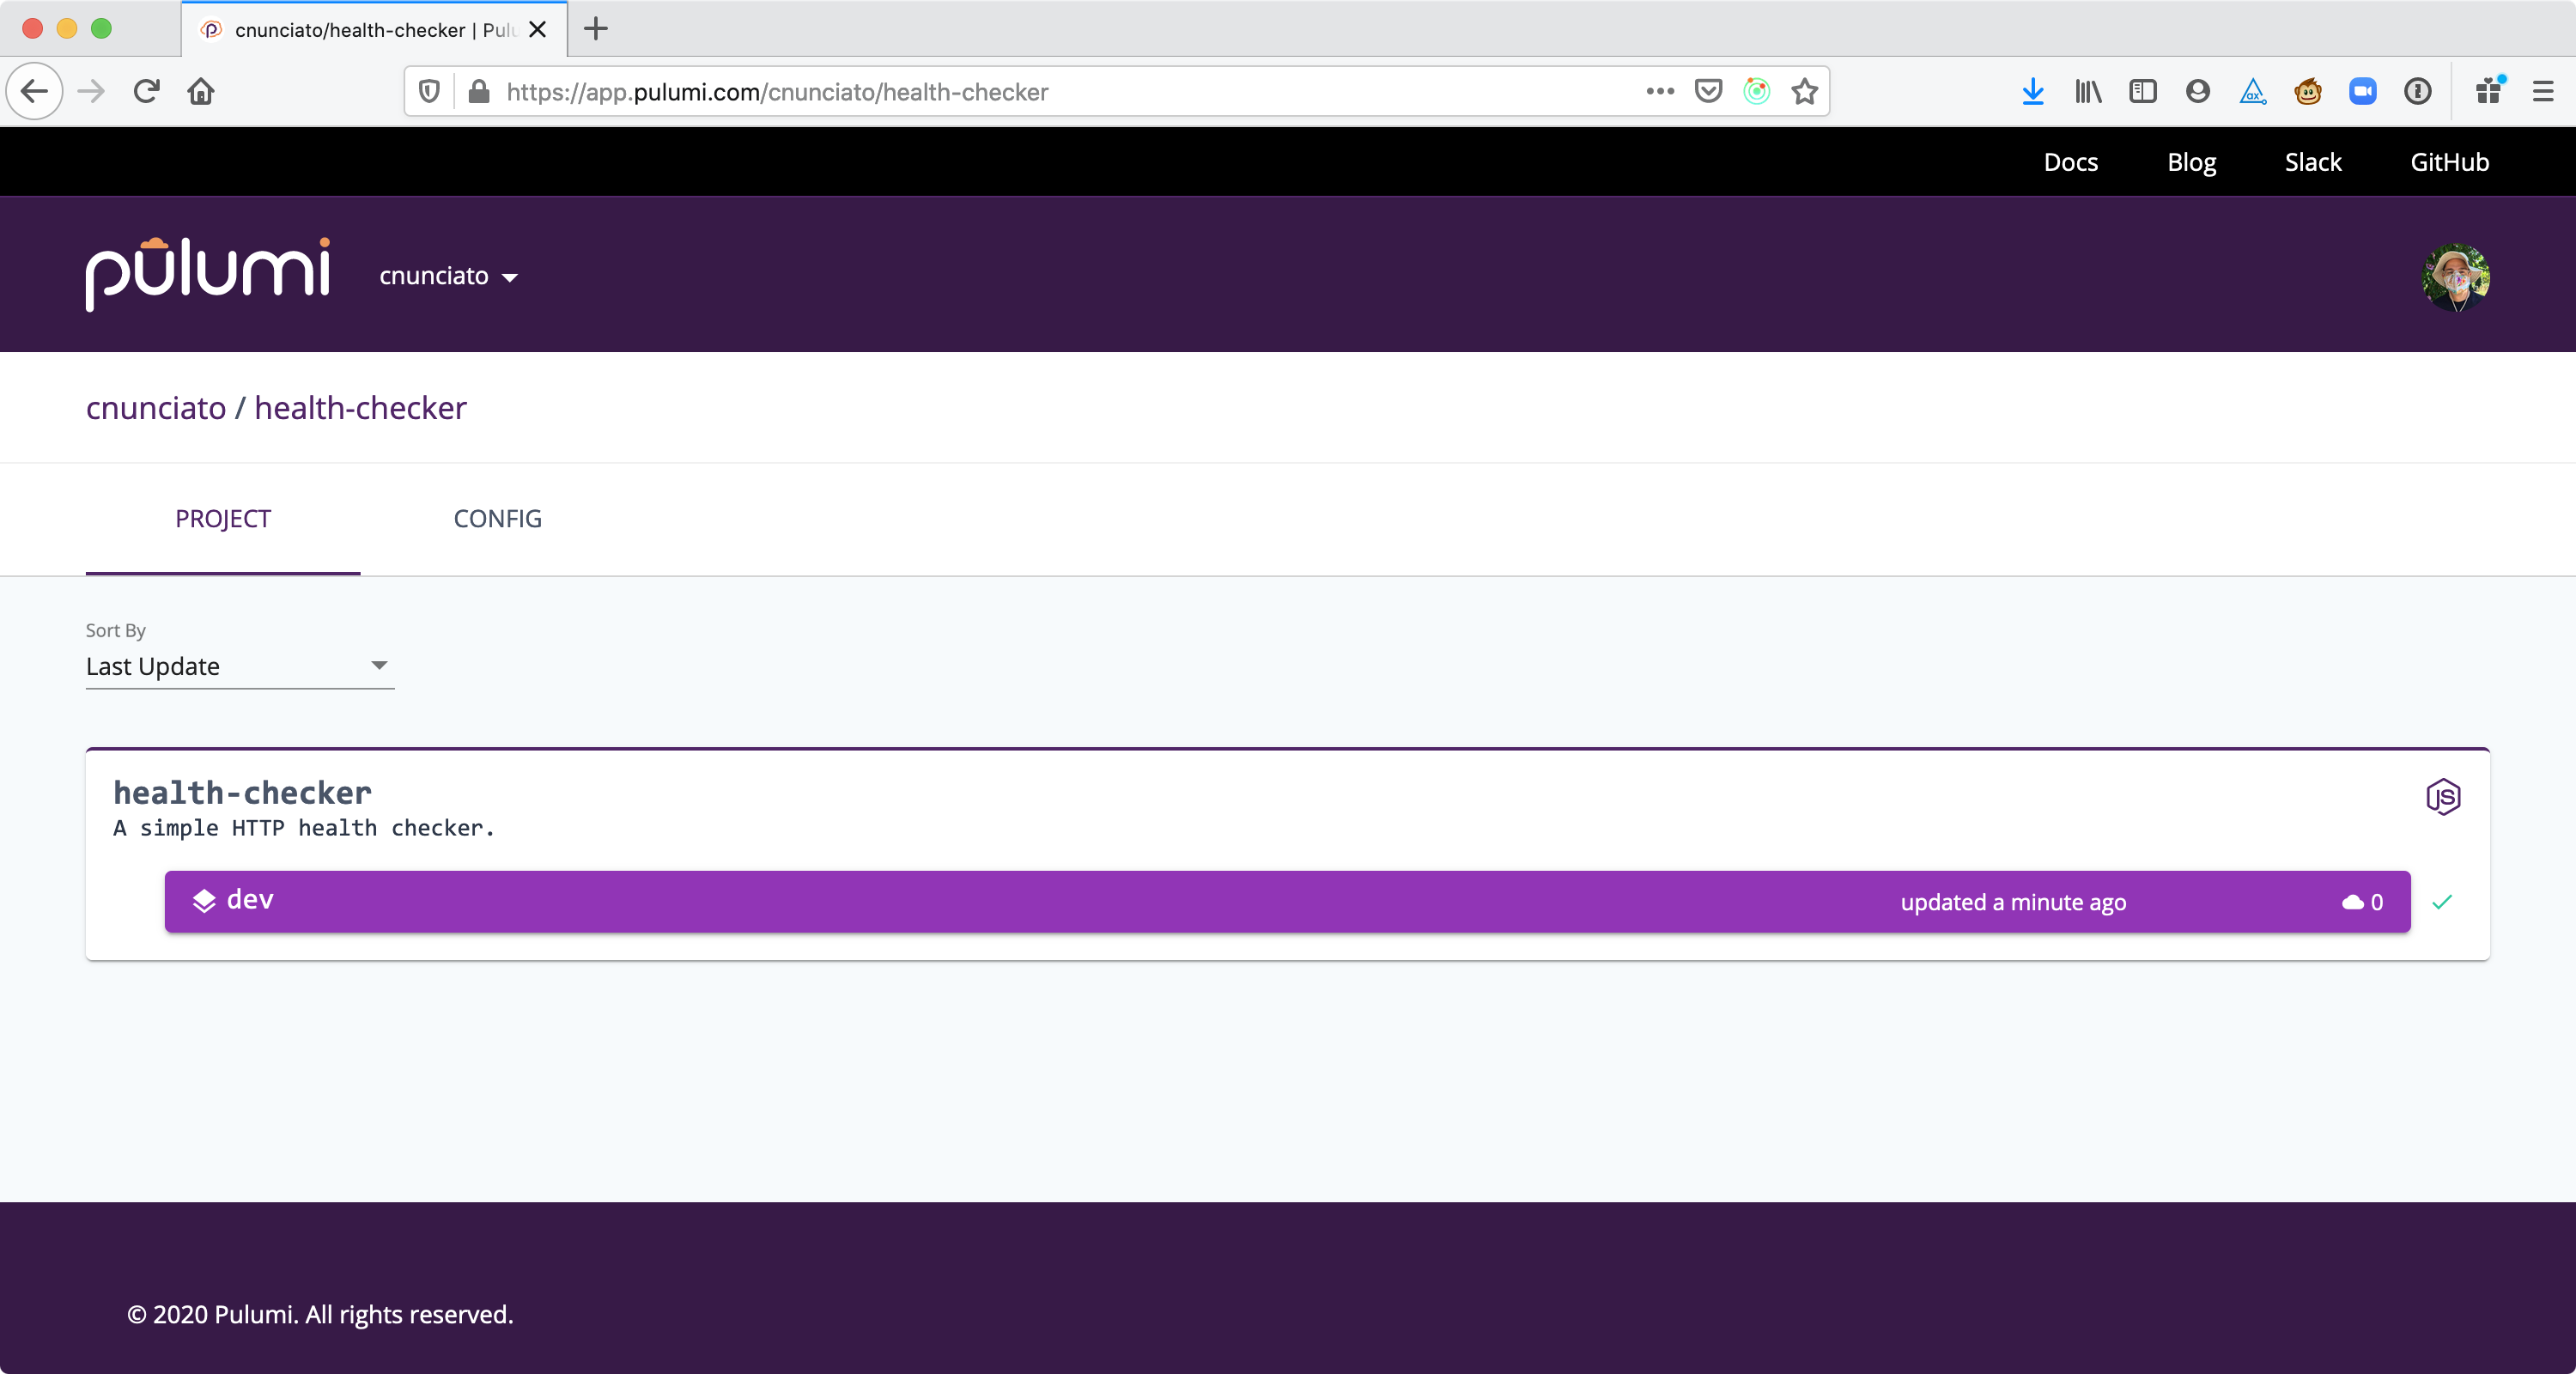
Figure 3.3: The health-checker’s first stack, dev, currently managing zero cloud resources.
With a clean, empty program and stack, we’re ready to start building.
Still, the point of this chapter isn’t just to build an app — it’s also to build a better understanding of projects and stacks. Up to now, we’ve just been using them, as logical containers for programs and resources, and of course, that’s what they are. But to develop a stronger mental model of both and to use them more effectively, it’d be good to take a moment to think about them in terms of the kinds of problems they’re intended to solve.
Thinking in projects and stacks
Section titled “Thinking in projects and stacks”When you set out to build a new application — any kind really, but especially the networked, internet-based kind — you often start out with some sort of a sketch: a handful of boxes or other shapes usually connected by lines and arrows meant to capture the flow of information between the parts of a system. A sketch for a typical web app, for example, might look something like Figure 3.4, which covers the typical parts of your average three-tiered variety.

Figure 3.4: A napkin sketch of the components of a traditional web application.
Sketches like these are deliberately high-level: this piece talks to that one, this one to that, until all of the major pieces are accounted for and their relationships reasonably clear. The goal at this point isn’t to account for every last detail — it’s just to externalize the overall shape of the application as it exists in your mind, free from languages or frameworks or other specifics, to give you (and maybe others) a high-level model and something to work by.
From here, the next step is often to start breaking these shapes down into more granular components: “front end” becomes a virtual machine with a web server and some web pages, perhaps; “API” becomes a Node.js app running Express4 or Koa5 or some other framework (maybe on the same server, maybe not), until eventually, you’ve got something that looks a bit more like a proper architecture diagram, as in Figure 3.5.

Figure 3.5: The napkin sketch becomes an architecture diagram.
At this point, you’ve often got enough detail to actually start building, and you generally do that by setting up a development environment. We all approach this step a little differently; some of us like to get everything running on localhost, for example, which can make for a tight development loop; others prefer to work in a way that more closely resembles the finished product. Every approach has its pros and cons, but they all serve the same purpose, namely to represent the objects depicted in that original diagram. Later, when the time comes to deploy into other environments — staging, say, or eventually into production — we construct those environments in much the same way, as manifestations of that diagram. The details may differ from one environment to the next — in production, you’ll usually want higher-performance components than in development, etc. — but their parts are generally pretty similar, because to us, every environment is just a version of “the app”, a concrete instance of our original conceptual blueprint, much like what you see in Figure 3.6.

Figure 3.6: Development, staging, and production environments as concrete instances of an abstract blueprint.
Projects and stacks let you model your applications and infrastructure in exactly this way. In a Pulumi project, the program acts as the blueprint (or more accurately, a recipe for creating the blueprint), and its job is simply to declare cloud resources and their relationships. By itself, it doesn’t do a whole lot; it just allocates JavaScript objects and exits. But when run with Pulumi in the context of a particular stack, those objects become instances of cloud infrastructure, and the stack, by extension, becomes an instance of the program.
If all of this is starting to sound a bit like object-oriented (OO) programming, then we’re on the right track. In the same way an OO class is like a blueprint for an object, and an architecture diagram is like a blueprint for an environment — a template for an eventual development, staging, or production — a Pulumi program is like a blueprint for a stack. And a stack essentially is an environment.
A bit of pseudocode might help bring this idea back down to earth. The TypeScript class below, for example, models the high-level components of our original sketch in more of an OO-classical way, with a constructor allowing for some variation between instances. Take a look:
export class WebApplication { public database: SQLDatabase; public restAPI: APIService; public frontEnd: StaticWebsite;
constructor(pricingTier: string) { this.database = new SQLDatabase(pricingTier); this.restAPI = new APIService(pricingTier, this.database); this.frontEnd = new StaticWebsite(this.restAPI); }}6 | WebApplication’s constructor exposes a pricing tier as an instance argument. |
7 | Creates an instance of SQLDatabase using the specified tier. |
8 | Creates an instance of APIService, passing it a reference to the database instance. |
9 | Creates an instance of StaticWebsite, passing it a reference to the restAPI instance. |
What this code expresses should be fairly clear: a WebApplication consists of a few major components — a frontEnd, a restAPI, and a database — and instances of WebApplication can vary by pricingTier. You could imagine using a class like this one to create and configure as many environments as you wanted, simply by calling its constructor with an appropriate signature.
const development1 = new WebApplication("free");const development2 = new WebApplication("free");const staging = new WebApplication("reasonably-priced");const production = new WebApplication("expensive");1-2 | Creates a couple of development stacks on a hypothetical cloud provider’s free tier. |
3 | Creates a staging stack on a paid tier. |
4 | Creates a production stack on a more expensive tier. |
We haven’t been writing Pulumi programs in exactly this way yet, but since we’re working with a general-purpose language like TypeScript, we certainly could, and there are advantages to doing so. At this point, though, it’s enough to understand that projects and stacks exist to allow you to model your infrastructure much like you’re used to modeling your software, and that stacks in particular let you model traditional environments in a first-class way.
Let’s bring it all forward, now, and get back to the task at hand.
Developing the application
Section titled “Developing the application”To recap, the goal is to write a simple application whose job is to monitor the uptime of a web service and to trigger a notification when something goes wrong. A good next step, then, would be to define a check interval (i.e., how often to run the uptime check) and then wire up a function to be called on that interval. Much like you did in Chapter 2, you can express both with a single line of code, passing the schedule expression as a string and the function itself as an inline callback.
Scheduling and handling an event
Section titled “Scheduling and handling an event”Replace the contents of index.ts with those of Listing 3.4, which adds a line to log a short greeting to the console whenever the inline callback is invoked.
import * as aws from "@pulumi/aws";
const schedule = "rate(1 minute)"
const handler = new aws.lambda.CallbackFunction("subscription", { policies: [aws.iam.ManagedPolicy.AWSLambdaBasicExecutionRole], callback: () => { console.log("Greetings from the cloud!"); },});
aws.cloudwatch.onSchedule("subscription", schedule, handler);3 | Defines a CloudWatch schedule expression of once per minute. |
5 | Declares the Lambda handler as a CallbackFunction. |
6 | Scopes its role to a single managed policy --- least privilege. |
8 | Writes a greeting to the console. |
12 | Schedules the function to run on that interval. |
Now, in the terminal, making sure you’re in the same directory as Pulumi.yaml, run pulumi up to preview and deploy the stack. In the output, notice Pulumi will be creating several new resources, including a CloudWatch event rule (the schedule), an event-rule target (the callback function), the function itself (as an AWS Lambda), and an IAM role, policy attachment, and permission that let it run and send its logs to CloudWatch. Also notice you didn’t have to wire up all of these resources individually on your own: the @pulumi/aws library figured out the plumbing based on your call to aws.cloudwatch.onSchedule, while the policies array you passed kept the function’s permissions scoped to least privilege. Once again, that’s encapsulation at work.
$ pulumi up
Previewing update (dev)...
Updating (dev)...
Type Name Status pulumi:pulumi:Stack health-checker-dev + └─ aws:cloudwatch:EventRuleEventSubscription subscription created + ├─ aws:iam:Role subscription created + ├─ aws:cloudwatch:EventRule subscription created + ├─ aws:iam:RolePolicyAttachment subscription-58ed699a created + ├─ aws:lambda:Function subscription created + ├─ aws:lambda:Permission subscription created + └─ aws:cloudwatch:EventTarget subscription created
Resources: + 7 created 1 unchanged20 | Confirms the event subscription and its resources were created. |
21 | Confirms the stack resource was unchanged. |
When the update completes, take a look at the CloudWatch logs to make sure those events start rolling in as expected. As before, you can pass the -f option to stream the logs to your terminal, and press Control-C to stop. (If you don’t pass the follow option, you’ll get the logs from the last hour by default, and you can specify custom timespans as well. See the pulumi logs documentation (https://www.pulumi.com/docs/reference/cli/pulumi_logs) for details.)
$ pulumi logs --follow
Collecting logs for stack dev...
2026-06-07T14:58:08.036-07:00 [subscription-667a9e9]INFO  Greetings from the cloud!
2026-06-07T14:59:07.484-07:00 [subscription-667a9e9]INFO  Greetings from the cloud!
With the event and its handler now working, you can start filling out the logic of the program.
Adding an HTTP client
Section titled “Adding an HTTP client”Looking back at the architecture diagram in Figure 3.2, you’ll see you’ve already accounted for half of the components you’ll need for this application; you’ve got the CloudWatch event set up and the Lambda event handler wired up to it, so the next thing to do is write the code to check the health of the API service — assuming, of course, there’s an API service to check. (We’ll get to that part in a moment.)
Since we’re working in TypeScript, you can use just about any Node.js HTTP client you like.6 I like Got (https://github.com/sindresorhus/got) because it’s fairly lightweight and easy to use, so let’s go with that. Install Got with npm in the usual way, saving the package as a regular dependency. (Note that we’re using Got version 11 because it’s the latest version that supports CommonJS modules; later, you’ll learn how to configure Pulumi for use with ECMAScript modules.)
$ npm install --save got@11...
+ got@11.8.6added 27 packages from 11 contributors and audited 134 packages in 2.785s
found 0 vulnerabilities1 | Installs the Got HTTP library with npm, saving it as a regular Node.js dependency. |
For the API service, I’ve done a little work to make things easier for you. The app we’re developing is designed to handle failure, so given that you’re probably more practiced at writing software that doesn’t fail, I’ve taken the liberty of setting up a publicly accessible JSON API7 programmed to respond with an HTTP 500 around 80% of the time. That should give you enough coverage to handle both successes and failures. You’ll find that service at https://pulumibook.com/ch03/health-checker/api/dev.
Back in your editor, extend the program to import Got and use it to send GET requests to our delightfully unstable REST API. Listing 3.5 shows the code to be added, which includes a few lines to log successes and failures. Note that since Got’s API is promise-based, you can use the async keyword with the function declaration to take advantage of Node’s support for async/await, which can help make your code more readable and maintainable.
import * as aws from "@pulumi/aws";import got from "got";
const schedule = "rate(1 minute)"const siteURL = "https://pulumibook.com/ch03/health-checker/api/dev";
const handler = new aws.lambda.CallbackFunction("subscription", {    policies: [aws.iam.ManagedPolicy.AWSLambdaBasicExecutionRole],    callback: async () => {        try {            const response = await got(siteURL);            console.log(`Site's up! Status was ${response.statusCode}.`);        }        catch(error) {            const status = error.response.statusCode;            console.error(`Site's down! Status was ${status}`);        }    },});
aws.cloudwatch.onSchedule("subscription", schedule, handler);
2 | Imports the Got HTTP client. |
5 | Defines the URL of the API service to check. |
8 | Scopes the function to a single managed policy --- least privilege. |
9 | Adds an async keyword to the callback, enabling the use of await. |
11 | Makes an HTTP request to the API service. |
12,16 | Logs successes and failures to the console. |
With another pulumi up, you should see that the function was updated — which by now should come as no surprise, considering we changed its definition. The resulting output should resemble what you see below.
Updating (dev)...
Type Name Status Info ~ aws:lambda:Function subscription updated [diff: ~code,lastModified]
Resources: ~ 1 updated 7 unchanged
Duration: 6s5 | Indicates the Lambda function resource was indeed updated. |
Within a couple of minutes of the update completing, you should start to see successes and failures flowing into the logs as well, at a rate of about one entry per minute.
$ pulumi logs -f
Collecting logs for stack dev...
2026-06-07T15:03:13.453-07:00 [subscription-667a9e9]INFO  Site's up! Status was 200....
2026-06-07T15:04:08.823-07:00 [subscription-667a9e9]ERROR Site's down! Status was 500...
Good. Now that you’ve got a code path that’s followed when something “bad” happens, you can finish things off by writing the code to dispatch a notification about that.
Wiring up notifications
Section titled “Wiring up notifications”In the last chapter, you used AWS SNS to send a text message to your mobile phone in response to a scheduled event. You could do that again here, but notifications like these are more often published to a shared communication channel of some sort, allowing multiple interested humans, in addition to yourself, to subscribe and be notified of them.
Collaboration services like Slack (https://slack.com), Discord (https://discord.com), and Microsoft Teams (https://microsoft.com/teams) can be a good general-purpose fit for this kind of thing, and Slack in particular makes it easy to route formatted HTTP POSTs to a certain channel, which you — as an on-call human responsible for managing a web service, for example — can choose to monitor however you like.
So let’s go with Slack. It’s free, quick to set up, and a relatively popular real-world choice. Follow the steps below to create an Incoming Webhook, a built-in Slack integration that gives you a unique URL for posting messages into the Slack channel of your choice.
-
If you don’t already belong to a Slack workspace that you can administer (or at least add apps and integrations to), create a new, free workspace at https://slack.com/get-started.
-
From the workspace menu, choose Settings & Administration > Manage Apps.
-
Search for the Incoming Webhooks app with the keyword “webhooks” and select it.
-
Click Add to Slack.
-
Choose a default channel to post to, then click Add Incoming Webhooks Integration. As we’re still in the development phase, you might want to choose your own name from the list (to route messages to your private channel), especially if you belong to a Slack workspace that you’re sharing with others.
When you’re finished, make a note of the generated Webhook URL, as shown in Figure 3.7.
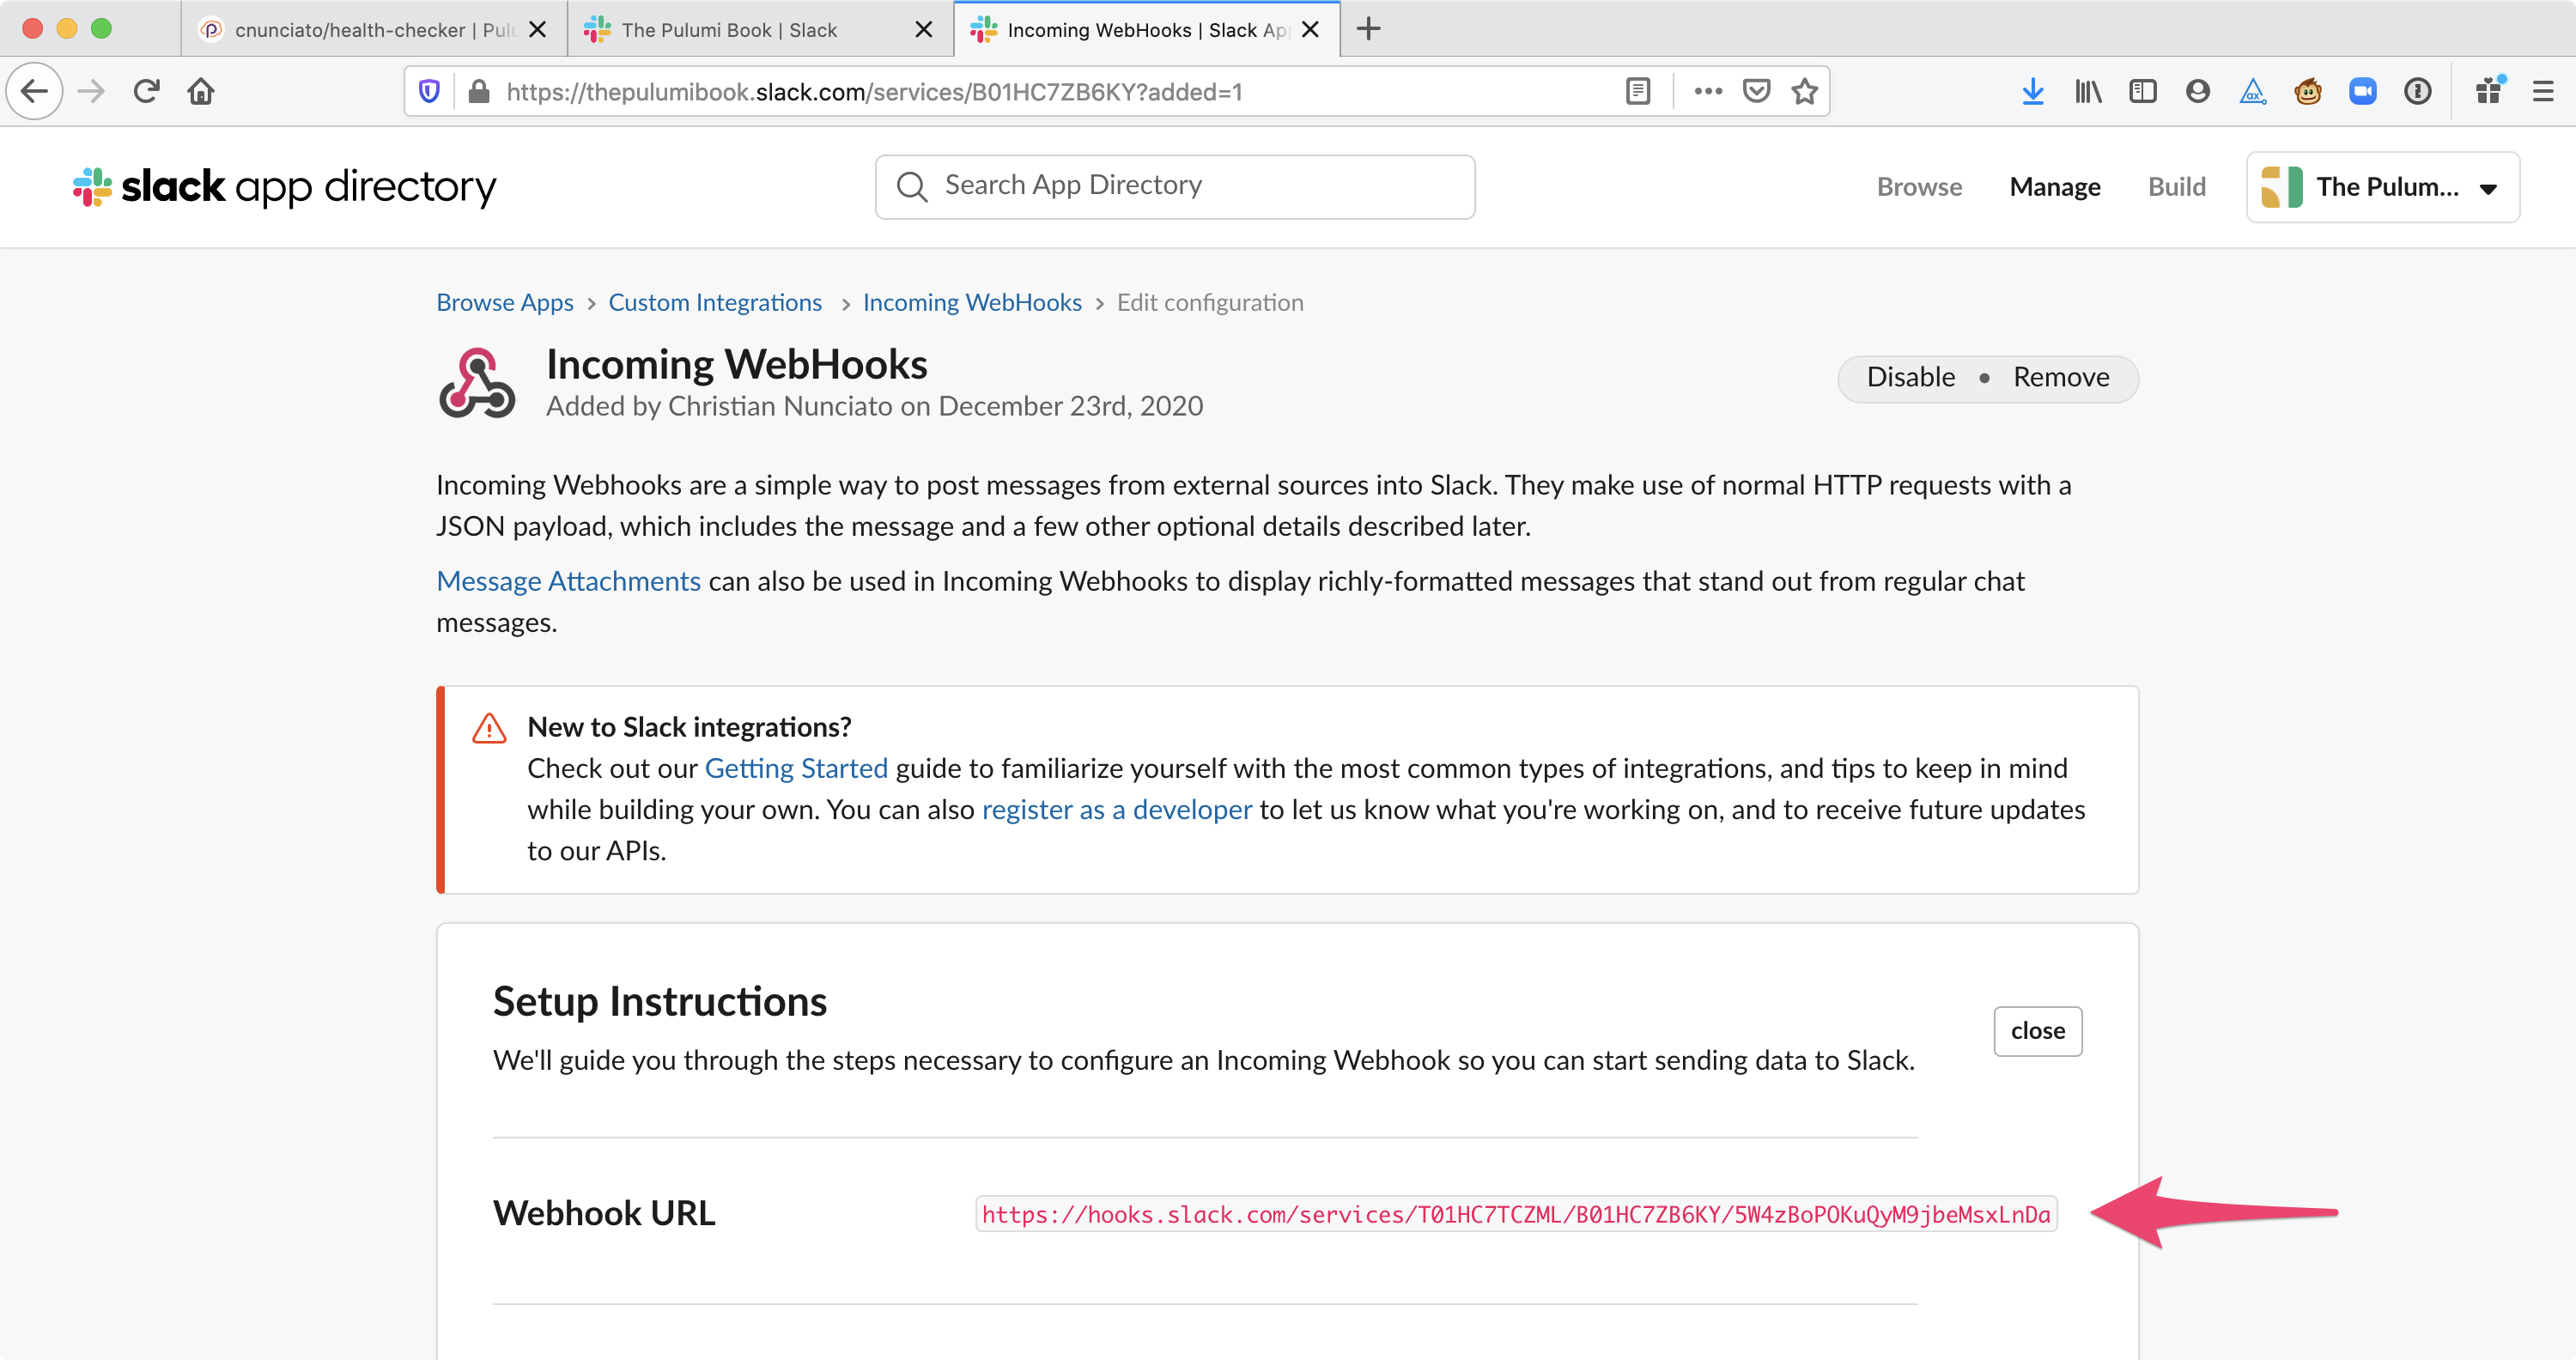
Figure 3.7: Creating and configuring an Incoming Webhook with Slack.
Posting to Slack
Section titled “Posting to Slack”All you need to start posting messages to Slack is to add the new lines in Listing 3.6, which parse out the values returned by the API service and use them to craft and submit an HTTP POST (also with Got)8 to your newly generated Webhook URL.
import * as aws from "@pulumi/aws";import got from "got";
const schedule = "rate(1 minute)"const siteURL = "https://pulumibook.com/ch03/health-checker/api/dev";const webhookURL = "https://hooks.slack.com/services/<team>/<service>/<token>";
const handler = new aws.lambda.CallbackFunction("subscription", { policies: [aws.iam.ManagedPolicy.AWSLambdaBasicExecutionRole], callback: async () => { try { const response = await got(siteURL); console.log(`Site's up! Status was ${response.statusCode}.`); } catch(error) { const status = error.response.statusCode; const message = JSON.parse(error.response.body).message;
try { const response = await got.post(webhookURL, { json: { username: "health-check", icon_emoji: ":scream:", text: `${siteURL} returned HTTP ${status} (${message}).` } }); } catch(error) { console.error(`Error posting to Slack: ${error}`); } } },});
aws.cloudwatch.onSchedule("subscription", schedule, handler);6 | Declares the Slack Webhook URL as a string constant (use your actual URL, of course). |
16-17 | Extracts the HTTP status and error message from the failed request. |
20 | Posts the message to your personal Webhook URL. |
21 | Prepares a JSON object for submission to Slack. |
29 | Logs any errors to your stack’s CloudWatch logs. |
Save the program and run another pulumi up to deploy the stack. Once again, you should see that only the Lambda is changing.
Previewing update (dev)...
Updating (dev)...
Type Name Status Info ~ aws:lambda:Function subscription updated [diff: ~code,lastModified]
Resources: ~ 1 updated 7 unchanged8 | Shows the Lambda function was updated. |
Within a few minutes, you should see notifications start to pop into Slack, as shown in Figure 3.8. If you don’t, double-check the value of webhookURL, and if that doesn’t help, try running pulumi logs to find messages tagged with an ERROR label. (That’s how calls to console.error() are surfaced in CloudWatch.)
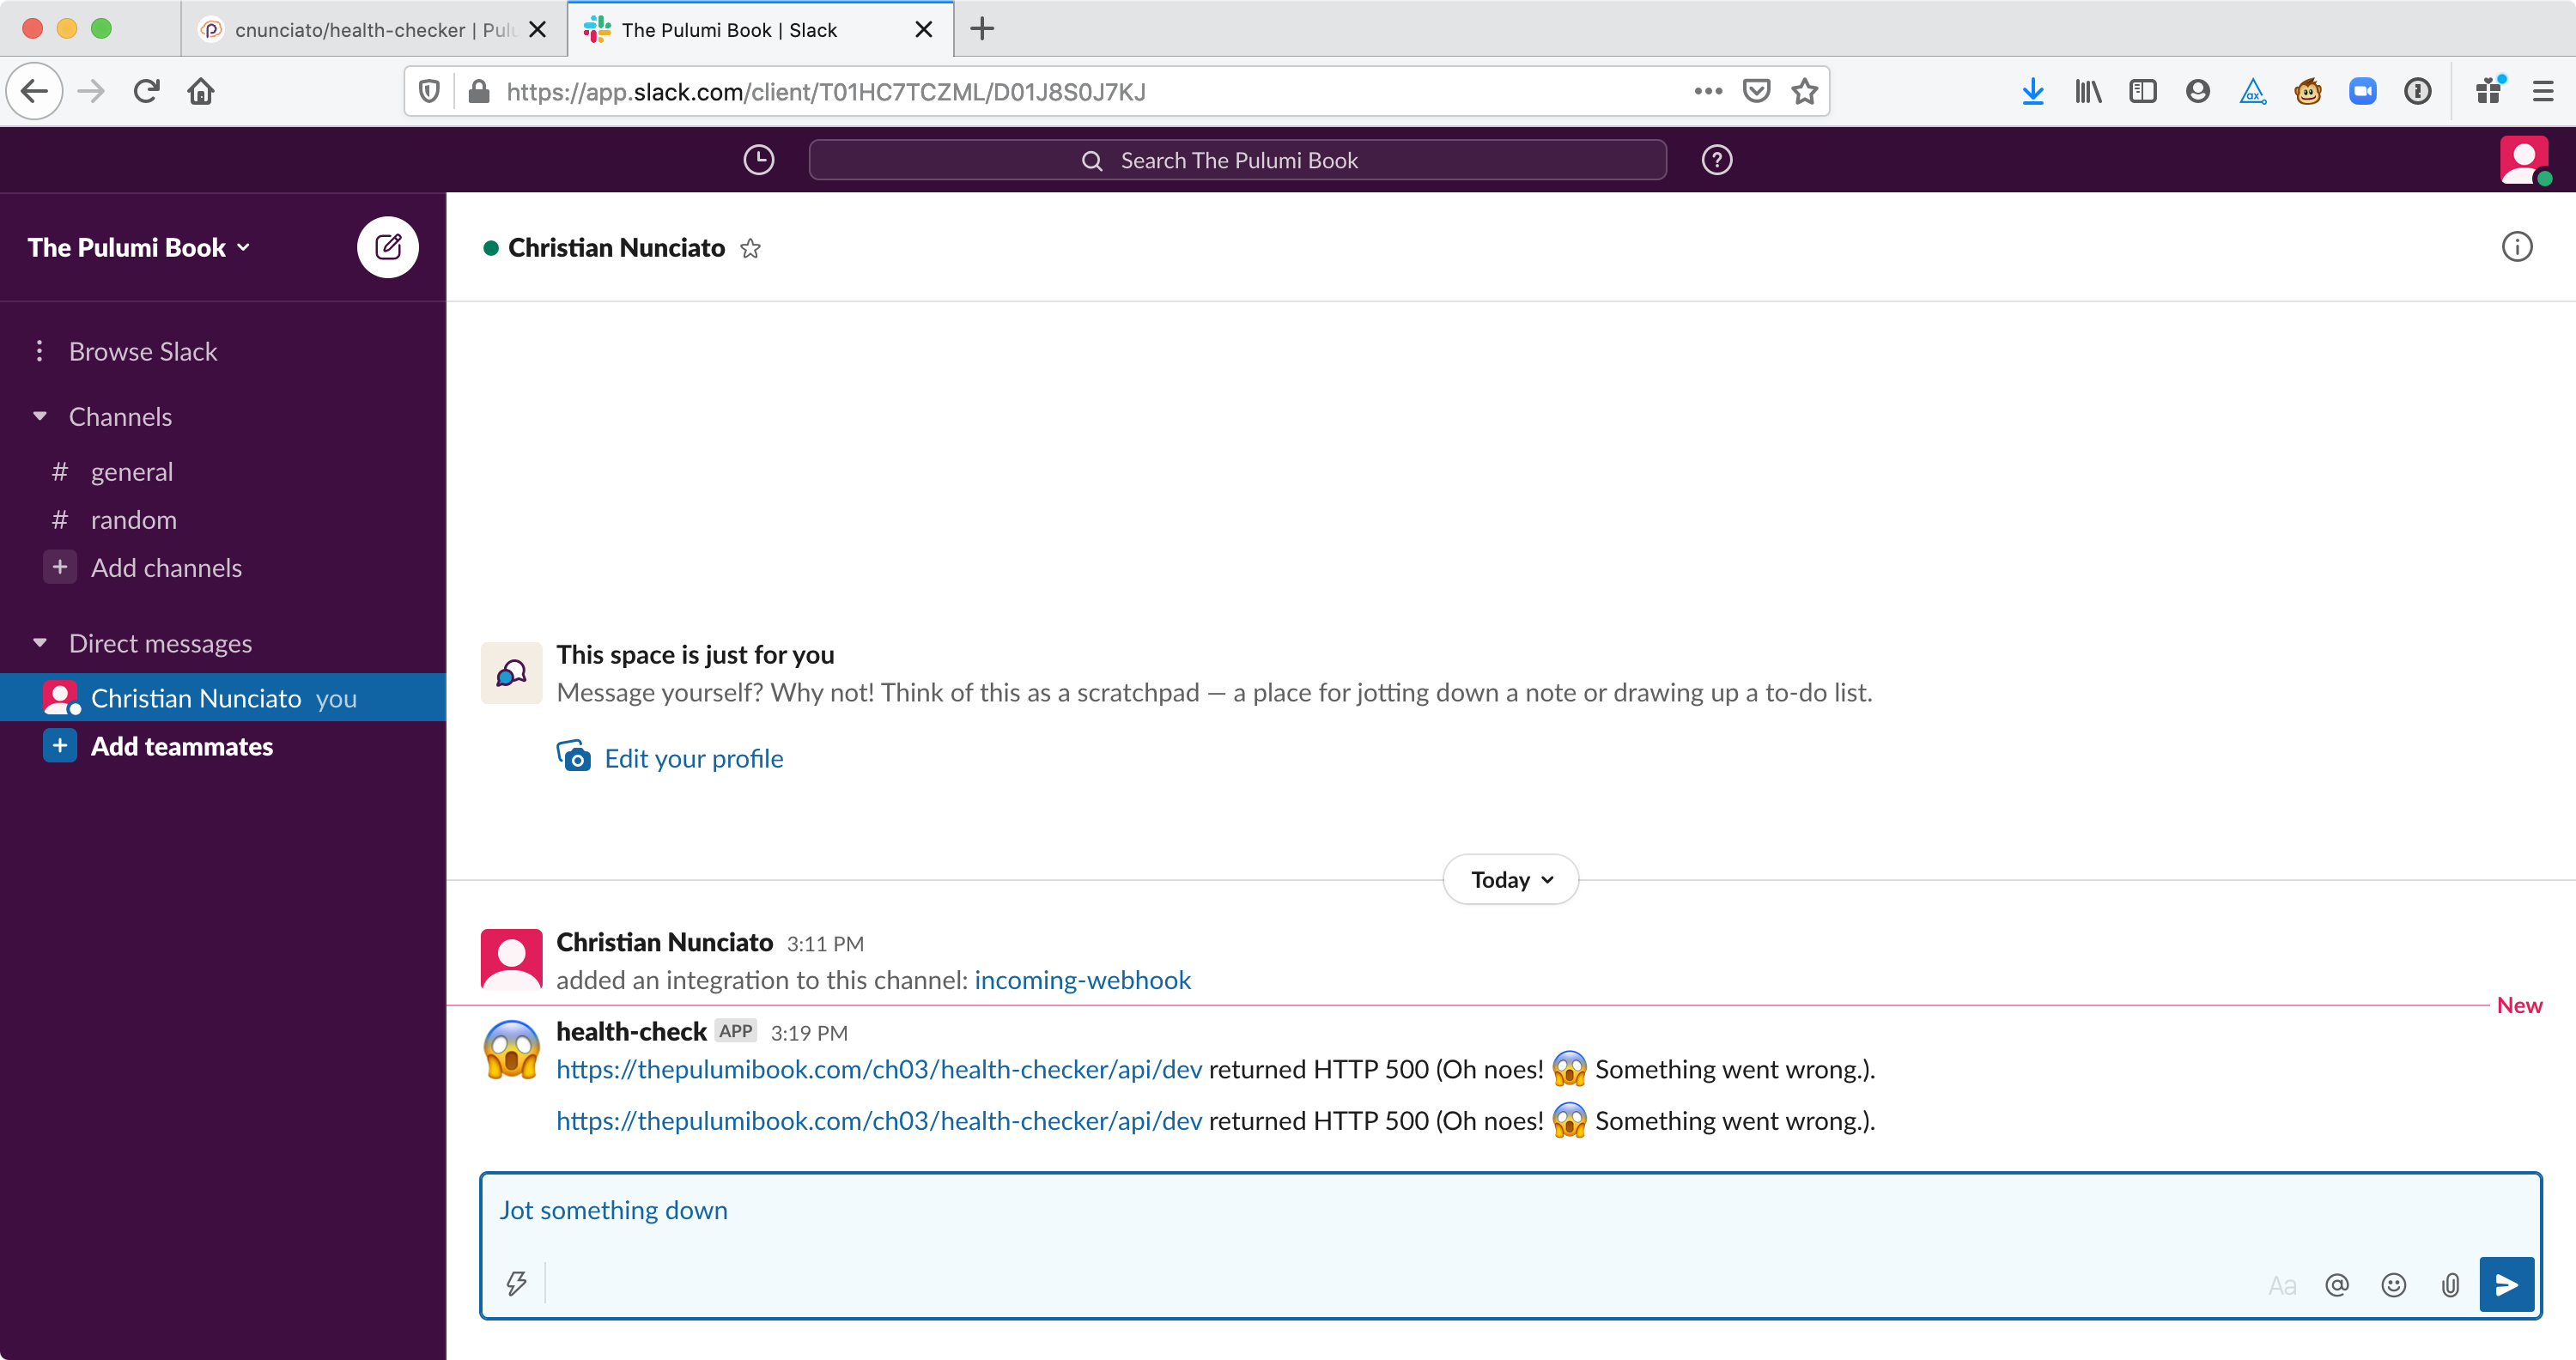
Figure 3.8: Successfully dispatching failure notifications to Slack.
Go ahead and let that run for a bit — and if you happen to have Slack desktop notifications enabled, consider disabling them for now (at least for this channel) to keep the noise level down as you read on.
Taking stock
Section titled “Taking stock”Things are looking good: you’ve got an app running in the cloud that’s actively monitoring the health of a REST API, and all it took was Pulumi and a few lines of TypeScript.
Stepping back, though, it’s clear we still have a few problems:
-
The app is effectively hard-wired to monitor an endpoint that’s programmed to fail. The program works, and that’s a great start, but in its current form, it’s not all that useful yet.
-
The
webhookURLis a secret value — note that you didn’t have to provide a Slack username, password, or other token to use it — and it’s currently baked into your source code as well. So you can’t really share this code with anyone else — at least not through a publicly hosted service like GitHub or GitLab. -
While you could easily replace
siteURLwith the URL of a “real” API service and redeploy, you’d be stuck in a weird place with regard to future development. How would you go about developing and testing a change to the program without affecting the resources you’ve already deployed?
The good news, though, is that you have all you need to finish this off. Your original diagram, way back in Figure 3.2, still holds — you just need to deploy another copy of it. With that addition, and a few tweaks to the code, you’ll end up with two totally separate environments: one for ongoing development and testing, and another one for production.
So, to finish this off:
-
We’ll take those hard-coded strings, like
siteURLand evenschedule, and make them configurable. -
We’ll make
webhookURLconfigurable as well, so you can store your code safely in a version-control system. -
We’ll create and deploy a second stack, which we’ll call
production, for monitoring a real API service.
Let’s get to work.
Making the program configurable
Section titled “Making the program configurable”Again, since we’re working in Node, there are all kinds of ways we could configure this program. We could read from the local filesystem (e.g., from a JSON file), use a third-party library like nconf (https://www.npmjs.com/package/nconf) or config (https://www.npmjs.com/package/config), fetch values asynchronously from a remote data source, or just go with plain old environment variables. Pulumi even ships with a built-in configuration system of its own, which you’ll learn all about in Chapter 4.
For now, let’s keep it simple and go with environment variables. That’ll let you pull those strings out of the code and expose them to the application in a standard way, without having to spend a lot of time worrying about where and how to store and retrieve them.
Back in the shell, run the commands below to set the schedule, site URL, and Webhook URL as environment variables. Make sure all three values exactly match the strings in your source code.
$ export SCHEDULE="rate(1 minute)"$ export SITE_URL="https://pulumibook.com/ch03/health-checker/api/dev"$ export WEBHOOK_URL="https://hooks.slack.com/services/<team>/<service>/<token>"Now, back in your editor, update the variable declarations for schedule, siteURL, and webhookURL to read from your shell environment using Node’s built-in process.env object, adding a block to raise an exception when one of those values is missing at runtime. Listing 3.7 shows the finished program.
import * as aws from "@pulumi/aws";import got from "got";
const schedule = process.env.SCHEDULE;const siteURL = process.env.SITE_URL;const webhookURL = process.env.WEBHOOK_URL;
if (!schedule || !siteURL || !webhookURL) { throw new Error("Missing one or more environment variables.")}
const handler = new aws.lambda.CallbackFunction("subscription", { policies: [aws.iam.ManagedPolicy.AWSLambdaBasicExecutionRole], callback: async () => { try { const response = await got(siteURL); console.log(`Site's up! Status was ${response.statusCode}.`); } catch(error) { const status = error.response.statusCode; const message = JSON.parse(error.response.body).message;
try { const response = await got.post(webhookURL, { json: { username: "health-check", icon_emoji: ":scream:", text: `${siteURL} returned HTTP ${status} (${message}).` } }); } catch(error) { console.error(`Error posting to Slack: ${error}`); } } },});
aws.cloudwatch.onSchedule("subscription", schedule, handler);4-6 | Reads these values from the runtime environment. |
9 | Throws a JavaScript error when a required value is missing, causing the Node.js process to terminate with a non-zero error code. |
With these changes in place, return to the terminal — make sure it’s the same terminal session that contains those three environment variables — and deploy the dev stack once more with another pulumi up. Note that because the string values themselves haven’t changed, both the preview and update steps should indicate no changes to be made.
Previewing update (dev)...
Resources: 8 unchanged
Do you want to perform this update? yes...
Updating (dev)...
Type Name Status pulumi:pulumi:Stack health-checker-dev
Resources: 8 unchanged5 | The preview computes no resource changes to be made. |
17 | The update confirms no resource changes were made. |
Since nothing actually changed, you should continue seeing failure notifications in Slack, just as before. Now let’s turn to the final task: adding a second stack to monitor a real API service.
Adding a production stack
Section titled “Adding a production stack”The second and final stack, which we’ll call production, will monitor a different URL, this one designed not to fail. As before, I’ve set up a “production” version of the API service to give you something to work with, which you’ll find at https://pulumibook.com/ch03/health-checker/api/prod.
Listing and creating stacks
Section titled “Listing and creating stacks”Right now, the health-checker project has only one stack, which you can confirm by running the ls (short for “list”) subcommand of pulumi stack:
$ pulumi stack lsNAME RESOURCES URLdev* 8 https://app.pulumi.com/.../health-checker/devMaking a new stack is as easy as running the init subcommand and giving the stack a name that’s unique to the project:
$ pulumi stack init productionCreated stack 'production'Now, when you run pulumi stack ls, you should see two stacks, each with accompanying metadata and links to the Pulumi Cloud console:
$ pulumi stack lsNAME RESOURCES URLdev 8 https://app.pulumi.com/.../health-checker/devproduction* n/a https://app.pulumi.com/.../health-checker/productionNote that the production stack is marked with an asterisk (*), indicating it’s the active one. That means any pulumi commands that you run at this point will be applied to the production stack. To switch between stacks, use pulumi stack select:
$ pulumi stack select dev
$ pulumi stack lsdev*production
$ pulumi stack select production
$ pulumi stack lsdevproduction*1 | Selects the dev stack. |
4 | Shows the dev stack is active. |
7 | Selects the production stack. |
11 | Shows the production stack is now active. |
Make sure you’re back on the production stack, as that’s the one we’ll deploy next.
But before we do, take a quick look at the contents of the current directory. You should see that despite having created two stacks for the project, you’ve still got only one stack-configuration file:
$ tree -I node_modules.├── Pulumi.yaml├── Pulumi.dev.yaml├── index.ts├── package.json├── package-lock.json└── tsconfig.json4 | We have two stacks, dev and production, but only one has a config file. Why? |
That’s because we haven’t yet applied any Pulumi configuration to the new stack. Indeed, if you were to run pulumi up at this point, with the production stack selected, there’s a good chance you’d get an error about a missing aws:region:9
$ pulumi up...
Diagnostics: aws:iam:Role (subscription): error: 1 error occurred: * missing required configuration key "aws:region": The region where AWS operations will take place. \ Examples are us-east-1, us-west-2, etc. Set a value using the command `pulumi config set aws:region <value>`.10 | Pulumi suggests a remedy for the missing configuration value. |
Pulumi (or rather, its underlying AWS provider) needs this value to communicate with AWS, and you can set it in different ways, but since pulumi new writes this value to Pulumi.dev.yaml when it creates a new project, let’s follow that same pattern here (as the error suggests) and use pulumi config to set it explicitly:
$ pulumi config set aws:region us-west-21 | Sets us-west-2 (my choice) as the AWS region for the production stack. |
Now, when you list the contents of the current directory, you should see a new file for the production stack as well:
$ tree -I node_modules....├── Pulumi.dev.yaml├── Pulumi.production.yaml...5 | The newly created configuration file for the production stack. |
With a production stack defined, and a config file to go with it, you’re ready to deploy.
Deploying the production stack
Section titled “Deploying the production stack”In your shell-specific way, make sure the environment variables now required by the program are still set:
$ echo $SCHEDULErate(1 minute)
$ echo $SITE_URLhttps://pulumibook.com/ch03/health-checker/api/dev
$ echo $WEBHOOK_URLhttps://hooks.slack.com/services/<team>/<service>/<token>
Now, overwrite the SITE_URL variable with the one for the pre-built “production” API service quoted earlier:
$ export SITE_URL="https://pulumibook.com/ch03/health-checker/api/prod"
$ echo $SITE_URLhttps://pulumibook.com/ch03/health-checker/api/prod
A final pulumi up should render a preview that shows you’ll be creating a new stack10 and a new set of resources, and confirming the preview should deploy the stack to AWS.
$ pulumi up
Previewing update (production)...
Type Name Plan + pulumi:pulumi:Stack health...production create + └─ aws:cloudwatch:EventRuleEventSubscription subscription create + ├─ aws:cloudwatch:EventRule subscription create + ├─ aws:iam:Role subscription create + ├─ aws:iam:RolePolicyAttachment subscription-58ed699a create + ├─ aws:lambda:Function subscription create + ├─ aws:cloudwatch:EventTarget subscription create + └─ aws:lambda:Permission subscription create
Resources: + 8 to create
Do you want to perform this update? yes...
Updating (production)...
Type Name Status + pulumi:pulumi:Stack health...production created + └─ aws:cloudwatch:EventRuleEventSubscription subscription created + ├─ aws:cloudwatch:EventRule subscription created + ├─ aws:iam:Role subscription created + ├─ aws:iam:RolePolicyAttachment subscription-58ed699a created + ├─ aws:lambda:Function subscription created + ├─ aws:cloudwatch:EventTarget subscription created + └─ aws:lambda:Permission subscription created
Resources: + 8 created7 | Shows the production stack will be created. |
17 | Includes the stack in the count of resources to be created. |
36 | Shows the production stack was deployed successfully. |
When the deployment completes, you can follow the logs of the production stack with pulumi logs as well, just as before:
$ pulumi logs -f
Collecting logs for stack production...
2026-06-07T14:37:10.385-07:00 [subscription-14b559e]INFO Site's up! Status was 200....3 | Indicates the name of the stack that corresponds with this log stream. |
6 | Identifies the source of the log entry, the Lambda function belonging to the newly created production stack. |
Now when you navigate to the Pulumi Cloud console, you should see two stacks belonging to the health-checker project, each with its own set of cloud resources, as shown in Figure 3.9.
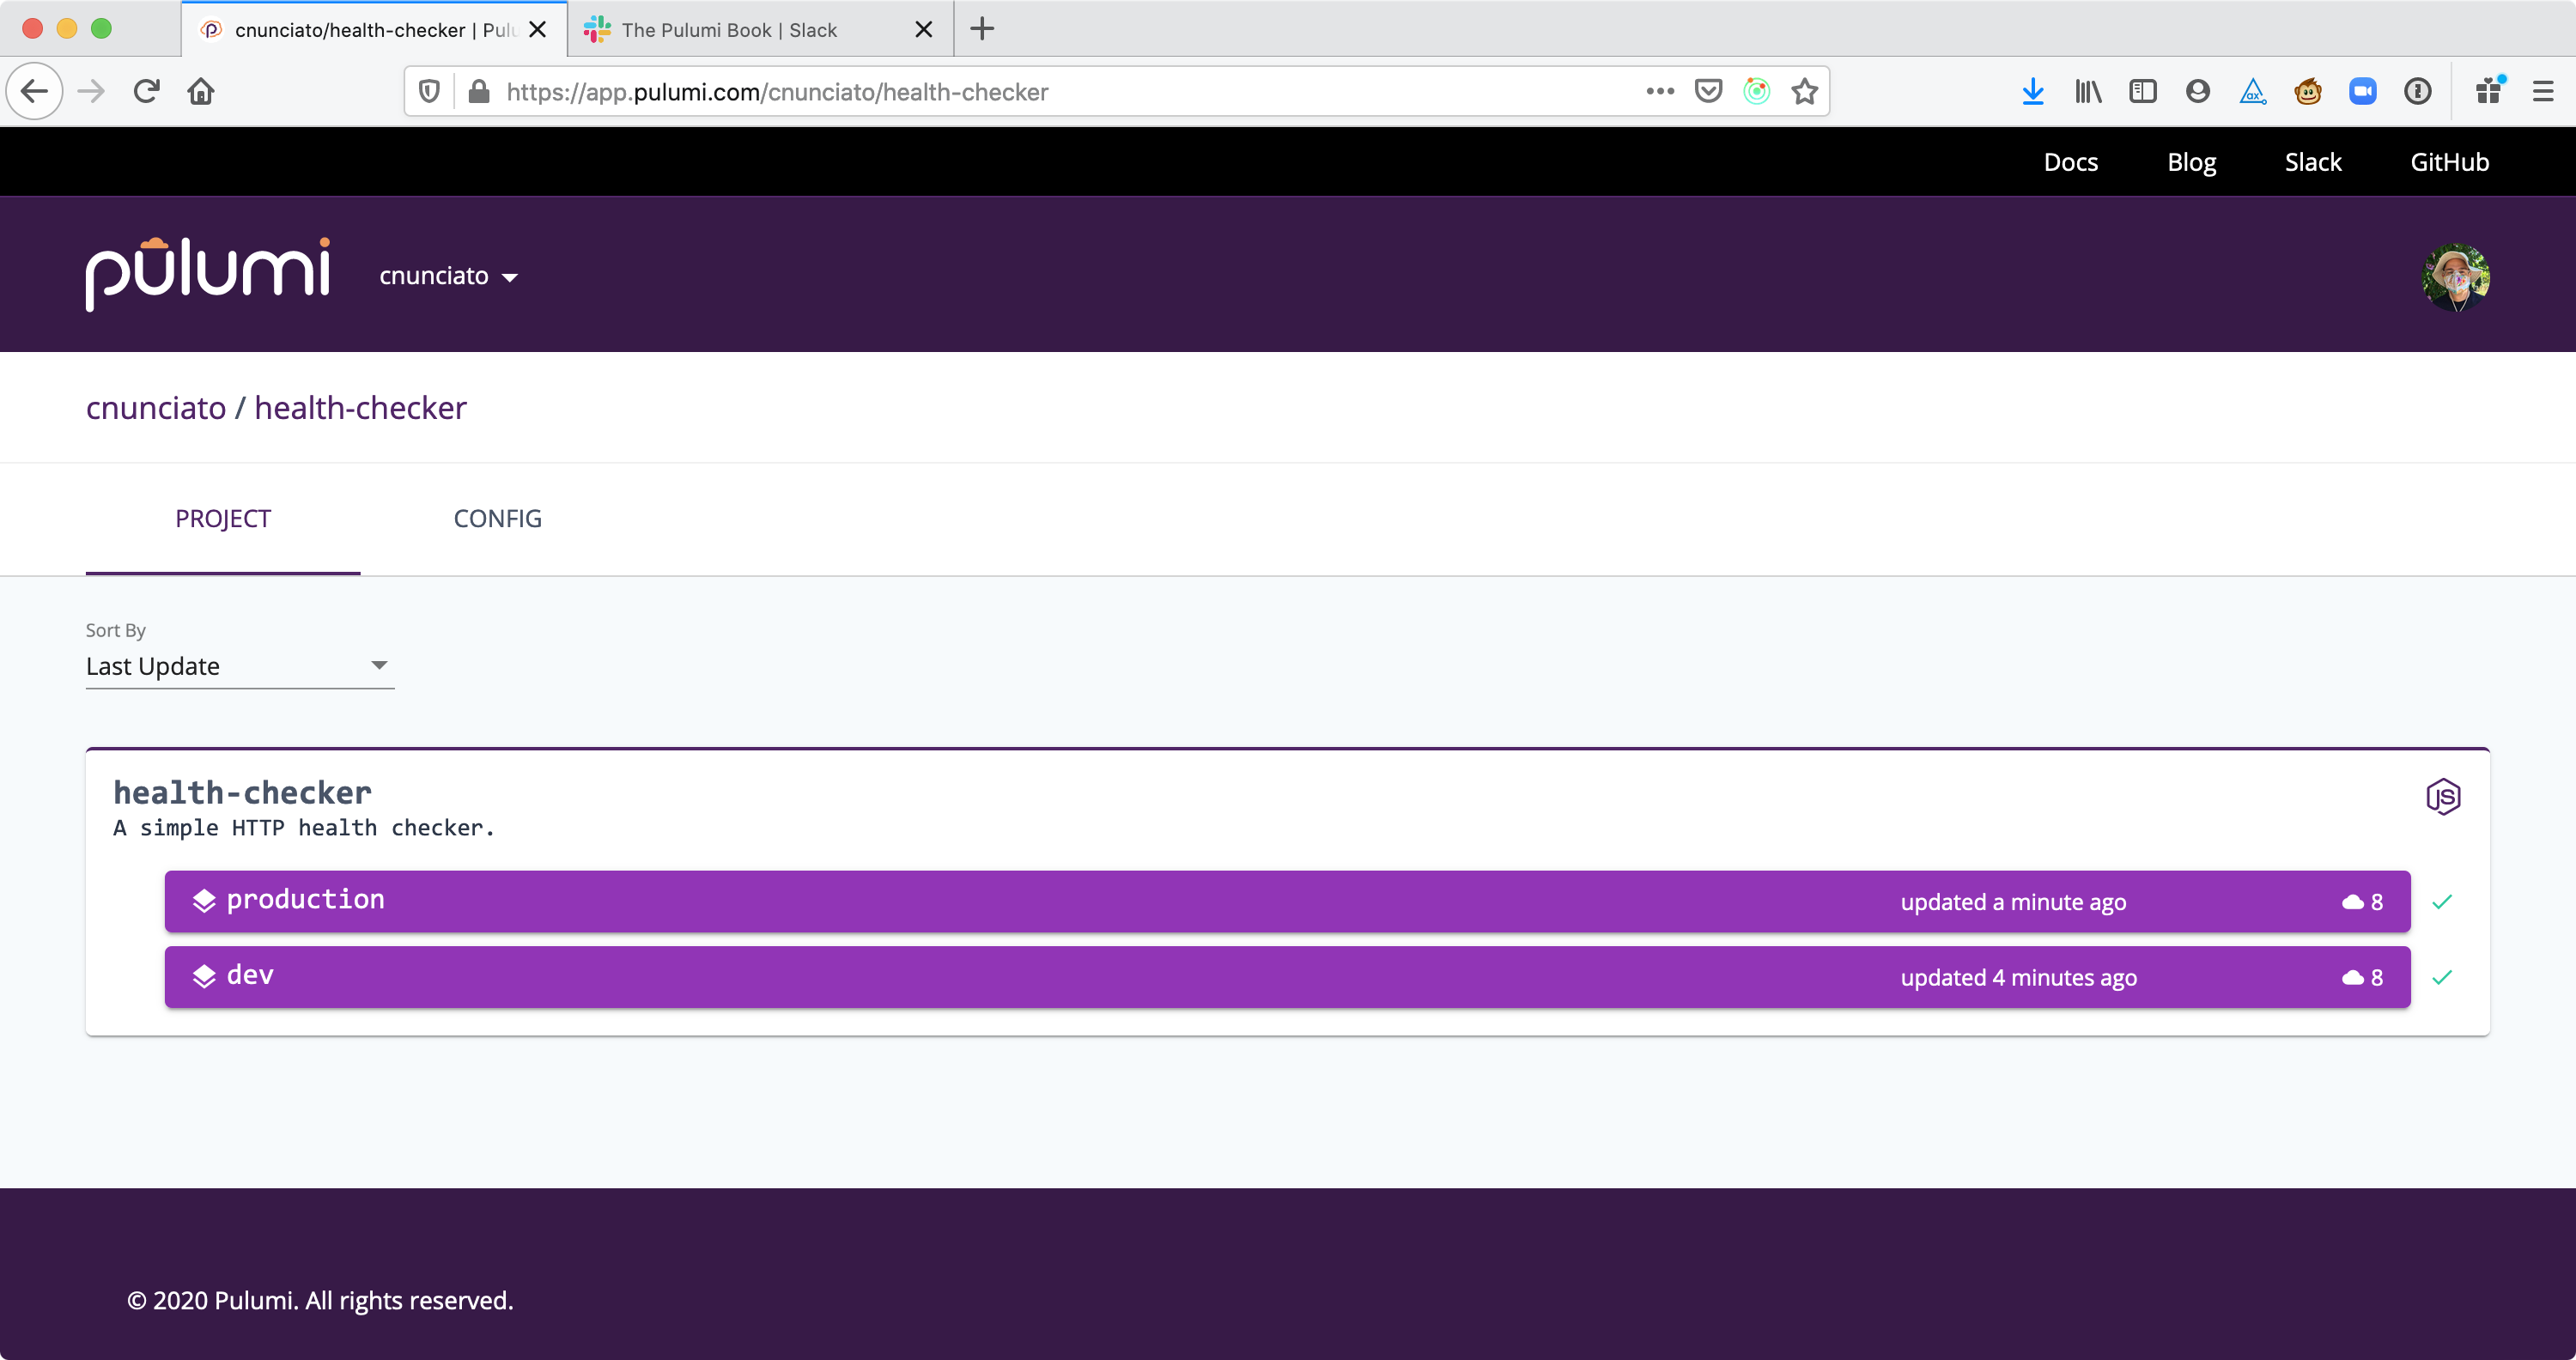
Figure 3.9: The health-checker application containing two stacks: one for dev, another for production.
Stepping back, and looking ahead
Section titled “Stepping back, and looking ahead”Once again, we covered a lot of foundational material in this chapter — about projects, stacks, the mechanics of both, and more — and we brought it all together to create a cloud-native app that actually serves a useful purpose. Pretty cool.
But while the environment variable-based approach we’ve taken to configure our lovely health checker is certainly fine from a technical perspective, there are still a few flaws in the design of the program that you’d probably want to address if you were deploying this program for real.
For one, there’s no easy way to tell how these two stacks are configured; you can’t, for example, query the production stack to find out what siteURL it’s monitoring, or what webhookURL it’s configured to post to. Right now, to obtain either of those two (rather important) bits of information, you’d either have to export the stack’s checkpoint file (e.g., with pulumi stack export, which emits the stack’s state as a JSON string) or sign into the AWS Console and dig into the raw content of the serialized Lambda — which, you might be surprised to learn, contains both values in plain text.
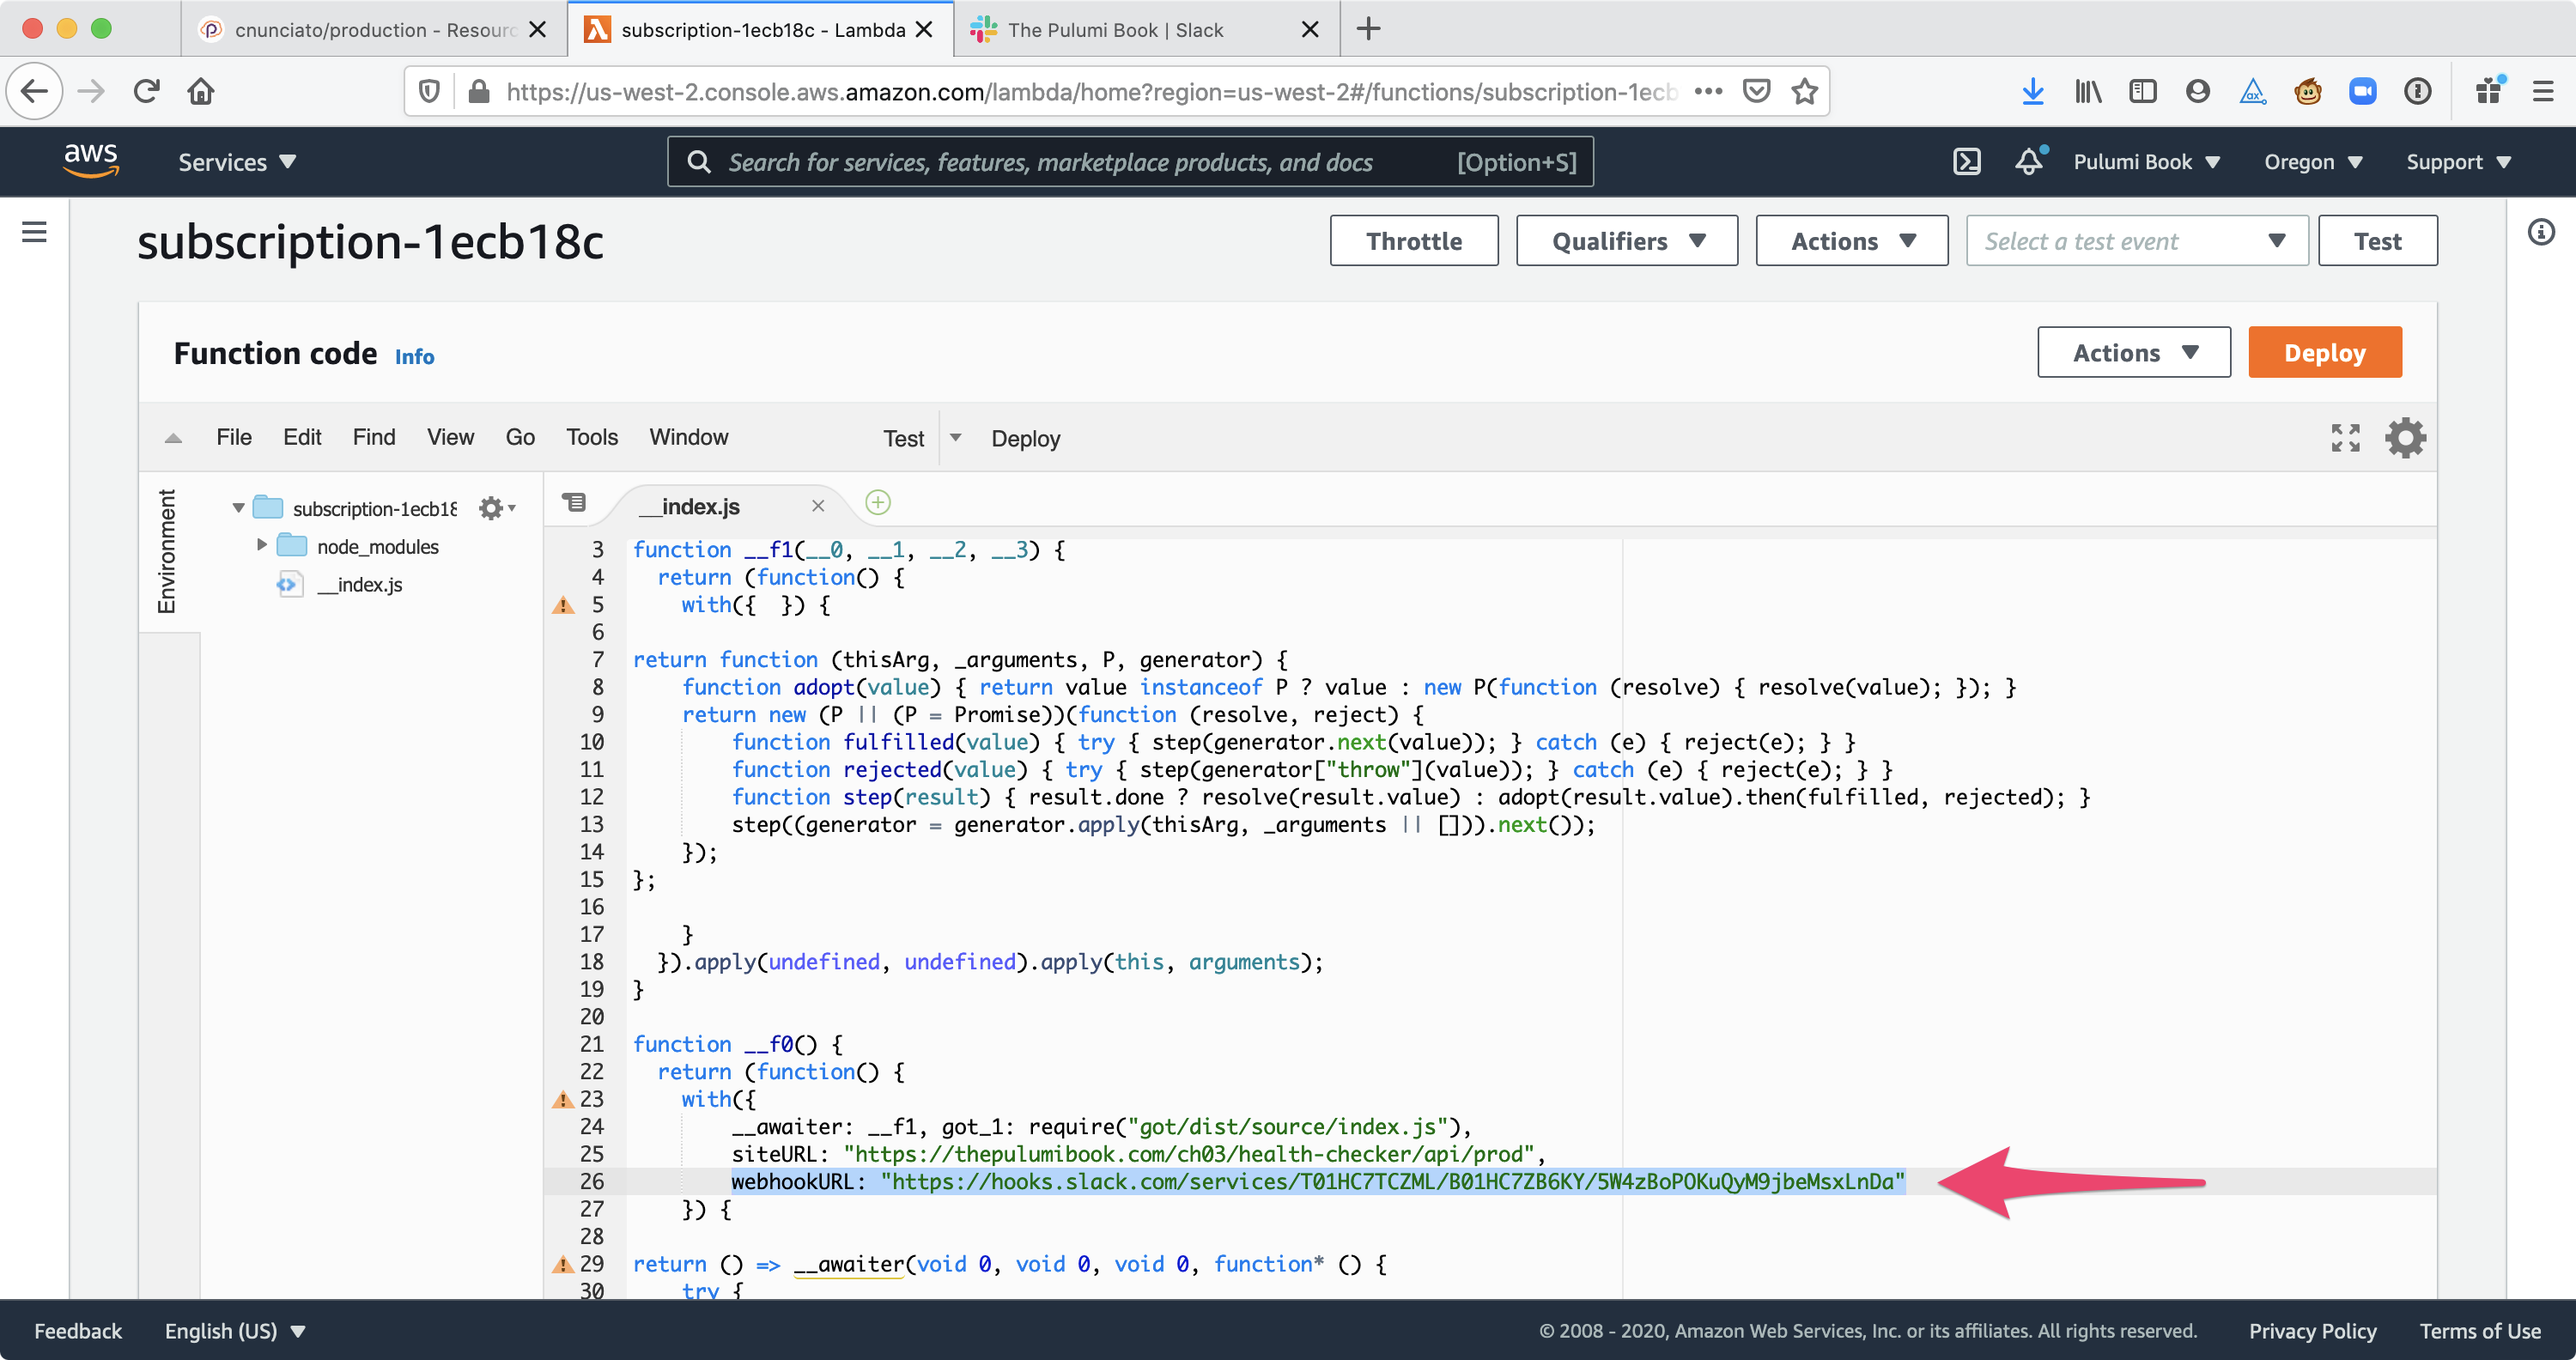
Figure 3.10: The plain-text value of the Slack Webhook URL, as seen in the AWS Console.
Second, because the values themselves, as environment variables, aren’t recorded or tracked anywhere, it’d be easy for a well-intentioned human to make a mistake, say, by deploying the production stack accidentally with environment variables meant for dev, or vice versa. In the case of our health-check app, that might not be such a big deal, but in a real-world situation, it could be a big deal indeed.
Finally, the webhookURL value in particular poses a problem in that it’s really a secret — a sensitive value, like a password or access token — that should be handled with care and protected from exposure. But as I mentioned, and as Figure 3.10 shows, it’s currently baked into the body of the Lambda, which means anyone with access to the AWS Console can find out what it is — again, probably not a huge security problem for this particular application, but in principle, far from ideal.
So in the next chapter, we’ll address all of these issues by diving into Pulumi’s built-in configuration system, which lets you store and retrieve config values as code, work with them programmatically as strongly typed data, and handle them safely using industry-standard encryption. To me, the config system is another one of Pulumi’s most powerful features, so we’ll round out Part 1 by learning everything there is to know about it, too.
Tidying up
Section titled “Tidying up”In keeping with the cleanup we did at the end of the last chapter, let’s close out this one as well with a pulumi destroy. Like most pulumi commands, destroy operates on the currently selected stack — but you can also target a specific stack (within the context of the current project) by passing the --stack (or -s) option.
The commands below destroy both dev and production, deleting all of their AWS resources but leaving the stack records themselves intact for future use. As usual, Pulumi will render a preview before running the deployment, giving you the option to exit before actually destroying any resources if you want to.
If you feel like living dangerously, though (or just like saving a little time), you can suppress the preview step by passing --skip-preview, and suppress confirmation by passing --yes (or -y).11
$ pulumi destroy --yes --skip-preview --stack dev && \ pulumi destroy --yes --skip-preview --stack production...
Resources: - 8 deleted
$ pulumi stack lsNAME RESOURCESdev 0production* 01-2 | Destroys all dev and production resources, skipping the preview and suppressing confirmation prompts. |
8 | Lists all stacks in the current project, showing all resources were deleted. |
Summary
Section titled “Summary”-
A Pulumi project is a directory containing a
Pulumi.yamlfile, an entrypoint (e.g.,index.ts), and one or more optional stack-configuration files. -
A project’s
Pulumi.yamlfile defines all of its settings, including its name and description, language runtime, and the locations of program and stack-configuration files. -
A project has one program, but can have any number of stacks, and the two can be thought of much like object-oriented classes and instances, where the program acts like a blueprint for an object and the stack like a concrete instance of that blueprint.
-
Stacks are a great fit for managing multi-stage deployments. For example, an application deployed in three environments — e.g., development, staging, and production — can be represented with a single Pulumi project consisting of one program and three independently configurable stacks, one for each environment.
-
Pulumi programs written in TypeScript or JavaScript are Node.js programs like any other, so you can use whatever third-party modules or libraries you like with them. When you include a reference to a third-party module or other variable in code that runs in the cloud (in an AWS Lambda, for instance), Pulumi serializes everything for you automatically.
-
Pulumi commands like
preview,up,config, anddestroyare generally run in the context of the currently selected stack. You can mark a given stack as the selected one withpulumi stack select, and you can list all of the stacks for a given project withpulumi stack ls. -
Pulumi programs can be configured in a number of ways, including with simple environment variables.
-
By default, Pulumi names all cloud resources uniquely, meaning you rarely need to worry about naming collisions, even when working with multiple stacks. If you need to override this behavior, you can do so by specifying the resource name explicitly.
-
To save a bit of time, you can suppress the preview step of a given deployment by passing the
--skip-previewoption, and to suppress the interactive confirmation step, you can pass--yes.
Footnotes
Section titled “Footnotes”-
treeis available for all major platforms via package managers like Homebrew and Chocolatey. ↩ -
That’s assuming you’re using the default Pulumi Cloud backend, of course. If you happen to be using an alternate backend, such as your local filesystem or a remote service like Amazon S3, the rules for project and stack-name uniqueness are a little different. We’ll explore alternate backends in more detail in Part 3. ↩
-
With one exception. While it’s technically possible to change the name of a project after you’ve created it, it’s not recommended, as doing so could lead to unpredictable results. If you find yourself wanting to change the name of a project you’ve already deployed, it’s generally better to create a new one to replace it, then go back and destroy the original. ↩
-
With one caveat: Because your function is ultimately serialized by Pulumi and uploaded to AWS Lambda as raw JavaScript source code — along with all of its runtime dependencies — it’s subject to Lambda’s service limitations, one of which is a 50 MB size limit. If your serialized code amounts to less than 50 MB, you’re fine. But if not, you might have to find a smaller library with fewer dependencies in order to comply with that limit. ↩
-
You’ll find the source code for this endpoint, and the rest of the companion website, in the book’s GitHub repository at https://github.com/pulumibook. ↩
-
You could also use the Slack Incoming Webhooks package, which is published by Slack and available on npm (https://www.npmjs.com/package/@slack/webhook). But since the code isn’t all that different from what we’re doing with Got, and the Incoming Webhooks package uses a different HTTP client, it didn’t quite seem like the best fit here. But it’s nonetheless a helpful little library to be able to reach for when you need it. ↩
-
Depending on your AWS configuration, that is. If you’ve configured your AWS credentials to apply a default region, Pulumi may recognize that setting and bypass this check. ↩
-
If you’re wondering why Pulumi is telling you it’s creating a stack you’ve already created — confirmed earlier with
pulumi stack ls— it’s because Pulumi manages the state of the stack itself as a resource as well, and you haven’t yet performed an initial deployment of this new one. ↩ -
I’d personally love to see a
--yolooption combine these two someday. ↩